Nothing kills a promising crop faster than swollen buds going grey with mold.
Most of the time, the culprit is two kitchen-sink variables: humidity and temperature control.
They shape every aspect of your growing conditions, from transpiration to resin production.
Experts and resources like the Greenhouse Grower’s Guide and Canopy Growth Corporation treat environmental control as non-negotiable.
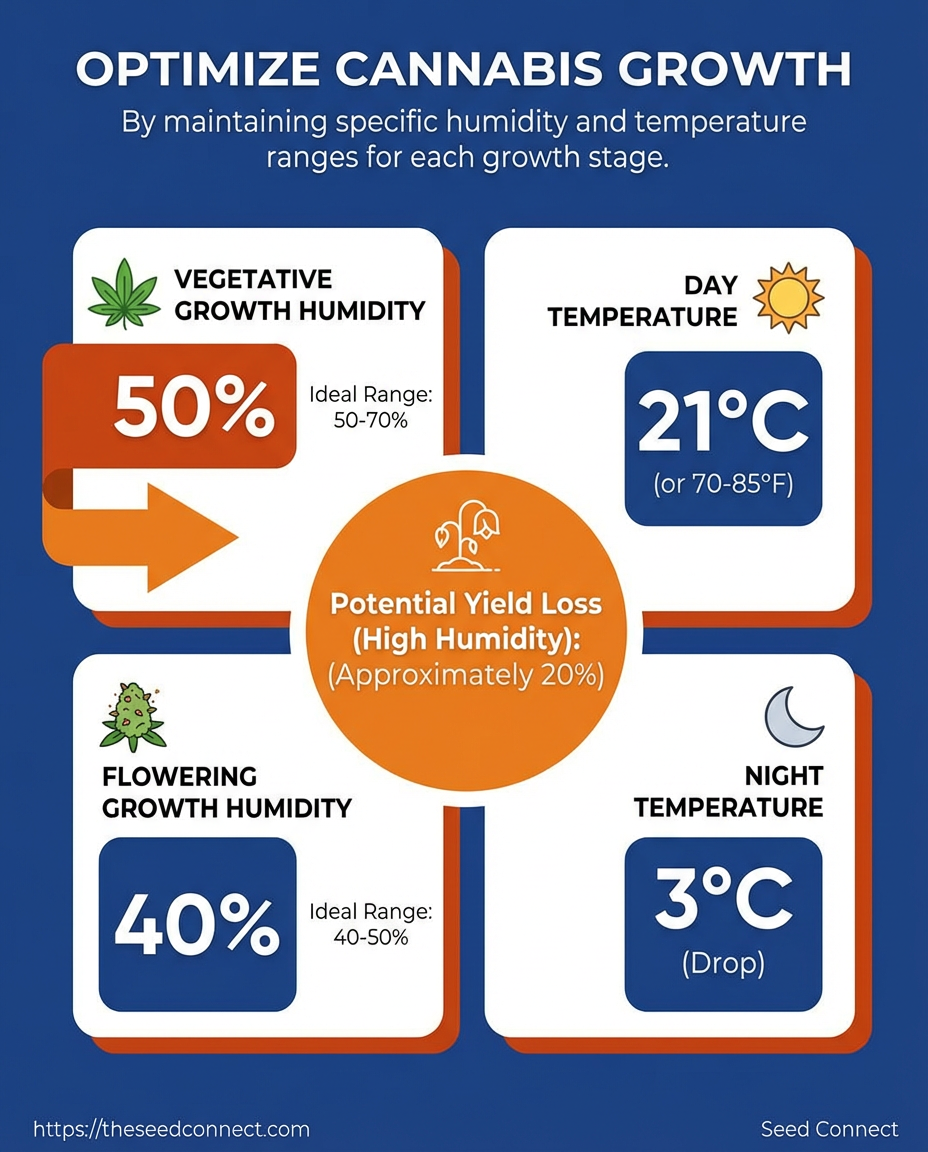
Target relative humidity of 40–60% in vegetative growth, dropping to about 40–50% during flowering.
Ideal day temperatures sit near 70–85°F with nights around 60–70°F.
Exceeding 60% humidity in flowering can reduce yields by 30–40% due to mold risks.
Temperatures below 60°F slow photosynthesis and stunt plants, while humidity above 70% invites bud rot and mildew.
Nailing these ranges turns climate from a constant risk into predictable growth and quality.
Table of Contents
- What if your grow tent conditions are quietly sabotaging yield?
- Ideal humidity and temperature ranges by growth stage
- Measuring your environment: tools and best practices
- Controlling humidity and temperature: practical solutions
- Common problems tied to wrong humidity or temperature and fixes
- Adapting setups for different contexts
- Troubleshooting quick checklist
What if your grow tent conditions are quietly sabotaging yield?
Ever notice healthy-looking plants that suddenly underperform at harvest? Small, steady slips in tent conditions are a common, invisible yield killer.
A few degrees too cool at night or a humidity spike during bloom can change how plants manage water, open their stomata, and build resin.
If relative humidity stays above 60% in flowering, expect serious risk: studies and industry reports note a 30–40% reduction in yield due to mold and bud rot.
Large operators like Canopy Growth Corporation emphasize tight humidity and temperature control for that exact reason. Cannabis plants prefer a narrow sweet spot: roughly 40–60% RH in veg, dropping to 40–50% RH in flower, with daytime temperatures around 70–85°F and nights near 60–70°F.
Even short periods outside those ranges change photosynthesis and terpene/cannabinoid production, so small swings add up fast.
Growers who follow guidance from programs such as the Greenhouse Grower’s Guide see fewer disease outbreaks and more consistent yields.
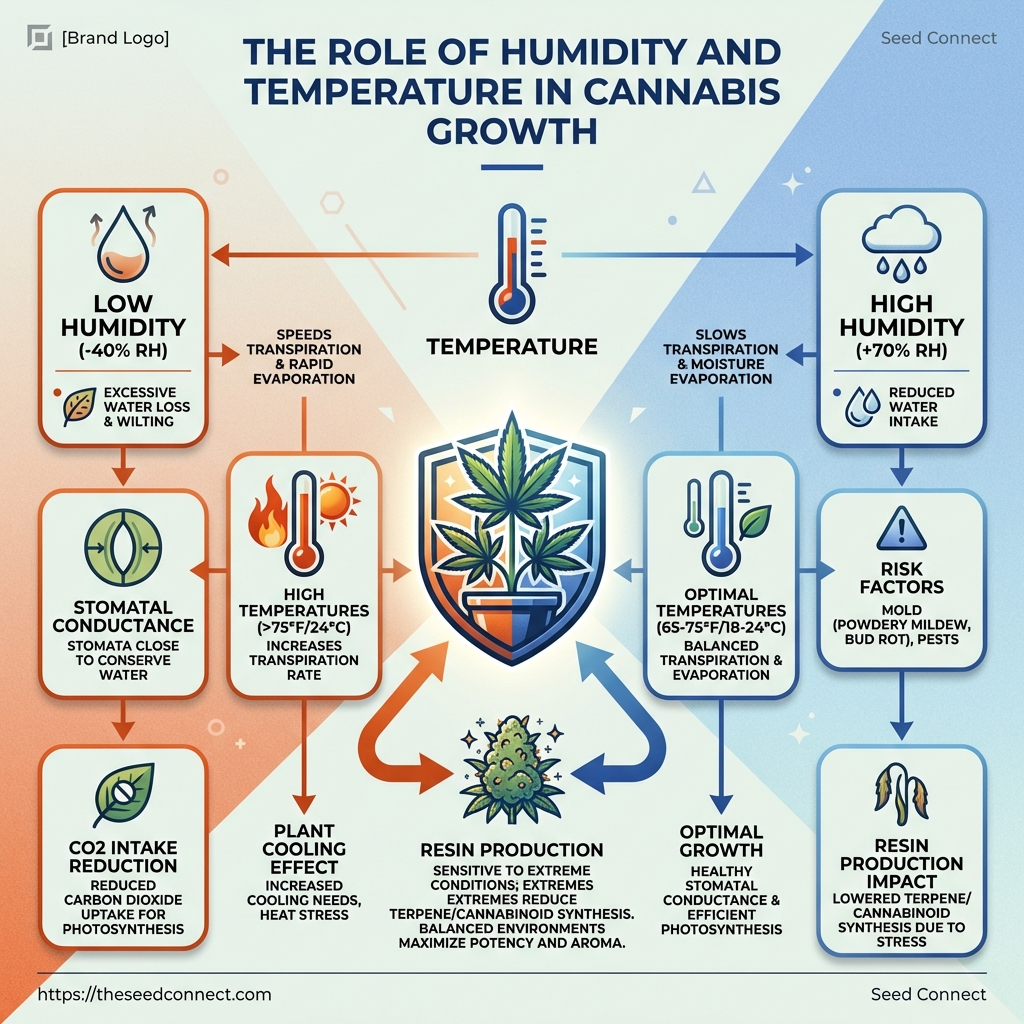
How humidity and temperature interact — the basic science
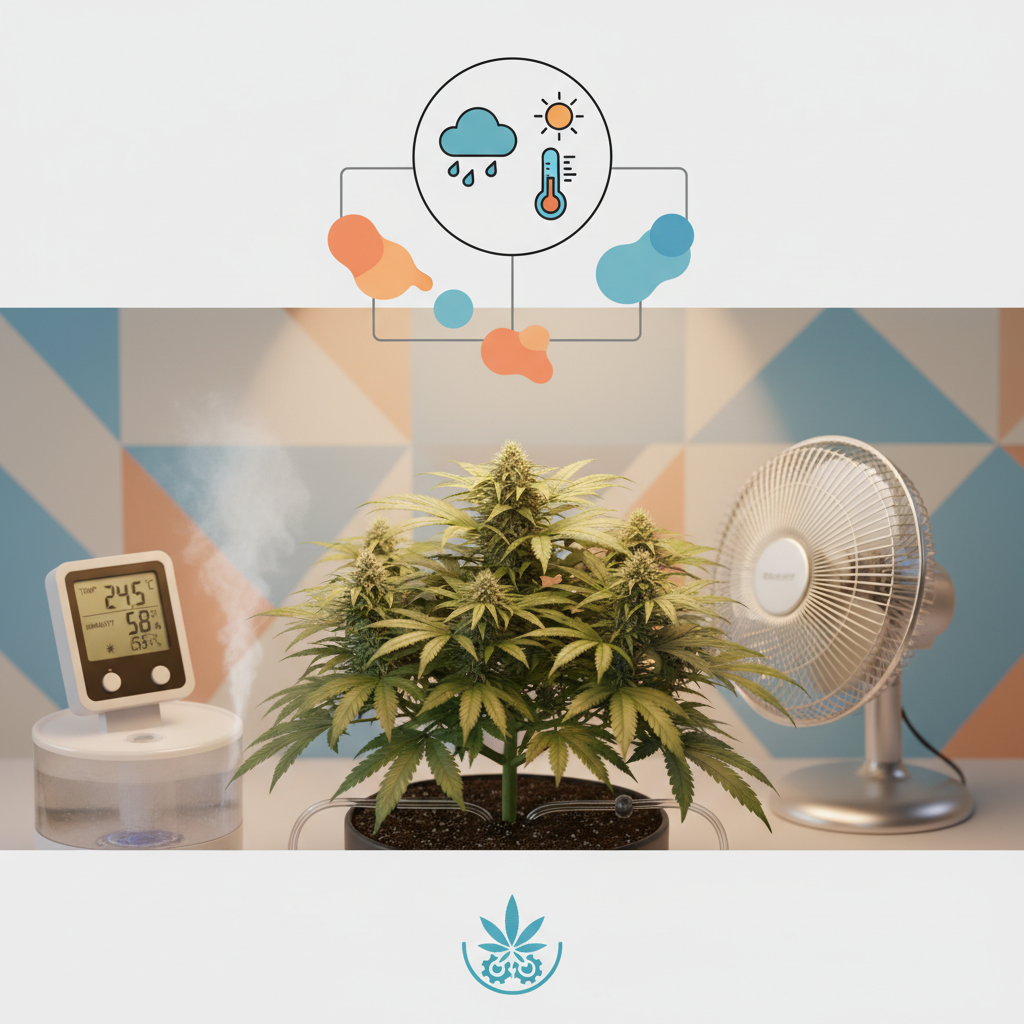
Temperature sets how quickly a plant transpires.
Humidity governs how easily that moisture leaves the leaf surface.
When air is dry, transpiration speeds up and stomata may close to conserve water, which slows CO2 intake and limits growth.
When air is too humid, moisture lingers on buds and leaf axils, creating conditions for powdery mildew and bud rot. Transpiration: The process of water moving through the plant and evaporating from leaves; drives nutrient uptake and cooling. Stomatal conductance: How open the leaf pores are; it balances water loss with CO2 intake. Resin production: Sensitive to stress; extreme heat or damp can reduce terpene and cannabinoid synthesis.
This infographic maps plant responses—transpiration rate, stomatal behavior, and resin changes—against small shifts in temperature and humidity.
Use it to quickly diagnose whether a recent environmental blip could explain slowed growth or early mold.
- Measure precisely: Place a calibrated hygrometer and thermometer at canopy level and log hourly readings for 72 hours.
- Calibrate at least two sensors placed at canopy height and near the intake; compare readings daily.
- Place one sensor at the top of the canopy where flowers form.
- Calibrate sensors in place, then set control bands rather than single setpoints.
Small, consistent fixes beat occasional extremes.
Tighten monitoring, control the microclimate, and most surprises at harvest stop being surprises.

Ideal humidity and temperature ranges by growth stage
Ever wonder why a single thermostat or hygrometer reading never tells the whole story? Plants move through physiological states, and each state demands a different microclimate to stay efficient at photosynthesis, transpiration, and bud development.
Industry guides like the Greenhouse Grower’s Guide and practices used by Canopy Growth Corporation emphasize staged control rather than a one-size-fits-all target.
Matching humidity and temperature to each stage keeps stomata working, prevents pathogens, and helps the plant partition energy to leaves or flowers when it matters most.
This section gives concrete ranges for each stage, explains why they shift, and lists quick actions you can take in a grow tent or greenhouse.
Vegetative stage ranges and why they change
Growth Stage | Relative Humidity (%) | Day Temperature (°C / °F) | Night Temperature (°C / °F) | Why it matters | Quick action |
|---|---|---|---|---|---|
Seedling | 65–70% | 22–26°C / 72–79°F | 18–22°C / 64–72°F | High RH reduces transpiration stress and keeps tiny roots hydrated. | Use humidity dome or humidifier; gentle airflow only. |
Early Vegetative | 60–65% | 22–26°C / 72–79°F | 18–22°C / 64–72°F | Plants bulk up leaf area; moderate RH supports growth without pathogen risk. | Introduce steady fans; open vents for exchange. |
Late Vegetative | 50–60% | 24–28°C / 75–82°F | 18–20°C / 64–68°F | Lower RH encourages thicker stems and better transpiration before flowering. | Gradually reduce RH with dehumidifier or venting. |
Early Flowering | 45–55% | 22–26°C / 72–79°F | 16–20°C / 61–68°F | Balanced humidity reduces early bud mold while supporting resin production. | Monitor bud sites closely; maintain airflow through canopy. |
Late Flowering / Ripening | 40–50% (aim lower last 2 wks) | 20–24°C / 68–75°F | 15–18°C / 59–64°F | Lower RH minimizes bud rot risk; excessive RH (>60%) can cut yield 30–40%. | Drop RH in final weeks; use dehumidifier and dessicant packs if needed. |
Keeping these ranges is the simplest way to protect yield while encouraging desirable plant chemistry.
Why the ranges move as plants mature Young plants need humidity to avoid desiccation because their root and leaf systems are small.
As canopies thicken, air circulation and transpiration increase, so RH must drop to prevent condensation in bud sites.
Flowering demands the strictest control because dense buds trap moisture.
Excess humidity at that point creates ideal conditions for powdery mildew and bud rot — problems stressed by Canopy Growth Corporation in controlled facilities.
Practical checks and climate controls
Small, consistent adjustments beat dramatic swings.
Keep sensors accurate, act early, and the plants will repay you at harvest.
Measuring your environment: tools and best practices
Accurate measurement separates guesswork from repeatable results.
Track the environment with instruments that log both brief spikes and day-to-day patterns, then use that data to make targeted fixes rather than wild guesses.
Professional growers map microclimates across a room; hobby tents deserve the same approach at a smaller scale. Rely on proper hygrometers, thermometers and dataloggers, plus a clear plan for where and how often to read them.
Environmental blind spots are where problems start.
Remember that sustained high humidity during flower can cut yield dramatically — sometimes by 30–40% — because of mold and bud-rot risk.
Essential tools
Start by choosing quality sensors and one centralized logger.
Cheap single-point meters give a snapshot, but not the story.
A simple kit should include at least one calibrated hygrometer, one accurate thermometer, and a datalogger that records at short intervals. Hygrometer: Measures relative humidity over time; look for ±2–3% accuracy and the ability to calibrate. Thermometer: Tracks air temperature; infrared thermometers are useful for spot checks but a probe-style sensor gives continuous readings. Datalogger: Records time-stamped readings from sensors and exports CSV files for analysis; prefer models with 5–15 minute sampling.
- Battery backup: Keeps logs during short power dips.
- Calibration tools: Small salt kits or reference devices to check accuracy.
- Wireless mesh sensors: Allow many sensors without cable runs.
- Cloud logging option: For remote alerts and long-term trend review.
Setting up reliable monitoring points
Placement beats precision if you only have one sensor.
Sensors must represent where the plants actually interact with air, not the hottest point near a light or the draft from an intake.
This short clip shows step-by-step sensor placement and how to read short-term spikes versus long-term averages.
Watch and pause while you tape or clip sensors into place.
Good measurement is cheap insurance: multiple, well-placed sensors and regular logging turn surprises into actionable data.
Keep a simple map of sensor locations and check the logs weekly to spot trends before they become problems.
Controlling humidity and temperature: practical solutions
Want predictable, steady tent conditions without babysitting clocks all day? Reliable control comes from three things: smart passive design, correctly sized active gear, and closed‑loop automation that reacts before problems start.
Done well, those three reduce spikes, cut disease risk, and free up time for better crop care.
Passive measures are the inexpensive foundation.
They blunt extremes and shrink the workload for fans, heaters, and dehumidifiers.
Think of them as shaping the problem so your equipment can handle it more easily.
Industry growers stress the same approach. Programs like the Greenhouse Grower’s Guide and operators such as Canopy Growth Corporation highlight how small design moves prevent big losses — especially during sensitive phases.
Passive fixes: airflow, spacing, and shading Start by treating the tent like a small greenhouse envelope.
Improve natural mixing and heat distribution before adding machines.
- Air circulation: Place oscillating fans to create gentle, uniform airflow; avoid direct blasts on colas.
- Plant spacing: Leave pathways and canopy gaps so air can move freely; overcrowding traps moisture.
- Shading & insulation: Use reflective liners and blackout cloth to control heat gain and reduce sudden swings.
Active equipment: heaters, AC, humidifiers, dehumidifiers and controllers After passive fixes, match equipment capacity to your tent volume and climate load.
Oversized units short‑cycle; undersized units never catch up.
- Right‑sized dehumidifier: Choose one rated for continuous operation and sized for tent cubic feet.
- Variable fans & ducting: Use speed‑controlled inline fans and smooth duct runs to avoid turbulence and resistance.
- Split A/C or portable units: Prioritize steady runtime over peak BTU; cycles cause humidity swings.
- Supplemental heater: Electric ceramic or hydronic heaters with fan distribution work best for small spaces.
- Dedicated controller: A controller that manages multiple devices prevents conflicting on/off behavior.
Exceeding ideal humidity during flowering can reduce yield by roughly 30–40% due to increased mold and bud rot risk.
Smart control setups for consistent conditions The simplest automation is a sensor → controller → device loop. Sensors read RH and temperature, the controller decides, and devices act.
That keeps conditions stable without manual intervention.
The diagram shows sensors feeding a central controller, which then runs fans, a dehumidifier, heater, and AC with feedback loops.
It highlights alarms and fail‑safe relays for power or device failure.
Small changes to tent layout and a modest investment in automation deliver big, reliable improvements in growing conditions.
Keep the system simple, monitored, and tuned, and the plants will reward you.
Common problems tied to wrong humidity or temperature and fixes
A single rotten cola or a week of high temps can undo months of careful work.
Problems caused by the wrong humidity or temperature typically show quickly in the canopy and the bud sites.
Catching them fast is what saves yield.
This section explains how to spot fungal outbreaks, recognize heat stress, and decide when the microclimate means changing watering or feed schedules.
Practical short-term fixes are paired with actions that prevent recurrence.
High humidity during flowering is particularly dangerous, often leading to a yield drop of 30–40% from mold and bud rot.
If you observe high humidity conditions, use targeted remedies like increased airflow or dehumidifiers to maintain optimal levels.
📥 Download: Download Template (PDF)
Adapting setups for different contexts
Different spaces demand different priorities.
A 2×2 tent is a living, tight microclimate where equipment, plant count, and placements change conditions fast.
A converted room behaves more like a small warehouse — thermal mass and air patterns matter.
Greenhouses add weather as a variable, so passive systems and genetics take on outsized importance.
Practical adaptation is about matching interventions to scale and risk.
Small tents need precision and quick-response gear.
Large rooms benefit from distributed airflow and zoning.
Greenhouses require strategies that work with—or blunt—the local climate rather than fight it.
What you do first is identify the biggest limiter for that context: air distribution, humidity buffering, pest pressure, or heat spikes.
Then choose the simplest fix that addresses that limiter without adding new problems.
Small tents vs. large rooms vs. greenhouse: what shifts
Small tents respond quickly to any change.
Fans, lights, and one plant’s transpiration can swing the environment in hours.
That makes placement and short duct runs essential.
Large rooms create pockets of differing conditions.
Air circulation must be zoned so plants don’t develop microclimates across the space.
Greenhouses interact with outside weather.
Solar gain, rain, and diurnal swings mean you design for variability, using shade, vents, and evaporative strategies rather than relying solely on mechanical control.
- Air distribution: Use multiple small fans in large rooms; in tents, focus on gentle, targeted movement.
- Thermal inertia: In rooms, add thermal mass (water barrels, masonry) to smooth temperature swings.
- Ventilation paths: Minimize long, insulated duct runs in tents; plan cross-ventilation in greenhouses.
Tips for growers in humid or arid climates
Humidity extremes force different operational choices.
In humid areas, the goal is drying surfaces and avoiding stagnant pockets.
In dry areas, the task is raising local humidity without creating standing moisture on buds or leaves.
- Humid climates — timed drying: Run higher-intensity circulation during the brief window after lights-off to dry leaf surfaces.
- Humid climates — targeted pruning: Remove dense inner growth to improve airflow through the canopy.
- Arid climates — localized humidity: Use trays or localized foggers near plant bases rather than room-wide humidifiers to avoid mold on surfaces.
- Arid climates — mulch and irrigation timing: Mulch or wetting soil in the evening reduces daytime evaporation and buffers humidity swings.
Studies and industry reports note a substantial yield loss when flowering humidity stays too high; estimates range around a 30–40% reduction in worst cases due to mold and bud damage.
International shipping and seed selection: matching genetics to climate
Seed choice matters more than most growers admit when they’re working cross-border.
Pick genetics with a native or proven history in climates similar to where you’ll grow.
- Heat-tolerant genetics: Favor sativa-leaning or heat-adapted varieties for tropical regions.
- Mold-resistant genetics: Choose varieties with dense trichome coverage and open bud structure for humid zones.
- Photoperiod vs. autoflower: Autoflowers remove photoperiod uncertainty across latitudes and can simplify international setups.
Platforms like https://theseedconnect.com are useful when filtering for climate-adapted strains and germination guarantees.
Adapting a setup is part engineering and part matchmaking — equipment meets genetics.
Start by solving the single biggest limiter for your space, then tune for consistency.
Troubleshooting quick checklist
Ever walk into the tent and sense something’s off, but the symptom doesn’t scream its cause? That moment is where a rapid diagnostic flow saves time and crop loss.
This checklist is built to isolate whether humidity, temperature, or something else is driving the problem, then guide immediate fixes and sensible follow-up checks.
This approach borrows from practical greenhouse practice used by programs like the Greenhouse Grower’s Guide and indoor teams at Canopy Growth Corporation: act fast to remove acute stress, then verify with logged data before changing feeding or topology.
Use the checklist below to triage symptoms quickly, prioritize safety (mold and extreme heat), and avoid knee-jerk treatments that hide the real problem.
Treat each row as a mini workflow: take the immediate action first, then run the follow-up check.
If conditions normalize in 24–72 hours and the plant responds, the environment was the likely culprit.
If not, widen the diagnostic to pests, nutrients, or root health.
Quick diagnostic checklist
Symptom | Likely environment cause | Immediate action | Follow-up check |
|---|---|---|---|
Leaves curling and wilting | Heat stress or root hypoxia from overwatering | Drop canopy temps, increase airflow, pause watering | Monitor leaf turgor and |
White powdery mildew on leaves | High humidity + poor circulation | Improve airflow, lower RH, remove infected leaves | Inspect daily inner canopy; log RH spikes |
Dense buds with inner mold | Humidity >60% during flowering, poor drying | Isolate affected cola, raise airflow, reduce RH quickly | Open buds after 48–72 hrs; watch for spread |
Slow stretching in vegetative stage | Night temps too low or weak light, not just humidity | Raise night temp to | Track stretch over next 7 days; check leaf temp |
Crispy brown leaf tips | High temps or low humidity during lights-on | Lower temps, increase RH slightly, move lights if hot | Check trichome health and tip progression |
Sudden leaf drop | Rapid temp swing or root anoxia | Stabilize temps and check pot drainage | Inspect roots; run |
Pale lower leaves | Chronic low temps or overwatering reducing uptake | Warm the tent, reduce water frequency | Test soil temps and nutrient runoff |
Stunted flowering transition | Night/day temp differential too small | Restore | Check bud set after one growth cycle |
Excessive resin ambering/heat stress | Sustained high temps during late flower | Cool canopy immediately, shade if needed | Monitor harvest timing and terpene smell |
Sticky sweet smell + soft calyxes | Early bud rot under high humidity | Remove affected areas, lower RH, increase drying | Inspect inner colas for recurring rot daily |
This table highlights patterns: rapid fixes often buy time, but data logging proves causality.
Remember that humidity over 60% in flower increases mold risk and can cut yield significantly, so err on the side of drying when in doubt.
- Quick airflow check: confirm inline fan and clip fans running at expected RPMs.
- Log for 72 hours: use a datalogger to capture spikes, not single readings.
- Isolate affected plants: prevents spread while you diagnose.
- Document actions: note what you changed and when to correlate with recovery.
A few calm, measured steps fix most tent surprises.
Keep records and let the data tell you whether to tweak environment or investigate deeper.
Conclusion
Make air and heat your crop’s first priority
Humidity and temperature control are not optional; they decide whether plants finish as dense, healthy buds or become a catastrophe of grey mold and lost yield.
Remember the opening image of swollen buds going grey — that late-flower window is unforgiving, and a single night of high canopy moisture can erase weeks of careful feeding and training.
Measuring cannabis humidity and temperature at canopy level and making small, staged adjustments to ventilation or dehumidification is the habit that protects your final flush and stabilizes your growing conditions.
Before lights-on tomorrow, do this: Calibrate your hygrometer and take a 24‑hour log at canopy height, note the daily highs and lows for temperature control and relative humidity, then act on the worst hour — increase passive intake, add timed exhaust cycles, or run a dehumidifier in short bursts.
If you’re starting a new cycle, pick genetics known for resilience and consider sources like Cannabis Seeds for varieties that repay careful environmental management.
Fix the air first and the plants will respond — ready to stop losing crops to damp, unstable air?