

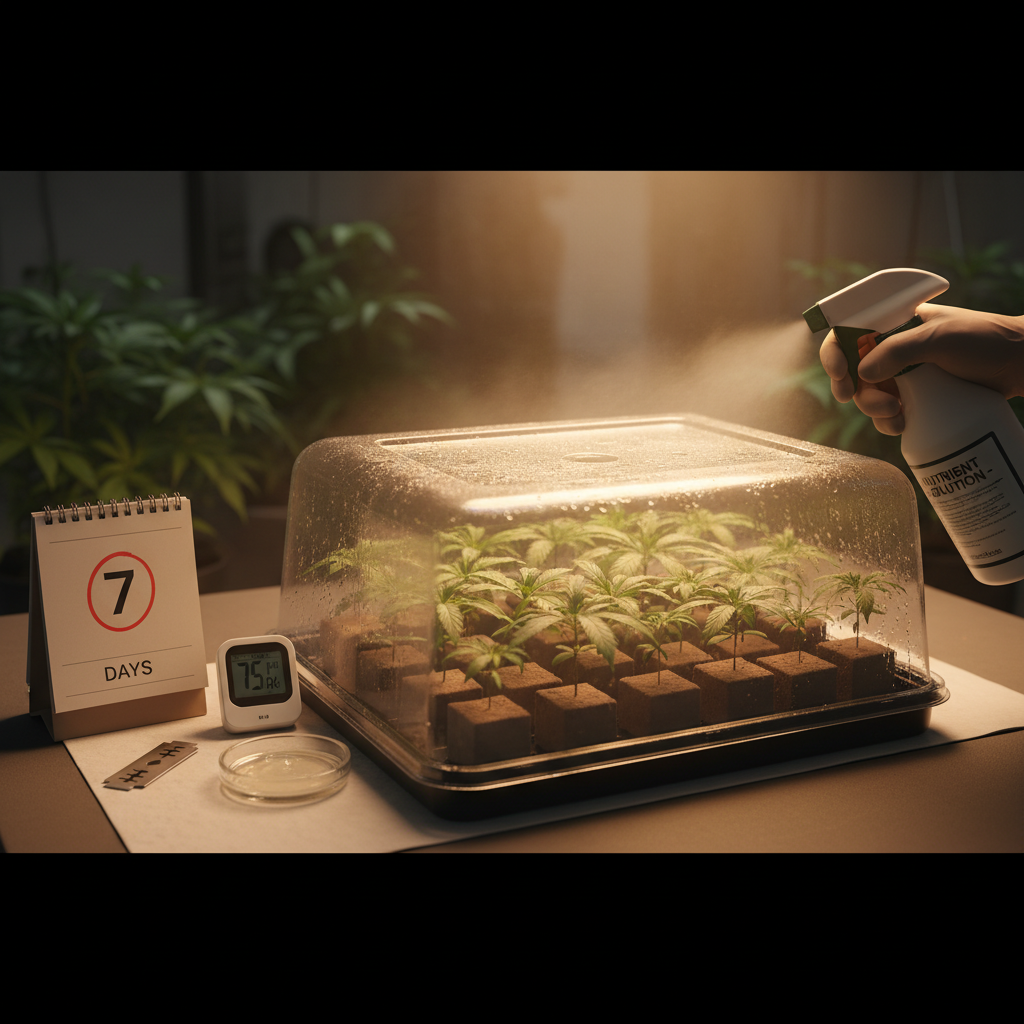
Have you ever clipped a healthy tip only to watch it wilt days later? It’s a common frustration among growers. This is especially true for those trying to clone feminized cannabis without a solid routine. Young cuttings often die for predictable reasons.
These include transplant shock, poor humidity control, or cutting techniques that damage the cambium. Identifying the cause within the first 48 hours can determine if you succeed or waste a week.
This cannabis propagation guide removes myths about mysterious hormones. It emphasizes repeatable actions that maintain plant health and rooting ability. Expect precise, hands-on cues for selection, cutting, environment, and recovery that experienced cultivators use to convert high-quality mother plants into vigorous, true-to-type clones.
What You’ll Need (Prerequisites)
To successfully clone cannabis, you need consistent conditions and the right tools. Losing just one small…
What You’ll Need (Prerequisites)
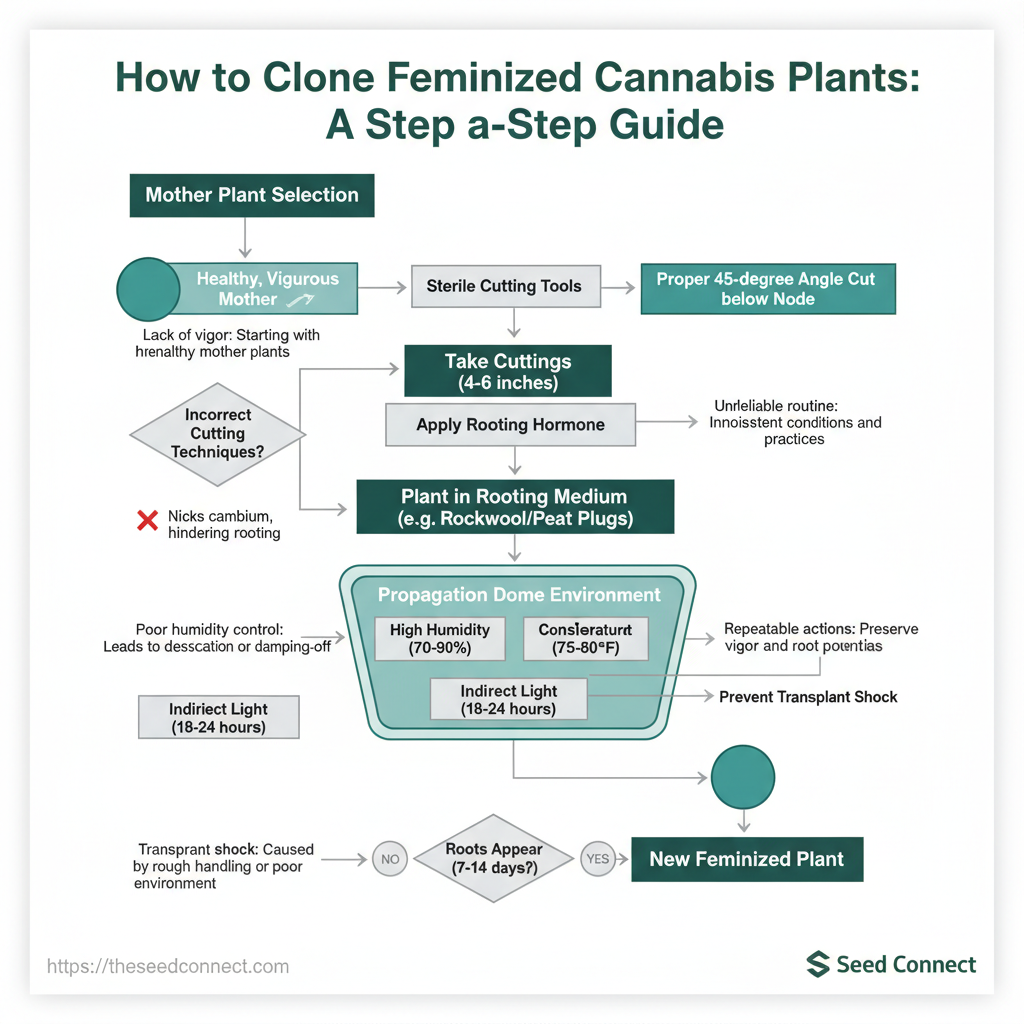
To successfully clone cannabis, you need consistent conditions and the right tools. Losing even one small item can cause failure. Prepare clean, sharp tools, a reliable rooting medium, and an environment you can control for the first 7–14 days while roots form. Below are the concrete supplies, environment specs, and skills to have on hand before you take your first cut.
Supplies — basic, high-impact items
- Sharp sterile clippers: clean cuts reduce tissue damage and infection. Trays & humidity domes: hold clones steady and keep RH high without drowning them. Labels & permanent marker: track strain, mother plant, and date.
5` for most soilless systems. Rooting agent: commercial IBA gel (Clonex) or powder; honey works as a low-cost DIY antiseptic for short-term use. Medium options: have rockwool, rapid rooters (peat plugs), and coco or soil on hand so you can test what your setup prefers.
- Clean water supply: dechlorinated or filtered water at room temp.
Environment prerequisites — what to control
- Temperature: maintain steady air temps between
72–78°F(22–26°C). 2.
Relative humidity: start high—70–80% RH for the first 7–14 days under a dome, then taper to 50–60% as roots develop. 3. Light: gentle, diffuse light only; 18–24 µmol/m²/s of PAR (or a low-output fluorescent/LED) to avoid stress.
- Airflow: gentle circulation to prevent mold; avoid direct drafts on cut sites. 5.
Sanitation: dedicate trays and tools to cloning or sterilize with 70% isopropyl between uses.
Skill prerequisites — what to practice
- Sterile cutting technique: make a 45° cut with one clean motion, immediately place in medium. 2.
Humidity management: know how to vent domes gradually to prevent damping-off. 3. Light control: recognize leaf turgor and chlorosis to dial intensity down quickly.
- pH and water troubleshooting: adjust pH and EC before symptoms appear.
Common quick tip: treat each clone like a fragile transplant for the first week—small stressors compound quickly.
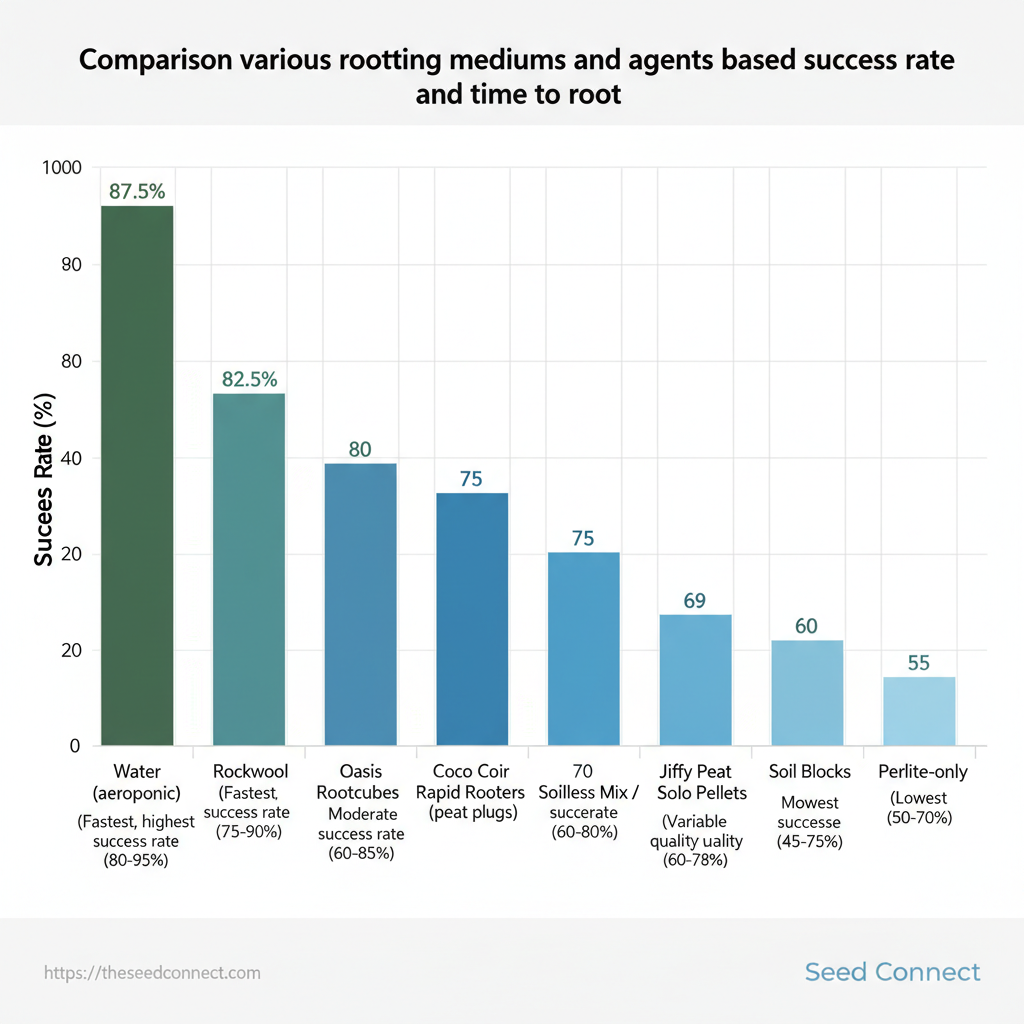
Common rooting mediums and agents that readers may consider based on cost, speed, and reliability
| Medium/Agent | Success Rate | Time to Root (avg) | Cost & Ease of Use |
|---|---|---|---|
| Rockwool | 75–90% | 7–12 days | Moderate cost; needs pH buffering; easy to handle |
| Rapid Rooters (peat plugs) | 70–88% | 8–14 days | Low cost; ready-to-use; slightly acidic |
| Coco Coir | 65–85% | 9–15 days | Reusable; pH stable with prep; moderate effort |
| Soilless Mix / Solo Cups | 60–80% | 10–18 days | Cheap; forgiving; slower initial rooting |
| Water Cloning (aeroponic) | 80–95% | 4–10 days | Fastest; higher equipment cost; requires sterilization |
| Jiffy Peat Pellets | 60–78% | 10–16 days | Very cheap; compact; variable quality |
| Oasis Rootcubes | 70–90% | 7–12 days | Designed for propagation; higher cost |
| Perlite-only | 45–65% | 12–20 days | Low cost; high drainage; needs nutrient solution |
| LECA (expanded clay) | 55–75% | 8–14 days | Reusable; good aeration; needs hydro setup |
| Soil Blocks | 50–70% | 12–21 days | Natural; no containers; skill required |
Understanding and assembling these prerequisites prevents the most common failures and lets growers focus on technique once clones are cut. When these elements are in place, propagation moves from guesswork to predictable results.
Step-by-Step Cloning Process (Numbered Steps)
Let’s walk through the careful steps for cloning feminized…
Step-by-Step Cloning Process (Numbered Steps)
Now, let’s dive into the steps for cloning feminized cannabis. First, choose a strong mother plant. Then, make clean, sterile cuts, root the cuttings in a stable humid environment, and finally move the clones into the vegetative stage while keeping the mother plant healthy. This step-by-step method aims to reduce stress and increase uniformity in a crop.
This is important for successful propagation and keeping consistent plant traits. The instructions below assume basic propagation tools and an understanding of vegetative growth cycles; they emphasize mechanical technique, timing, and environmental control so clones form roots quickly without rot or shock.
- Select and Prepare the Mother Plant
- Research from growweedeasy.com indicates that you should choose a vigorous, disease-free female in full vegetative growth.
- Flush or reduce fertilizer 48 hours before taking cuttings to lower salt load.
- Select lower branches with 3–4 nodes and limit cuttings per mother to avoid stress (typical: 6–12 cuttings weekly depending on mother size).
- Make Sterile Cuts and Prepare Cuttings
- Use a sharp sterile blade and cut at a 45° angle to increase surface area.
- Remove lower leaves and strip nodes cleanly; leave a couple of top fan leaves, trimmed if necessary.
- Dip the base in rooting hormone for
2–5seconds (follow product instructions) and keep cuttings shaded and cool until placed in medium.
- Insert Cuttings into Rooting Medium and Set Environment
- Insert cuttings firmly but gently to avoid air gaps; the medium should be moist, not waterlogged.
- Use a humidity dome, indirect light (T5s or low-output LEDs), and maintain
20–25°Cand70–85% RH. - Avoid strong direct light until roots develop.
- Daily Care and Monitoring (Days 1–14)
- Perform daily visual and moisture checks; mist as needed but avoid pooling water.
- Vent the dome incrementally over
7–10days. - If leaves collapse, reduce misting; begin hardening when roots are
0.5–1 inchvisible.
- Transplanting Clones to Vegetative Containers
- Transplant when roots are established (
0.5–1 inch). - Use well-draining potting mix or chosen hydro setup; increase light intensity over
3–7days. - Watch for droop versus nutrient burn after the first feed.
- Long-Term Care and Maintaining Mother Plants
- Keep mothers on a veg light schedule; limit removals per week to reduce stress.
- Rotate mothers every
6–12months for vigor and record phenotype/lineage for elite selections. - Recommended: maintain a simple tracking sheet for dates, number of clones, and observed traits.
Understanding and executing these steps consistently makes cannabis propagation predictable and repeatable. When performed correctly, this method delivers healthy, uniform clones and preserves mother-plant productivity over time.
Troubleshooting Common Issues
If your clones develop rot, yellowing, or weak roots, diagnose the issue promptly to prevent losses. Rot typically comes from high humidity and poor air movement; yellowing often signals nutrient or light stress; weak or absent roots point to temperature, hormone, or sanitation problems. This section gives precise checks, step-by-step fixes, and prevention actions you can implement in 10–48 hours to save the cutting.
It is suggested that identifying and rescuing root rot may take between 10–48 minutes to triage, according to a 2022 study from Klonetics. Root rot signs: brown slimy stems, foul odor, soft base.
- Immediate isolation: Remove affected clones from the tray or dome to stop spread.
- Trim and inspect: Using sterilized scissors, cut back to firm, white tissue; discard slimy material.
- Sanitize and treat: Rinse remaining stem in a
3% hydrogen peroxidesolution (1:3 with water) for 30–60 seconds, then place cuttings in fresh, sterile medium. - Improve environment: Increase ventilation, lower relative humidity to 65–70%, and add gentle air movement.
Leaves limp or yellow but moist (12–72 hours)
Commonly caused by excessive humidity under domes, low light, or early nutrient imbalance.- Reduce humidity: Open dome vents or remove dome for 1–2 hours daily, then increase.
- Lower light intensity: Move clones to indirect light or raise lights 10–20 cm.
- Check watering frequency: Avoid standing water; allow the medium surface to dry slightly.
No root growth after 10–14 days
Possible causes: low temperature, aged cloning hormone, or poor cut technique.- Verify temperature: Maintain
21–24°C (70–75°F)at the cutting site. - Re-cut and re-dip: Make a fresh bottom cut, apply a proven rooting hormone (fresh
IAA/IBAgel or powder), and re-insert into sterile medium. - Use a humidity cycle: Start with 90% RH and reduce by 5–10% daily.
Mold, algae, and surface contamination
White fuzzy growth indicates mold; green film is algae from standing water.- Clean and dry: Remove affected medium, wash trays with
10% bleachthen rinse thoroughly. - Avoid standing water: Use drip trays and elevate inserts to improve drainage.
- Maintain hygiene: Sterilize tools between cuts and use filtered water.
Quick diagnostic matrix linking symptom to probable cause and immediate fix
| Symptom | Probable Cause | Immediate Fix | Prevention |
|---|---|---|---|
| Brown slimy stems / foul smell | Bacterial/fungal rot from high RH & stagnant air | Isolate, trim to firm tissue, 3% H2O2 rinse, fresh medium |
Good airflow, lower RH, sterile tools |
| Leaves limp but moist | Excess humidity, low light, overwatering | Open dome vents, reduce light intensity, allow surface to dry | Gradual humidity reduction, proper light distance |
| No root growth after 10–14 days | Low temp, old hormone, poor cut | Re-cut base, reapply IBA/IAA, stabilize temp 21–24°C |
Fresh hormone, correct cutting technique |
| White fuzzy mold on medium | High humidity, contaminated trays | Remove medium, clean with 10% bleach, increase airflow | Clean trays, avoid standing water |
| Leaf yellowing / new growth stunted | Nutrient lockout, light stress, developing infection | Check EC/pH, reduce light, flush medium if needed | Balanced feed schedule, monitor pH/EC |
Understanding and practicing these checks reduces downtime and preserves stock so propagation stays predictable and productive. When troubleshooting is methodical and consistent, the small adjustments compound into noticeably higher success rates.
Key Takeaway: Treat propagation as a precise task. Small adjustments in the environment and timing can greatly affect how quickly and reliably a clone roots.
Tips for Success & Pro Tips
Treat propagation as a precise task. Small adjustments in the environment and timing can greatly affect how quickly and reliably a clone roots. These recommendations focus on actionable adjustments—when to take cuttings, light spectrum and humidity nuances, microbial micro-dosing, and simple tracking systems that save weeks of troubleshooting.
- Take cuttings at the right time
- Mid-morning hydration: take clones mid-morning after the mother has fully transpired overnight; stems are turgid, sap flow is steady, and wound response is cleaner.
- Use the healthiest growth: select vigorous, non-flowering shoots from the top third of the plant to maximize rooting hormone uptake.
- Light and spectrum for rooting
- Blue-heavy light: start with a blue-dominant spectrum (around
450 nm) at low intensity to encourage compact growth and root initiation rather than stretch. - Distance and photoperiod: keep clones under 18 hours light / 6 hours dark and maintain PAR around 50–150 μmol/m²/s during the first 7–10 days.
- Micro-dosing beneficial microbes
- Microbe micro-dose: apply a diluted
1/10solution of a beneficial rhizobacteria/mycorrhizae product on day one and again on day seven to accelerate root establishment without overpowering the delicate cutting. - Compatibility check: avoid full-strength fertilizer; many rooting media already contain starter nutrients — use half-strength feeds only after roots appear.
- Labeling, tracking, and hygiene
- Label consistently: use
motherID + dateon each clone (example:M12-0510) so you can correlate mother genetics with rooting performance.
70% isopropyl between cuts to prevent cross-contamination.
- Record growth metrics: log root emergence day, humidity, temp, and product batch for continuous improvement.
Practical template for labels
MOTHER: M12 STRAIN: Blue Diesel DATE: 2025-05-10 CLONE ID: M12-0510-ATroubleshooting quick hits
- Slow roots: raise humidity by 5–10% and reduce light intensity.
- Rot risk: increase air exchange and reduce saturation of media.
- Stretching: increase blue light or lower light distance.
These techniques are incremental but compounding: consistent labeling and micro-dosing paired with the right light and timing produce more uniform, faster-rooting clones for both hobby and commercial propagation. When applied routinely, they shorten crop cycles and reduce variance between batches.
Key Takeaway: Show the physical steps and outcomes so readers can replicate cannabis propagation and cloning techniques without guesswork. Visuals should be clear, labeled, and captioned with what to look for, when to act, and why it matters.
Why You Need Clear Visuals for Successful Cloning
Show the physical steps and outcomes so readers can replicate cannabis propagation and cloning techniques without guesswork. Visuals should be clear, labeled, and captioned with what to look for, when to act, and why it matters. Photographs must be high-resolution and consistent in lighting; diagrams should use simple color codes and arrows to highlight direction, depth, or timing.
Captions need to be short, actionable, and include when (days), what (part shown), and why (decision cue).
- Close-up of a 45° angled cut with labels
- What to photograph: close-up of the stem at 45° showing cambium and node placement.
- Caption example: 45° cut through the node; expose fresh cambium and remove lower leaves — take this within 2 minutes of cutting to reduce desiccation.
- Why include it: makes proper cutting angle and tissue exposure unambiguous for successful rooting.
- Before-and-after root development timeline photos
- What to photograph: same clone in the same pot at days 0, 4, 8, and 12, with consistent background and scale.
- Caption example: Day 0 → Day 12: visible root mass increase; transplant when roots circle 25–33% of the plug.
- Practical tip: use a ruler or grid in frame for scale and note ambient RH and
temperaturein caption.
- Humidity dome setup and venting progression
- What to diagram/photo: dome closed at day 0, partially vented day 4–6, fully opened day 8–10; include hygrometer reading snapshots.
- Caption example: Dome vent schedule with
RHtargets: 90% → 80% → 65–70% as roots form; open vents incrementally to avoid shock. - Troubleshoot: if leaves wilt when vents open, restore humidity and slow the venting schedule by 48 hours.
- Transplant technique and potting depth visual
- What to photograph: removing the plug, placing at correct depth, and backfilling with contact soil; show correct vs. incorrect depths.
- Caption example: Correct transplant depth — collar at soil level, no burying of new shoot; firm soil for root-soil contact without compaction.
- Why this matters: avoids stem rot and ensures immediate water uptake.
Additional image assets to include
- Lighting setup: show distance and angle relative to canopy.
- Labeling system: example tags with strain, date, mother ID.
- Common failure modes: algae on media, fungal growth, nutrient burn.
Use this caption template for consistency:
[Day X] • [Visual focus] • Conditions: [RH X% / Temp Y°C] • Action: [what to do next]Including these visuals and concise, action-oriented captions reduces ambiguity during cloning and supports faster, more reliable cannabis propagation. When implemented, this visual-first approach shortens learning curves and improves success rates across genotypes, including feminized and autoflower seeds.
Safety, Legal & Ethical Considerations
Cloning and propagating cannabis requires more than horticultural skill; it demands deliberate attention to legal compliance and breeder rights. Before cloning or propagating feminized plants, check local laws about possession, plant limits, and propagation. Many areas allow home growing but may ban selling or sharing plants. Respect breeder terms: unauthorized resale, rebranding, or commercial propagation of proprietary strains can breach licensing or intellectual property agreements and carries legal and ethical risk.
Compliance checklist for growers
- Verify local statutes: Confirm possession, plant count limits, and propagation rules with municipal and state codes. 2.
Review breeder terms: Read seed labels and supplier agreements for resale or propagation restrictions. 3. csv` with seed lot numbers, purchase dates, and germination outcomes.
- Secure cultivation: Keep clones out of public view where law requires and prevent pollen escape for sinsemilla crops.
Practical examples and on-the-ground practices
- Verify plant limits: If your state allows six mature plants per household, track counts across all cultivars and locations. Respect breeder restrictions: Many breeders permit home propagation for personal use but prohibit commercial distribution — follow label language. Use approved pest control: Choose pesticides and fungicides registered for use on cannabis or labeled for similar crops; avoid experimental or unapproved chemistries.
- Privacy and security: Position cloning stations in locked rooms, windowless closets, or use blackout curtains to comply with visibility laws.
Record templates and tools Use a simple CSV template to document provenance and compliance:
csv seed_id,breeder,acquired_date,guarantee_terms,germ_rate,notes SS-001,SeedHouse,2025-03-12,personal_use_only,95%,feminized autoTroubleshooting common legal/ethical issues
- Unauthorized resale risk: If unsure about resale rights, stop distribution and contact the breeder for written permission.
- Pesticide compliance: If plants test positive for unapproved residues, quarantine and document inputs to resolve regulatory concerns.
- Visibility complaints: If neighbors report visible plants, relocate clones and reinforce physical barriers.
Understanding these points reduces legal exposure and preserves breeder relationships; it also makes operations more resilient and reputable. When practiced consistently, lawful and ethical propagation keeps growers out of legal trouble and protects the industry’s future.
📥 Download: Cannabis Cloning Checklist (PDF)
Key Takeaway: Cloning feminized cannabis and successful propagation hinge on timing, numbers, the right medium, and fast troubleshooting. Below are concise answers to the most common questions growers ask, plus a printable checklist with realistic time estimates…
FAQ and Quick Reference
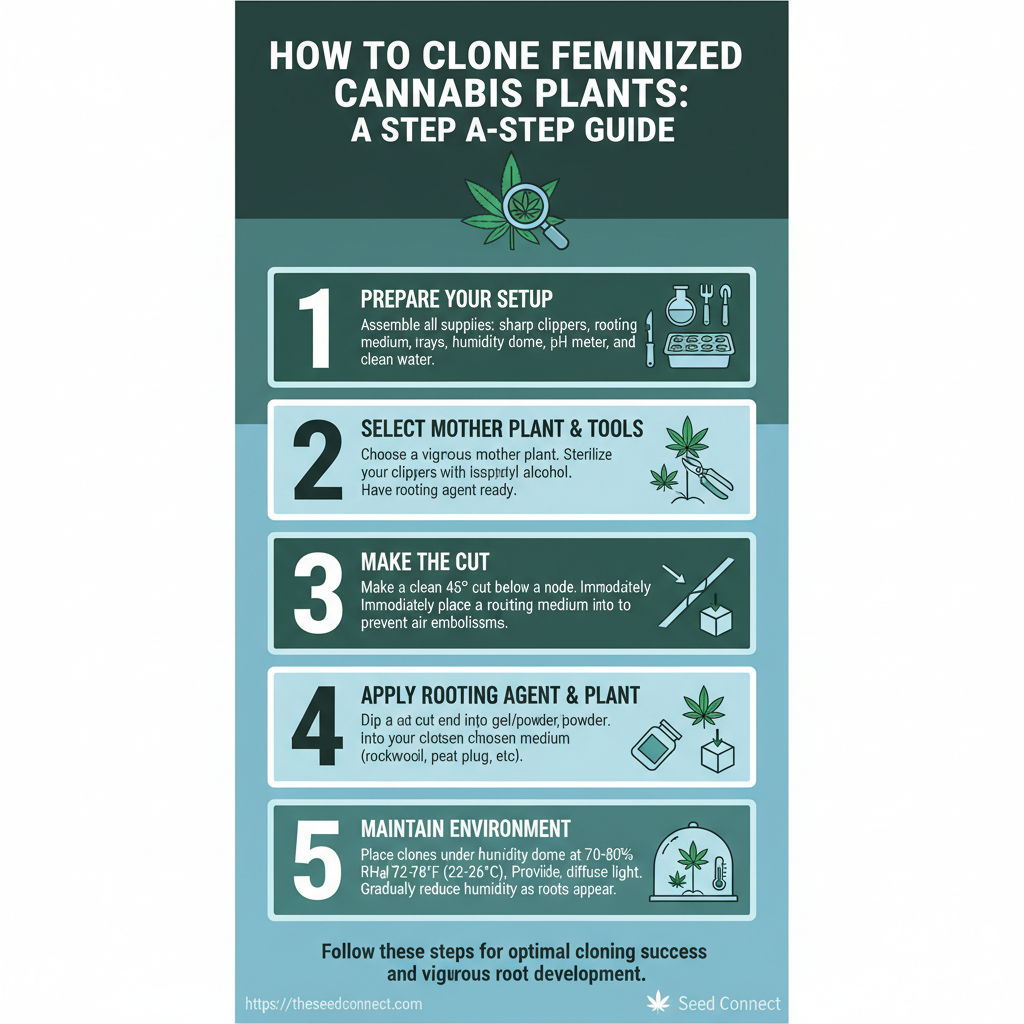
Cloning feminized cannabis and successful propagation hinge on timing, numbers, the right medium, and fast troubleshooting. Below are concise answers to the most common questions growers ask, plus a printable checklist with realistic time estimates to move from cuttings to rooted transplants.
Top FAQs (short answers)
- When to take cuttings: Take cuttings during the vegetative phase when plants show 3–4 nodes and vigorous growth; morning hours work best because turgor is high. How many clones per mother: Aim for 3–5 healthy cuttings per desired plant, plus 20–30% extra to cover failures. Scale up if selecting for phenotype.
- Best medium for rooting: Use sterile, well-draining media: rockwool, rapid-rooter plugs, or a 50/50 mix of perlite and peat. Hydroponic cloning in
RDWCorDWCworks when oxygenation is controlled. Common troubles: Wilting, slow rooting, and algae/mold growth are most frequent — check humidity, cleanliness, and cutting technique first.
Practical guidance and references to steps
- Prepare mother (Step 1): Prune and water mother 12–24 hours before cutting to maximize turgor. 2.
Take cuttings (Step 2): Use a sterile razor; cut below the node at a 45° angle. 3. Dip and place (Step 3): Use a rooting hormone gel or powder; place immediately into pre-moistened medium.
- Environment (Step 4): Maintain
70–80%humidity,18–22°Cair temp, and 18/6 light until roots form. 5.
Acclimate (Step 5): Gradually reduce humidity over 3–4 days once roots appear.
Printable checklist (time_estimate per stage)
- Mother prep: 12–24 hours
- Cuttings (30 min per 10 cuttings): 30 min
Rooting under dome: 7–14 days
- Transplant to pots: 10–30 minutes per plant
Troubleshooting quick fixes
- Wilting: Keep humidity high and move cuttings to lower light; inspect for air embolism or excessive heat.
- No roots by day 14: Re-evaluate hormone use and medium sterility; try fresh cuttings from the same mother.
- Mold/algae: Improve air exchange and use sterile water; reduce surface moisture.
> “Clones are reported to typically root within approximately 7–14 days under optimal conditions.”
Suggested quick tools and assets: a humidity dome, a sterile trimming station, pH meter, and a rooting hormone gel. For growers focused on feminized lines, using high-quality feminized cannabis mothers reduces time wasted on male or hermaphrodite selections. Implementing these checks speeds up propagation while keeping losses low.
Understanding these practical points helps teams move faster without sacrificing quality.
Clipping a strong tip, maintaining high humidity, and choosing the right medium are essential. They create the foundation for successful cannabis propagation. When you do it right, cuttings that once wilted will reliably root in just 7–14 days.
Recall the troubleshooting example earlier where a small home grower corrected pH and swapped from peat to rockwool; their survival rate reportedly jumped from approximately 40% to over 85%.
Address common worries—will the clone root without rooting hormone? sometimes, but use a hormone for predictable results; worried about mold in the dome? reduce humidity slowly and increase airflow.
These changes, along with the step-by-step process in this cannabis cloning guide, help prevent early failures and allow growers to expand with confidence.
Next steps are concrete: select a vigorous mother plant, prepare clean tools and a stable humidity dome, and follow the timed light and misting schedule outlined in the guide. For growers who want ready-to-use seeds or expert support, consult The Seed Connect’s germination and propagation resources at The Seed Connect cloning resources for seed options and troubleshooting help. If questions remain about timing, medium choice, or environmental controls, return to the troubleshooting section and run one variable test at a time—this methodical approach turns guesswork into repeatable success.