
As cannabis cultivation continues to grow in popularity, so does the need for environmentally responsible growing methods. Sustainable practices not only reduce waste and conserve resources but also lead to healthier plants and more efficient harvests.
Whether you’re cultivating at home or managing a larger setup, adopting eco-friendly techniques can significantly lower your environmental impact while improving long-term soil and plant health.
This guide explores the essential sustainable practices every cannabis grower should know — from smart water management to renewable energy solutions — helping you cultivate with intention, efficiency, and respect for the planet.
Understanding Sustainability in Cannabis Cultivation
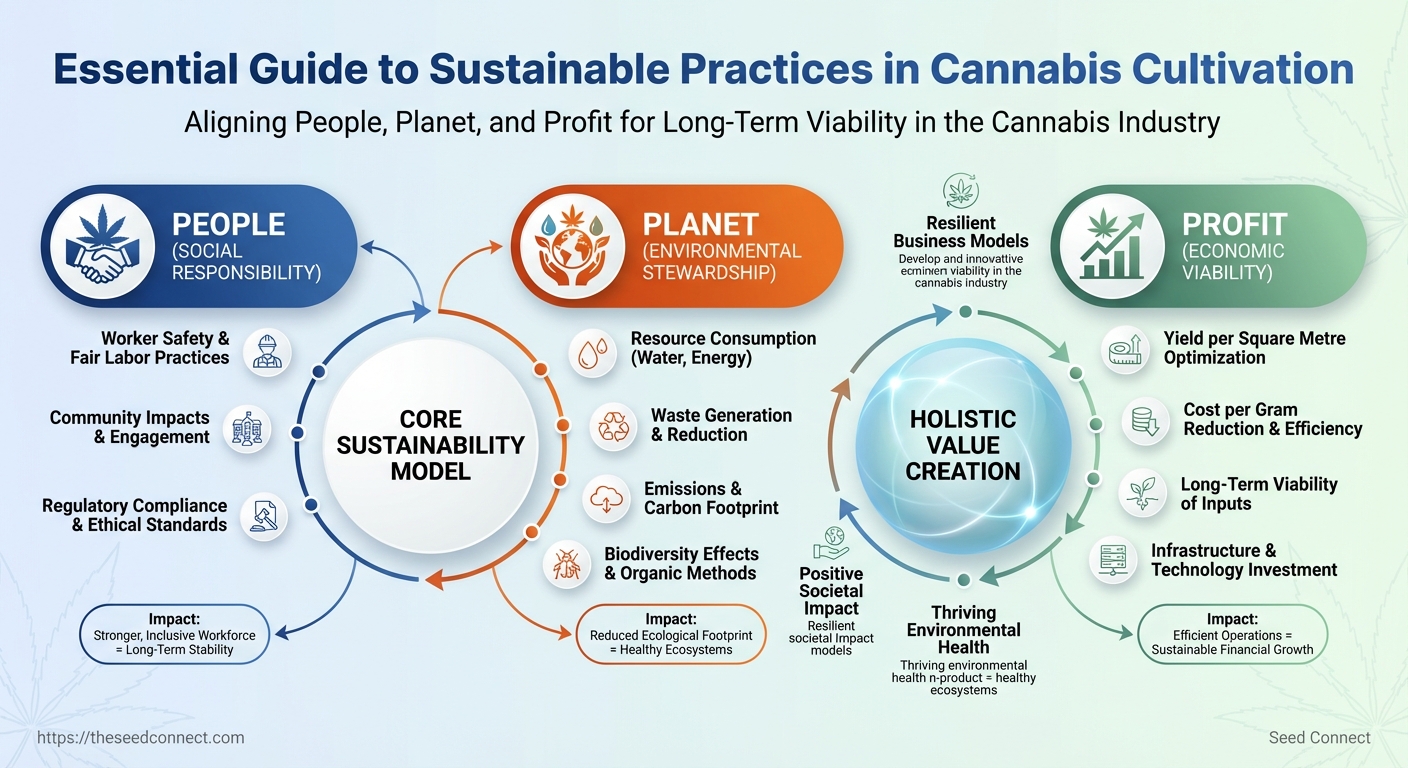
Sustainability in cannabis cultivation means managing environmental, social, and economic impacts so a grow operation remains productive, resilient, and responsible over the long term. Practically, that translates to tracking a handful of measurable metrics, designing systems that reduce inputs and waste, and making decisions that protect margins while lowering ecological footprint. Grow teams that treat sustainability as a set of operational KPIs—not a marketing tag—gain faster returns and more predictable outcomes.
Sustainability framed as the triple bottom line
People: Social responsibility, worker safety, community impacts, and regulatory compliance.
Planet: Resource consumption, waste generation, emissions, and biodiversity effects.
Profit: Yield per square metre, cost per gram, and long-term viability of inputs and infrastructure.
Primary metrics every grower should measure
Energy intensity: Track kWh/g for cultivation and drying; it directly drives operating cost. Water intensity: Measure L/g for irrigation and post-harvest use; includes recycling rates. Waste diverted: Percent of organic and non-organic waste diverted from landfill. Nutrient use efficiency: Percent of applied nutrients that are taken up by plants versus lost. * Carbon footprint: Estimate kgCO2e/g including upstream inputs and on-site energy use.
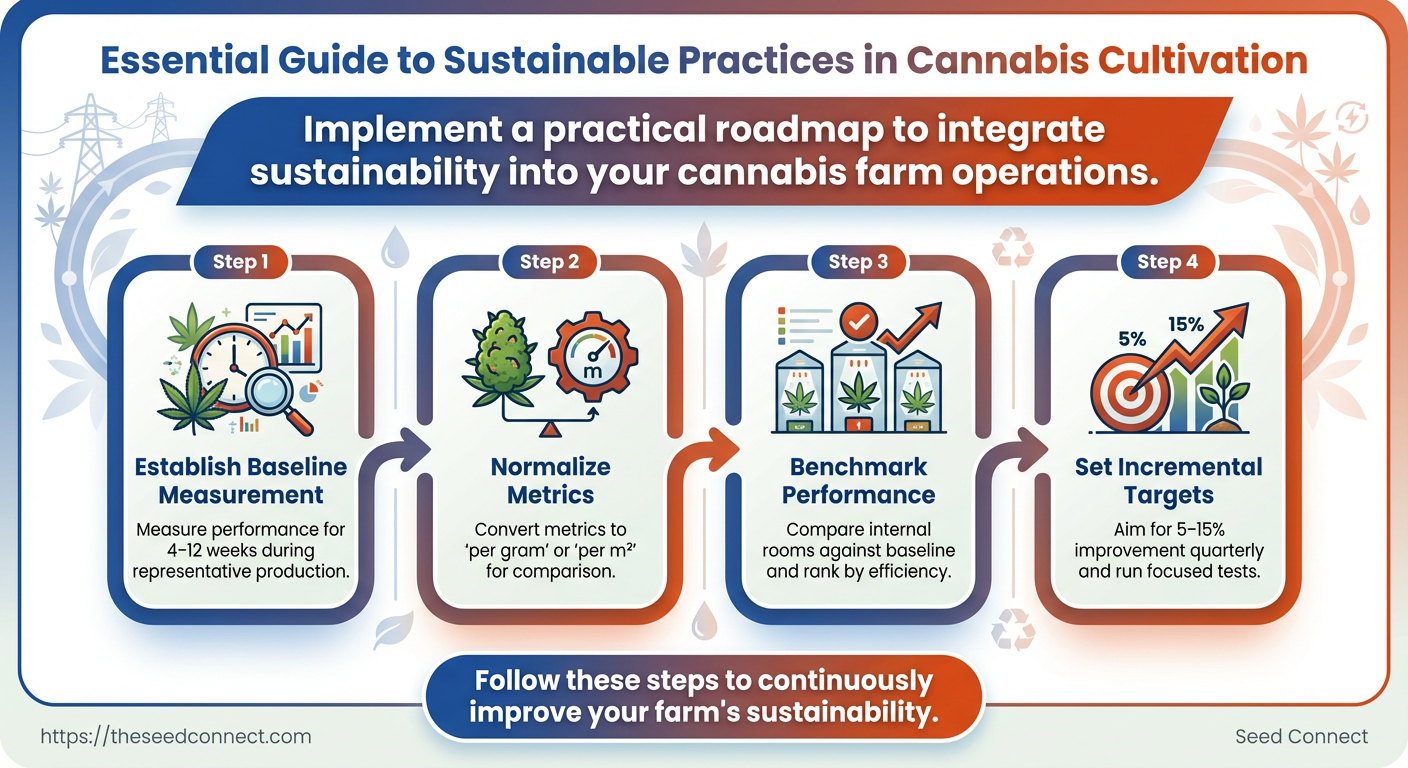
How to benchmark performance
- Establish a baseline measurement period of 4–12 weeks during representative production.
- Normalize metrics to
per gramorper m²to compare across rooms and cycles. - Compare internal rooms against the baseline and rank by energy, water, and yield efficiency.
- Set incremental targets (5–15% improvement) per quarter and run focused tests.
that clarify
- Small indoor example: A 10-plant tent may target
~3–5 kWh/gdepending on lighting and HVAC efficiency. - Medium greenhouse example: A mixed-light greenhouse can often achieve
~0.5–1.5 kWh/gwith shade and supplemental lighting. - Nutrient efficiency: Switching from broadcast feeding to fertigation often raises uptake efficiency by 10–25%.
Practical benchmarking requires consistent measurement windows and normalization. Tools like submeters, flow meters, and simple per-room logs turn these concepts into actionable KPIs. Understanding these principles helps teams prioritize investments that cut costs and reduce impact without sacrificing quality.
Baseline sustainability metrics and example calculations for different grow scales
| Metric | Definition | Small indoor example | Medium greenhouse example | Why it matters |
|---|---|---|---|---|
| Energy use (kWh/g) | Electrical energy consumed per gram of finished flower (kWh/g) |
3.5 kWh/g | 0.9 kWh/g | Energy is the largest operational cost and primary emissions driver |
| Water use (L/g) | Litres of water used per gram including irrigation and post-harvest | 4.0 L/g | 2.0 L/g | Water scarcity and municipal limits make efficiency critical |
| Waste diverted (%) | Percent of total waste sent to compost/recycling vs landfill | 60% | 75% | Reduces disposal costs and improves regulatory standing |
| Nutrient use efficiency (%) | Percent of applied nutrients assimilated by plants | 55% | 70% | Higher efficiency lowers input costs and runoff risk |
| Carbon footprint (kgCO2e/g) | Estimated greenhouse gas emissions per gram | 0.012 kgCO2e/g | 0.003 kgCO2e/g | Useful for reporting and comparing mitigation strategies |
Key insight: These baseline metrics reveal where incremental changes deliver the largest returns—energy and nutrient efficiency usually move margins fastest, while water and waste metrics often unlock regulatory and community benefits.
Energy Efficiency Strategies
Energy efficiency in a commercial or hobby grow comes down to three coordinated levers: lighting selection and specification, HVAC right-sizing and heat recovery, and automation with sensors. Prioritizing fixtures with high photosynthetic photon efficacy, matching HVAC capacity to sensible and latent loads, and deploying sensors and controls to eliminate waste delivers the biggest reductions in kWh per gram while protecting yield quality.
PPFD: Photosynthetic Photon Flux Density measured in µmol/m²/s; target canopy values depend on cultivar and stage (commonly 300–900 µmol/m²/s for flowering).
Efficacy: The measure of photons produced per watt, reported as µmol/J; higher values mean more usable light for less energy.
Lighting: what specs matter and why
- High efficacy: Aim for fixtures rated ≥2.6 µmol/J for modern commercial installs; this reduces energy per photon relative to older LEDs and HID.
- PPFD targeting: Use dimmable drivers and lensing to deliver uniform
PPFDacross the canopy; measures should be taken at canopy height with a quantum sensor. - Spectrum and ROI: Full-spectrum or adjustable spectra improve PAR utilization and crop quality; prioritize fixtures with documented spectral power distributions.
- Thermal management: LEDs with lower case temperatures reduce HVAC load; fixture placement and spacing matter for air movement and leaf-temperature control.
HVAC & heat-recovery basics
- Calculate both sensible load (from equipment, lights, outside air) and latent load (transpiration, humidity).
- Right-size equipment for combined peak loads with 10–15% contingency; oversizing increases cycling and energy waste.
- Specify systems with variable-speed compressors and EC fans to modulate capacity in real time.
- Heat Recovery: Run exhaust through a heat-recovery ventilator or a heat pump loop to reclaim sensible and latent energy, cutting makeup air heating/cooling costs substantially.
- Maintenance: Clean coils and re-balance airflow seasonally to keep system efficiency high.
Automation & sensors to cut waste
- Environmental sensors: Place
PPFD, temperature, RH, and CO2 sensors across the canopy for zonal control. - Control strategy: Use PID loops or model-predictive controls to reduce overshoot and cycling.
- Scheduling: Dim lighting during low-demand windowing and stage-specific setpoints to shave peak loads.
Common lighting and HVAC options for energy, upfront cost, lifespan, and suitability for scales of grow
| Option | Energy use (relative) | Upfront cost | Lifespan/maintenance | Best for (scale) |
|---|---|---|---|---|
| HID (MH/HPS) | High | Low–Moderate | 8–18 months lamp replacement; moderate ballast maintenance | Small to legacy commercial |
| Basic LED panels | Moderate | Moderate | 3–5 years; passive cooling | Small to medium grows |
| High-efficiency LED (commercial) | Low | High | 7–12 years; serviceable drivers | Medium to large commercial |
| Split AC HVAC | Moderate–High | Moderate | 10–15 years; frequent filter/coil service | Small to medium rooms |
| Ducted heat-recovery HVAC | Low–Moderate | High | 15–20 years; scheduled maintenance | Large commercial / multi-room |
Key insight: High-efficiency commercial LEDs plus ducted HVAC with heat recovery deliver the lowest lifecycle energy use despite higher upfront cost, while sensor-driven controls and correct right-sizing prevent common efficiency losses.
Understanding these principles helps teams reduce energy intensity without compromising crop outcomes. When implemented correctly, the right combination of fixtures, HVAC design, and controls frees resources for genetics and crop optimization.
Water Conservation and Soil Health
Efficient irrigation choices combined with deliberate soil management dramatically reduce water use while improving plant resilience. Selecting an irrigation system by scale and crop stage, amending soil to retain moisture, and capturing runoff are practical tactics that cut irrigation frequency and protect soil structure. These strategies lower operational cost, reduce stress on plants during dry spells, and create a feedback loop where healthier soil further reduces water demand.
Scale and crop-stage selection
- Small-scale, vegetative phase: Hand watering or a simple soaker hose gives fine control over wet/dry cycles and nutrient delivery.
- Medium-scale, mixed stages: Drip irrigation provides consistent root-zone moisture with minimal evaporation and is easy to zone for different stages.
- Large-scale or automated grows: Sub-irrigation or ebb-and-flow systems recycle water and nutrients, offering top water efficiency and predictable schedules.
Soil amendments that reduce watering frequency
- Biochar: Adds porosity and increases water-holding capacity while stabilizing microbial communities.
- Compost: Improves aggregate stability and organic matter content, which increases available water per volume of soil.
- Hydrogels:
superabsorbent polymerscan buffer short-term dry periods when used sparingly and mixed into the root zone. - Cover crops: Increase organic matter and shading, reducing surface evaporation and improving infiltration.
Simple water-reuse and runoff capture solutions
- Install gutters and sloped hardscape to direct runoff into collection tanks.
- Use first-flush diverters to exclude debris, then route captured water through a sediment trap before storage.
- Reuse stored water for irrigation after basic filtration and, when needed, solar UV or chlorine dosing for pathogen control.
- Integrate captured water into a fertigation loop with monitoring to keep nutrient concentrations stable.
Practical operational tips
- Mulch liberally: Surface mulches cut evaporation and moderate soil temperature.
- Zone by need: Group plants by water demand and stage to avoid overwatering conservative beds.
- Monitor with sensors:
soil moisture tensionor volumetric sensors prevent habitual calendar-based watering.
Irrigation methods on water efficiency, cost, labor, and scalability
| Irrigation Type | Water Efficiency | Initial Cost | Labor Intensity | Best Use Case |
|---|---|---|---|---|
| Drip irrigation | High (low losses) | Moderate ($/zone) | Low | Zoned beds, stage control |
| Ebb-and-flow | High (recycles) | High (tank/pumps) | Moderate | Medium-large propagation benches |
| Hand watering | Low (variable) | Low | High | Small, high-value plants |
| Sub-irrigation | Very high (deep watering) | High | Low | Large automated greenhouses |
| Flood-and-drain | Moderate (depends on reuse) | Moderate | Moderate | Hydroponic benches with reuse |
Key insight: Drip and sub-irrigation deliver the best on-site water savings for cannabis operations; smaller grows often balance cost and control with hand/soaker methods while reuse systems improve efficiency at scale.
Understanding these approaches lets teams match system complexity to grow goals and climate, reducing water footprint without compromising plant performance. When implemented deliberately, water-smart soil management frees time and budget for refining genetics and crop quality.

Sustainable Nutrient and Pest Management
Healthy plants start with healthy soil. Building microbial-rich media and using an Integrated Pest Management (IPM) workflow reduces dependence on synthetic inputs, preserves potency, and keeps crops compliant with organic goals. Practical IPM pairs observation-driven thresholds with low-toxicity interventions timed to crop phenology so treatments protect yield without harming beneficials.
Soil biology and organic inputs
Strong microbial communities make nutrients plant-available and outcompete pathogens.
Compost: Mature, well-cured compost supplies diverse microbes and slow-release nutrients.
Worm castings: High microbial activity and plant-growth-promoting compounds; apply as top-dress or in potting mix.
Mycorrhizal inoculants: Improve phosphorus uptake and drought resilience when applied at transplant.
Fish/kelp emulsions: Quickly available macro- and micronutrients for vegetative growth; use dilute foliar or root drench applications.
Biochar: Enhances cation exchange and habitat for microbes when charged with compost tea.
Implementation tips: Begin building biology during propagation, maintain steady carbon inputs, and avoid over-fertilizing with soluble salts that suppress microbes.
IPM workflow and decision thresholds
IPM is a decision tree, not a spray schedule.
- Scout daily during vegetative and early flower windows.
- Record pest counts and plant symptoms.
- Compare observations to thresholds (example: >5 live spider mites per leaf triggers action in dense canopy).
- Prioritize cultural controls before treatments.
- Apply biologicals or low-toxicity products timed to vulnerable pest life stages.
Thresholds: Use conservative thresholds during bloom to avoid residue issues; adjust downward for dense canopy cultivars.
Low-toxicity treatments and timing
Timing treatments to pest life cycles preserves beneficial species and reduces reapplications.
- Predatory mites: Release when spider mite eggs are present; establish before heavy infestations.
Bacillus thuringiensis(Bt): Target lepidopteran larvae; apply late day to protect pollinators.- Insecticidal soaps and horticultural oils: Use early morning/late evening; avoid high temperatures and bloom when possible.
- Beneficial nematodes: Apply as soil drench for fungus gnat larvae; keep soil moist 48 hours after application.
> Biological control programs can reduce chemical sprays by over 50% when integrated with proper sanitation and monitoring.
Common pests/diseases and match sustainable control options with prevention strategies
| Pest/Disease | Prevention | Biological Controls | Organic Treatments | When to escalate |
|---|---|---|---|---|
| Spider mites | Reduce dust; increase humidity; open canopy | Predatory mites (Phytoseiulus, Neoseiulus) | Horticultural oil, insecticidal soap | Heavy webbing or >5 mites/leaf |
| Powdery mildew | Airflow, resistant genetics, lower humidity | Ampelomyces quisqualis (biofungus) |
Potassium bicarbonate, sulfur (pre-bloom caution) | Widespread lesions on flowers |
| Whiteflies | Yellow sticky traps; remove weeds | Encarsia formosa (parasitic wasp) | Insecticidal soap, neem oil | Rapid population growth across canopy |
| Root rot (Pythium) | Avoid overwatering; sterile media | Trichoderma spp., Pythium antagonists |
Hydrogen peroxide dips (seedlings) | Stunted plants, root blackening |
| Fungus gnats | Dry topsoil, sticky traps | Steinernema feltiae (nematode) |
Bacillus-based drenches, diatomaceous earth | Larval damage to root tips |
Key insight: Prevention and biology-first responses keep treatments effective longer; escalate to organic chemical options only when thresholds indicate damage risk.
Understanding these principles allows teams to reduce chemical dependence while protecting yield and cannabinoid quality. When biology and monitoring guide decisions, interventions become surgical rather than routine.
Waste Reduction, Recycling & Packaging
Getting practical about waste starts with simple systems that divert organic matter, minimize single-use packaging, and meet cannabis-specific compliance requirements. A low-tech compost setup, deliberate reuse flows, and smart packaging choices reduce costs, lower environmental impact, and improve retail perception without adding regulatory risk. Below are actionable steps, materials guidance, and packaging comparisons that work for small cultivation rooms up to multi-site operations.
Low-tech compost system: step-by-step
- Choose a location with good drainage and partial shade, close to the grow area.
- Prepare a 3:1 ratio of browns (dry plant waste, cardboard) to greens (trimmings, fresh plant material).
- Layer the materials in a bin or windrow about 3 feet wide and 3 feet high to maintain heat.
- Turn the pile every 7–14 days to aerate and speed decomposition; monitor moisture (like a wrung-out sponge).
- After 8–12 weeks the compost should be dark, crumbly, and ready for soil amendment or potting blends.
Tools & materials
- Compost bin: Affordable plastic tumblers or wooden pallet enclosures work.
- Thermometer: Ensures temperatures reach 131°F (55°C) periodically for sanitation.
- Shredder or scissors: Reduces bulky fan leaves and stems for faster breakdown.
Which cannabis materials are safe to compost
Green trimmings: Fresh leaves and small stems are fine; heavy resin build-up is acceptable in small amounts.
Dry flower waste: Limit to avoid odor and potency concerns; mix with browns.
Soil and potting mix: Small amounts can be reintroduced after sterilization; avoid repeated reuse without testing.
Non-compostables: Plastic pots, tape, child-proof caps, and vaped cartridges must be recycled or disposed per local rules.
Practical reuse opportunities include sanitizing and reusing rigid trays, repurposing cardboard for strain labeling, and reclaiming water for non-consumptive uses.
Packaging choices: compliance vs sustainability
Packaging materials on sustainability, compliance, cost, and consumer perception
| Material | Sustainability (recyclable/compostable) | Compliance (child-resistant options) | Cost range | Retail perception |
|---|---|---|---|---|
| Rigid plastic (PET) | Recyclable in many regions | ✓ Child-resistant inserts available | $0.15–$0.60/unit | Familiar, durable, moderate trust |
| Glass jars | Highly recyclable, inert | ✓ Tamper-evident, CR caps add cost | $0.50–$2.50/unit | Premium, high trust |
| Paperboard boxes | Recyclable; some compostable | ✓ CR designs exist but add complexity | $0.10–$0.80/unit | Eco-friendly, artisan appeal |
| Compostable bags | Compostable (industrial/home varies) | ✗ Some struggle to meet CR standards | $0.20–$1.00/unit | Strong green credentials, variable trust |
| Reusable containers | Reusable, lower lifetime impact | ✓ Can be designed CR; return program needed | $1.50–$5.00/unit | High perceived value, requires logistics |
Key insight: Glass and well-designed paperboard balance compliance and positive retail perception; compostable options signal sustainability but often require supplier verification for child-resistance.
Understanding these principles helps teams reduce waste without jeopardizing compliance or product integrity. When implemented thoughtfully, these practices lower costs and strengthen brand positioning while making operations more resilient.
Lifecycle Assessment & Certification Pathways
Lifecycle assessment frames environmental impact across a product’s life; for cannabis that means measuring everything from seed genetics and cultivation inputs to processing, packaging, and transport. A practical LCA identifies hotspots — typically energy for indoor grows, fertilizer and irrigation for outdoor/greenhouse systems, and post-harvest processing — then matches mitigation options to certification pathways that deliver market credibility.
What an LCA measures and common hotspots
Cradle-to-gate: Impact from seed/propagation through harvest and post-harvest processing, often the most actionable scope for growers.
Energy use: Electricity consumption for lights, HVAC, and drying — usually the single largest footprint for indoor cultivation.
Input emissions: Fertilizer production, pesticide manufacture, and soil amendments contribute upstream GHGs and eutrophication risk.
Water footprint: Irrigation volumes and local scarcity context affect both impact and regulatory scrutiny.
Packaging & transport: Materials and logistics determine end-of-life waste and distribution emissions.
Popular certification programs and demands
- Organic certification: Requires documented inputs, banned-synthetic lists, and soil/compost management; typically annual inspections.
- Regenerative agriculture programs: Focus on soil health metrics, carbon sequestration reporting, and multi-year crop plans.
- Local eco-labels: Municipal or regional programs that combine energy efficiency, water conservation, and waste diversion metrics.
- Carbon offset verification: Quantifies emissions reductions for sale or neutralization, requires robust baseline and monitoring.
- Third-party sustainability audits: Custom audits (e.g., ISO 14001-aligned) that assess management systems and continuous improvement.
Preparing documentation and data for audits
- Create a traceable inventory of inputs.
- Collect meter-level energy and water logs.
- Maintain batch-level cultivation records linked to input use.
- Retain invoices and MSDS for all fertilizers and pesticides.
- Produce a formal waste management and packaging plan.
Practical examples of usable evidence include kWh/m2 energy reports, greenhouse gas calculations by batch, and soil organic matter lab reports. Tools that streamline this are energy submetering, digital grow logs, and sample chain-of-custody templates.
Certification programs by scope, cost, timeline, benefits, and geographic availability
Certification programs by scope, cost, timeline, benefits, and geographic availability
Key insight: Certification choice balances budget, timeline, and buyer expectations — organic and carbon verification carry higher costs but unlock premium channels, while local eco-labels offer quicker market differentiation.
Selecting the right pathway starts with a focused LCA that quantifies hotspots and documents a prioritized mitigation plan. Integrating genetics that require fewer inputs — such as stable feminized or autoflower lines — reduces baseline impacts and smooths the path to certification. When implemented well, these steps convert operational improvements into verifiable market value.
📥 Download: Sustainable Cannabis Cultivation Checklist (PDF)
Practical Roadmap: Implementing Sustainability on Your Farm
Start by prioritizing a few high-impact, low-complexity changes in months 0–3, then scale investments that return measurable savings in months 3–12. This approach reduces disruption while delivering visible results for operators, finance teams, and regulators. The phased plan below assigns realistic budgets, clear KPIs, and expected impacts so teams can make trade-offs between speed and long-term value.
Early wins (0–3 months)
- Conduct a baseline audit: Measure energy, water, and input use across facilities.
- Fix low-cost inefficiencies: Replace inefficient bulbs, seal duct leaks, and calibrate irrigation.
- Set KPIs: Energy per square foot, water per plant, germination rate (if relevant).
Scale investments (3–9 months)
- Upgrade systems: Install variable-speed drives, retrofit LED fixtures, and implement drip irrigation.
- Process changes: Shift to integrated pest management and optimize feeding schedules.
- Tracking: Implement a simple dashboard to log monthly KPI trends.
Optimization and certification (9–12 months+)
- Integrate renewables: Add on-site solar or contract renewables where ROI aligns with budget.
- Prepare for certification: Document SOPs, traceability, and waste records for sustainability programs.
- Long-term KPIs: Carbon intensity per kg, yield per kWh, and cost per gram.
> Industry analysis shows incremental upgrades often pay back within 12–36 months depending on scale and local energy costs.
12-Month Phased Implementation Plan
Outline the 12-month roadmap with tasks, estimated cost ranges, and KPIs per phase
| Phase/Timeline | Key Actions | Estimated Cost Range | Primary KPI | Expected Impact |
|---|---|---|---|---|
| Phase 1 (0-3 months) | Baseline audit, quick LED swaps, leak fixes | $1,000–$10,000 | Energy/Sqft reduction (%) | 5–15% immediate savings |
| Phase 2 (3-9 months) | HVAC retrofits, efficient irrigation, process SOPs | $10,000–$75,000 | Water per plant, kWh/kg | 15–35% medium-term savings |
| Phase 3 (9-12 months+) | Solar installs, automation controls, training | $25,000–$250,000+ | Carbon/kg, uptime (%) | Major OPEX reduction, resilience |
| Ongoing monitoring | Dashboarding, monthly reviews, continuous tweaks | $500–$5,000/yr | KPI trend adherence | Sustained performance gains |
| Certification preparation | Documentation, audits, traceability systems | $3,000–$20,000 | Certification readiness (%) | Market access, premium pricing |
- Start with a short audit to gather reliable baseline data.
- Prioritize projects with <24-month payback for capital constrained operations.
- Implement monitoring and monthly reviews to maintain momentum.
- Use certification prep as a forcing function to institutionalize practices.
When interventions are staged this way, teams capture cashable savings quickly and create the operational discipline needed for bigger investments. This makes sustainability a continual improvement process rather than a one-off expense.
Conclusion
Bringing sustainability into cannabis cultivation is both practical and strategic: shifting to LEDs, tightening irrigation with drip and soil sensors, and building compost-rich soil yields measurable reductions in energy and water use while often improving plant health. Growers who implemented an LED retrofit and a phased compost program reported noticeably lower utility bills and steadier yields, and those that pursued third-party lifecycle assessments gained clearer decision-making data for packaging and inputs. Start with a focused audit, then tackle the highest-impact changes first — energy, water, soil health — and layer in certifications when operations are stable.
Three clear actions to take this week: – Run a simple energy and water audit to identify low-effort, high-impact savings. – Pilot regenerative soil practices on a small block (compost, cover crops, microbial inoculants). – Set a roadmap for certification or LCA once pilot results are consistent.
Questions like “How expensive is this?” or “Will yields drop?” are valid: initial costs vary, but many investments pay back within seasons, and proper trials prevent yield loss. For practical guidance and seed sourcing that supports sustainable runs, consult resources such as the sustainability guides at The Seed Connect. Take these steps now, measure results, and scale what demonstrably improves both profit and planetary impact.