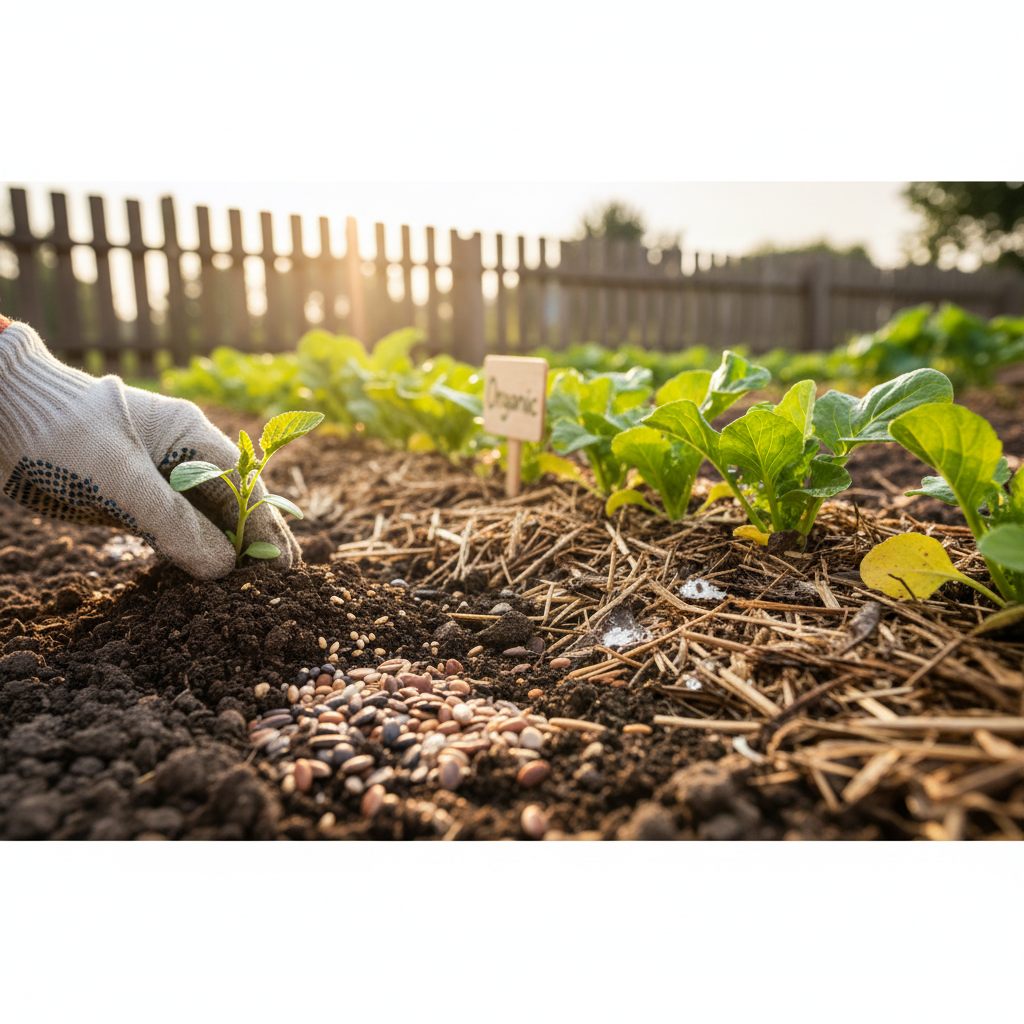
Soil that compacts after a single rain, seedlings that yellow despite regular watering, and packets of seeds that never sprout—these are the moments that make a newcomer rethink gardening. Mastering organic gardening techniques starts by recognizing those small failures as signals, not verdicts, and adjusting simple things: soil structure, seed choice, and microclimate.
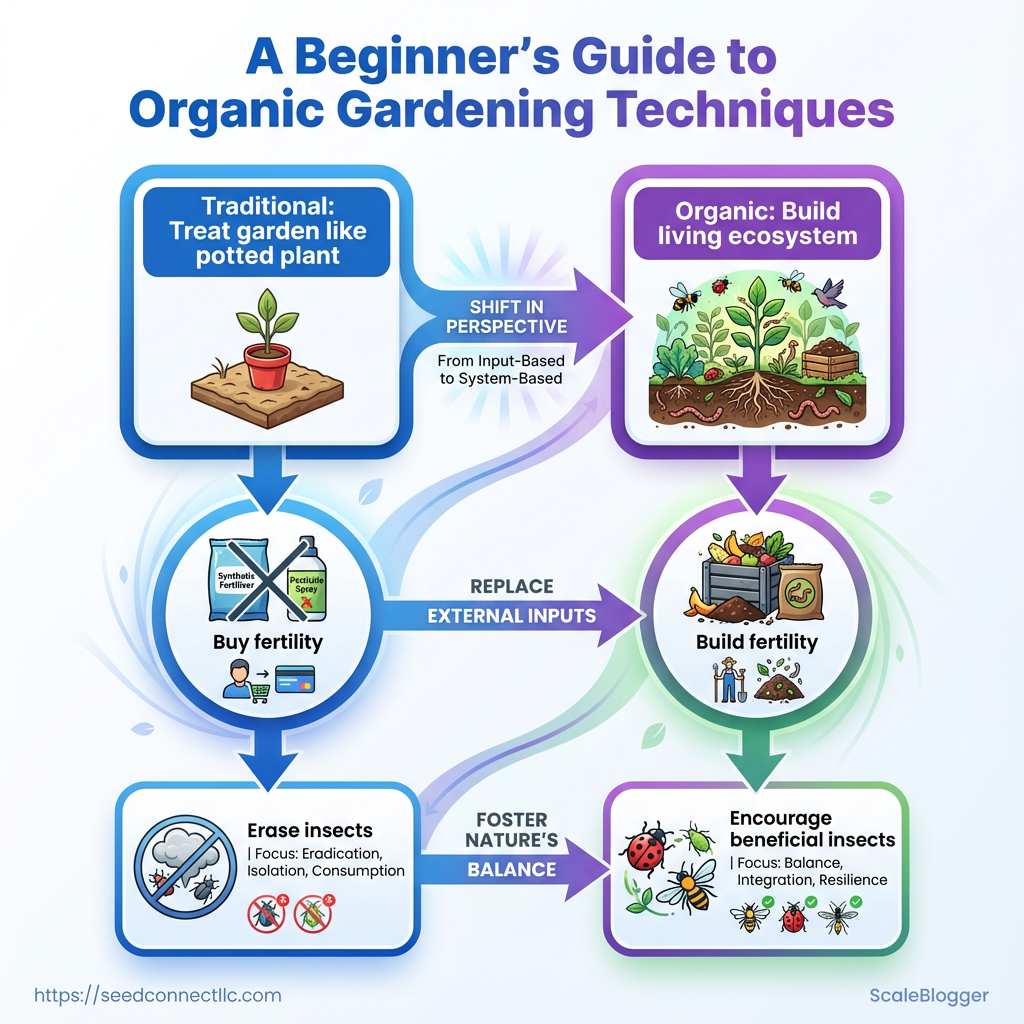
Beginner gardeners make one predictable mistake: treating the garden like a potted houseplant rather than a living ecosystem. Shifting to organic gardening methods means building fertility instead of buying it, encouraging beneficial insects instead of erasing them, and choosing plant varieties that match sun, soil, and season.
The practical difference is immediate—healthier seedlings, fewer surprise pests, and a steadily improving soil that rewards patience. This guide focuses on the everyday decisions that transform frustration into reliable harvests, with clear actions for soil, seeds, and pest balance so novice growers see measurable progress within a single season. []
What You’ll Need (Prerequisites)
Start by assembling a compact set of tools, reliable materials, and a few practiced skills—the right preparation removes most guesswork during the growing season. For a backyard or small-scale organic plot, prioritize a good hand toolkit, quality soil inputs, and a clear seed-selection checklist. Practical experience with basic soil checks, seed handling, and simple sanitation practices will cut failure rates and improve germination outcomes.
Tools & Materials
- Hand tools: Compact, ergonomic pieces speed work and reduce strain.
- Soil-building inputs: Compost, well-rotted manure, and balanced organic fertilizers feed plants over the season.
- Seeds: Choose certified organic or clearly labeled heirloom/non-GMO varieties and match them to your climate and season.
- Mulch and water management: Mulch conserves moisture and suppresses weeds; simple drip or soaker hoses improve water efficiency.
- Optional power tools: A battery-powered cultivator or small tiller for larger plots reduces elbow grease but is not required for raised beds.
Skills to practice before planting
- Learn to test soil texture and
pHusing a simple kit. - Practice seed-starting indoors: proper depth, consistent moisture, and labeling.
- Master basic pruning and thinning to avoid overcrowding.
- Establish sanitation habits: clean tools and avoid cross-contamination between beds.
Soil health: Understand your soil’s organic matter content and drainage before selecting amendments.
Seed selection: Buy seeds with clear provenance; certified organic or reputable heirloom suppliers reduce risk of contaminants and low-viability lots.
Sanitation: Clean pruning shears between disease-suspect plants to prevent spread.
Definitions and quick references
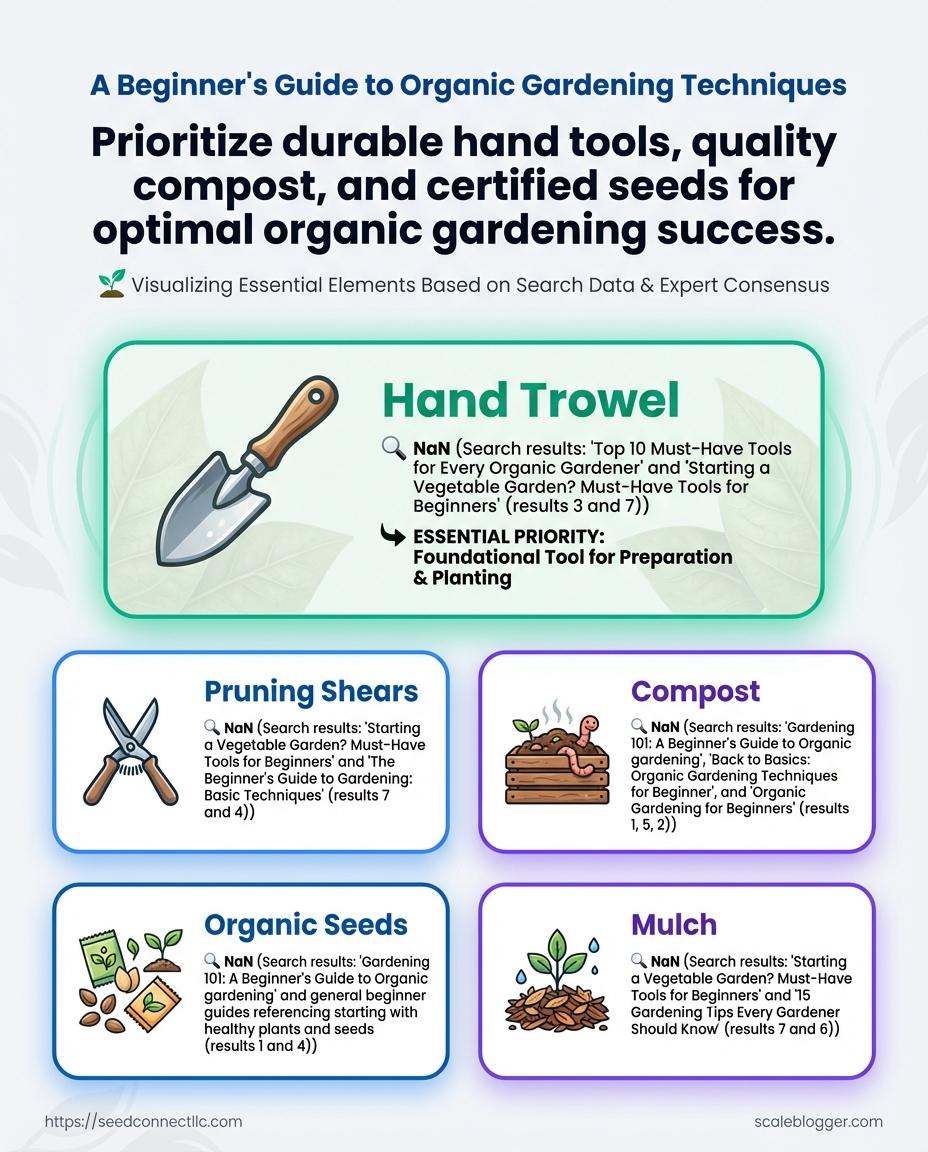
Hand trowel: A short-handled digging tool for planting seedlings and moving small amounts of soil.
Pruning shears: Secateurs for trimming and harvesting; bypass blades recommended for live stems.
Compost: Decomposed organic matter that improves soil structure and nutrient availability.
Organic seeds: Seeds produced without synthetic pesticides or fertilizers and often third-party certified.
Mulch: Organic cover (straw, wood chips) that reduces evaporation and suppresses weeds.
Essential tools and materials with purpose, recommended alternatives, and approximate cost
| Item | Purpose | Recommended Quality/Specification | Budget Alternative |
|---|---|---|---|
| Hand trowel | Transplanting, digging small holes | Stainless steel, comfortable grip, 8–10″ blade | $8–$15 plastic-handled trowel |
| Pruning shears | Harvesting, pruning | Bypass blades, sap-resistant coating | $10–$20 basic snips |
| Compost | Soil structure, nutrients | Finished, screened, high OM | Homemade yard/food-waste compost |
| Organic seeds | Genetic quality, no synthetic residues | Certified organic or reputable heirloom vendor | Non-certified heirloom seeds from trusted sellers |
| Mulch | Moisture retention, weed suppression | Straw, wood chips, 2–3″ layer | Grass clippings or shredded leaves |
Key insight: Choose durable hand tools and invest in good compost and certified seeds first—these deliver the largest returns in plant health. Budget alternatives work when matched with careful technique, but durable tools and quality organic inputs reduce rework and losses.
Understanding these prerequisites makes planting days predictable and productive, and ensures the first season establishes the right habits and soil foundation for ongoing success.
Planning Your Organic Garden
Choosing the right location and layout makes the difference between a productive, low-maintenance garden and one that constantly fights shade, soggy soil, or access problems. Start by testing sun and drainage, then match those results to the growing system—raised beds, in-ground rows, or containers—while planning accessibility and irrigation so maintenance becomes predictable rather than reactive.
Testing Sun Exposure and Soil Drainage
Begin with simple, repeatable checks to map microclimates across the site.
- Observe sunlight over three days, noting hours of direct sun on each zone at midday.
- Perform a drainage test: dig a 12-inch by 12-inch hole, fill with water, and time how long it takes to drain.
Sun test: Record full sun where you get 6-8 hours of direct light, partial sun for 3-6 hours, and shade under 3 hours.
Drainage test: Drainage faster than 2 inches per hour indicates very free-draining soil; slower than 0.5 inches per hour suggests poor drainage that needs amendment or raised beds.
Practical example: a west-facing yard may get intense afternoon light but poor evening airflow; plant warm-season crops there and reserve morning-shade areas for lettuce and herbs.
Raised Beds vs. In-Ground vs. Containers
Match the system to site test results and goals.
- Raised beds: Better drainage and soil control, easier ergonomics, warms earlier in spring.
- In-ground: Best for long-term root crops and perennials, lower upfront cost, requires soil-building if native soil is poor.
- Containers: Maximum flexibility, ideal for patios and rental properties, requires more frequent watering and nutrient management.
Example: On a compact urban lot with mixed sun, use two 4×8 raised beds for tomatoes and peppers, and a set of 12-inch containers for herbs and lettuces that prefer afternoon shade.
Accessibility and Irrigation Planning
Plan beds and paths for comfortable access and efficient watering.
- Path width: 24–36 inches for beds serviced from both sides; 18 inches for single-sided access.
- Irrigation backbone: Install a
¾-inchsupply line with adjustable drip emitters or soaker hoses on separate zones. - Control: Use a timer or smart controller to avoid overwatering and to water at dawn.
Small-space layout tips
- Vertical layers: Train vining crops on trellises to free ground space.
- Succession planting: Stagger planting dates to keep beds productive.
- Modular units: Use uniform container sizes or bed modules for easier crop rotation.
Understanding site characteristics first reduces costly rework and lets seed selection — including high-quality organic varieties sourced for your conditions — deliver predictable yields. When the layout supports accessibility and irrigation, daily care becomes a quick, productive habit rather than a chore.
Preparing and Improving Soil Organically
Healthy crops start with living soil. Start by understanding where your soil is now—structure, pH, organic matter and biology—then apply simple, repeatable organic practices that rebuild nutrient cycles rather than mask deficiencies. A DIY soil test, regular additions of compost and targeted amendments, plus cover crops and green manures turn inert dirt into a resilient, productive medium that supports seed genetics and plant immune systems.
DIY soil test: step-by-step process
- Collect 6–8 subsamples from 4–6 inches depth across the bed, avoiding compost piles and walkways.
- Mix subsamples in a clean bucket and air-dry a cup of the blend for at least 24 hours.
- Use a home pH kit or meter to measure pH and note texture by feel—squeeze damp soil to judge sand/silt/clay balance.
- Send 1–2 cups to a lab if available for detailed nutrient and organic matter analysis; otherwise use
pH,N-P-Kstrips and a texture test as baseline. - Record results and map them to planting areas so amendments target actual needs.
When and how to add compost and organic amendments
- Apply compost annually: Spread 1–3 inches of finished compost before planting in spring or as a topdressing in fall.
- Use aged manure carefully: Apply in fall to allow mineralization and avoid seedling burn.
- Add mineral amendments strategically:
Bone mealorrock phosphatefor P needs;greensandfor trace minerals; incorporate at planting or in fall. - Starter compost teas: Use sparingly for transplant dips to introduce microbes, not as fertilizer substitute.
Using cover crops and green manures
- Short-term fixes: Buckwheat: fast biomass, suppresses weeds, quick breakdown.
- Nitrogen builders: Hairy vetch, crimson clover: fix N, cut before seed set and incorporate.
- Deep-rooted break-up: Daikon radish: reduces compaction and improves infiltration.
Indicators of healthy soil: Structure: Aggregates break into crumbs and resist crusting.
Smell: Earthy, not sulfurous or ammonia-rich.
Earthworms: Visible counts per spadeful indicate active biology.
Porosity: Water infiltrates within minutes rather than ponding.
Common organic soil amendments by primary benefit, application timing, and typical application rate
| Amendment | Primary Benefit | Best Time to Apply | Typical Application Rate |
|---|---|---|---|
| Compost | Builds organic matter, feeds microbes | Fall or spring; topdress anytime | 1–3 inches (25–75 lb/yd³) |
| Aged manure | Adds nutrients, organic matter | Fall, well-aged to avoid pathogens | 20–40 lb/100 ft² |
| Bone meal | Slow-release phosphorus | At planting or fall incorporation | 2–4 lb/100 ft² |
| Rock phosphate | Long-term phosphorus source | Fall for slow mineralization | 1–3 lb/100 ft² |
| Greensand | Adds potassium and trace minerals | Spring or fall; works gradually | 5–10 lb/100 ft² |
Key insight: Compost is the most broadly effective amendment for building resilience; mineral amendments like bone meal and rock phosphate are targeted fixes for P, while greensand supports long-term trace mineral balance. Timing ahead of planting (fall or early spring) gives biological processes time to mobilize nutrients.
Understanding these practices speeds the transition to a biological system that sustains high-yielding plants. When soil is alive, seed choices and organic varieties perform predictably and with fewer inputs.
Starting Seeds and Transplants Organically
Begin with a predictable, clean system: a sterile, well-draining medium, consistent warmth and light, careful moisture control, and a planned calendar that times sowing to the local last-frost date. These core practices reduce damping-off and transplant shock while producing vigorous seedlings ready for the garden.
Medium recipe and sterile practices
Seed-starting medium: Use a soilless, sterile mix to minimize pathogens and retain light moisture.
- 2 parts
coco coirorpeat(organic, buffered) - 1 part
perlitefor drainage and aeration - 1 part well-aged
compostfor microbial balance and gentle nutrients
Sterilize reused flats or trays by washing with hot soapy water, then soaking in 10% bleach solution for 10 minutes and rinsing thoroughly. When reusing media, steam-pasteurize at 180–200°F (82–93°C) for 30 minutes rather than relying on home ovens.
Light, temperature, and watering
Light: Provide 14–16 hours daily of full-spectrum LED grow light positioned 2–4 inches above seedlings; increase height as plants grow to avoid stretching. South-facing windows are unreliable—supplement with artificial light.
Temperature: Maintain soil temperatures of 65–75°F (18–24°C) for most vegetables; brassicas prefer the cooler end (60–65°F / 15–18°C).
Watering: Keep medium evenly moist but not saturated. Bottom-watering into trays encourages roots to grow downward and reduces foliar disease. Allow the surface to dry slightly between waterings.
Timing seeds for your local last-frost date
- Determine your local last-frost date from extension services or historical records.
- Count backward the number of weeks listed on seed packets for “weeks before last frost.”
- Add any extra weeks needed for slow-growing varieties (e.g., tomatoes often need 6–8 weeks).
- Schedule sowing so transplants reach sturdy, true-leaf stage about 1–2 weeks before the garden planting window.
Hardening off and transplant timing
Hardening off: Start outdoors in sheltered shade for 1–2 hours, increasing exposure by 1–2 hours daily over 7–10 days; introduce wind and full sun gradually.
Transplant indicators: Transplant when seedlings show 2–4 true leaves, a well-developed root system that holds soil, and cooler night temperatures are consistently near or above plant tolerance.
Using high-quality organic seeds sourced for vigor and local adaptation improves success; SeedConnect’s catalog includes many certified organic and heirloom options suited for this workflow. When seedlings are raised with consistent light, temperature, and a sterile medium, transplant shock drops and establishment is quicker, letting plants channel energy into growth rather than recovery.
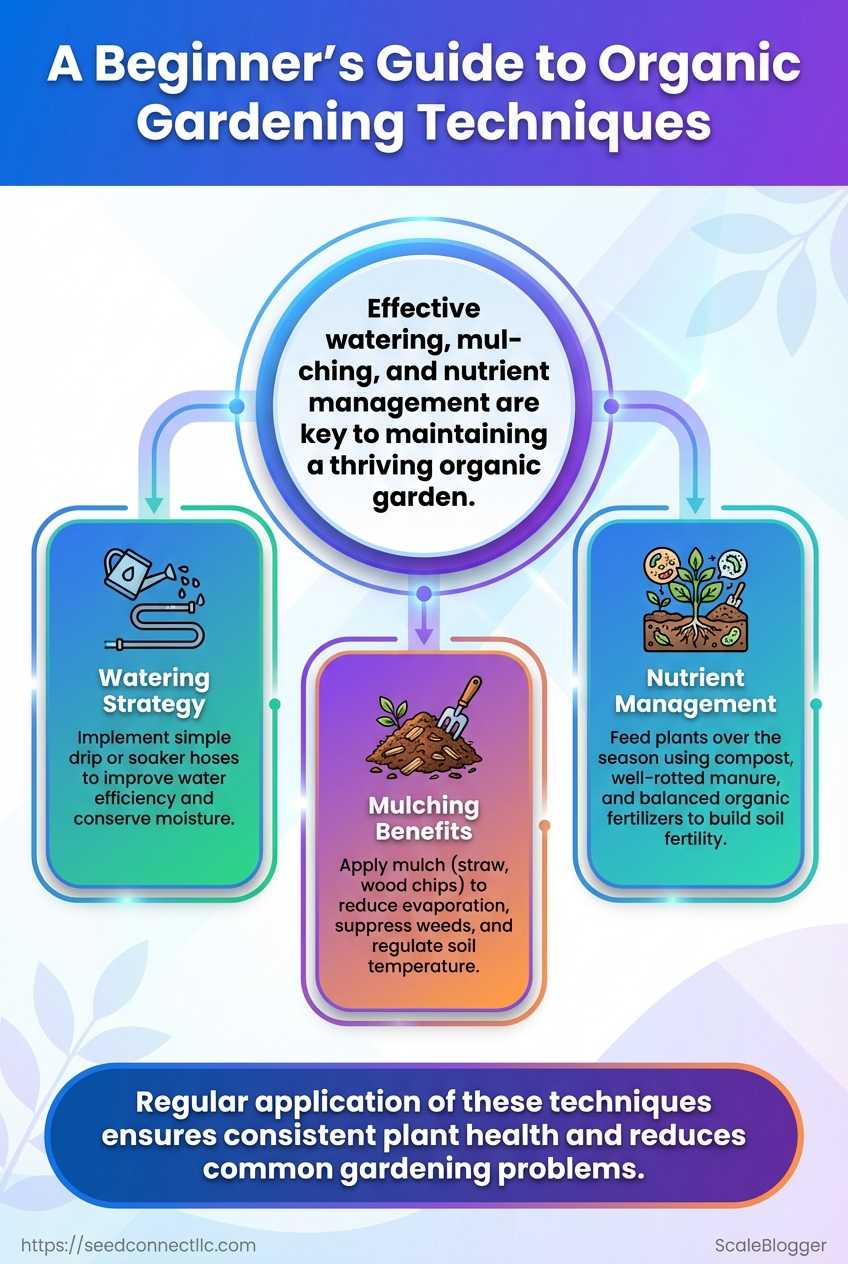
Watering, Mulching, and Nutrient Management
Efficient water delivery, the right mulch, and timely organic feeding together determine whether seeds become vigorous, productive plants or struggle to survive. Start by matching irrigation method to crop, soil texture, and season; layer mulch to stabilize moisture and temperature; and time organic nutrient inputs so microbes mineralize nutrients when roots need them most.
Irrigation: pick the right approach Drip systems deliver water slowly to the root zone with minimal evaporation and disease risk; they are ideal for row crops, raised beds, and long-season vegetables. Soaker hoses behave like distributed drip lines and are lower-cost for small plots. Overhead (sprinkler) watering is fastest for germination and large areas but increases foliar disease risk and evaporative loss. Consider these trade-offs when planning layout, water budgeting, and planting density.
- Drip: precise, water-efficient, lowers foliar disease
- Soaker hose: inexpensive, easy retrofit, moderate uniformity
- Overhead: fast germination, good for even coverage, higher evaporation
Mulch types and effects on soil temperature and moisture influence germination, root growth, and microbial activity. Mulch moderates surface temperature swings, reduces evaporation, and suppresses weeds, but certain mulches can tie up nitrogen during decomposition or harbor pests if applied too thickly.
Mulch types with pros/cons, best uses, and recommended application depth
| Mulch Type | Best Uses | Pros | Cons |
|---|---|---|---|
| Straw | Vegetable rows, annual beds | Light, insulates, easy to remove | May contain weed seeds; decomposes quickly |
| Wood chips | Perennial beds, paths | Long-lasting, suppresses weeds, improves structure | Can immobilize nitrogen near surface; coarse texture |
| Shredded leaves | Raised beds, top-dressing | Readily available, increases organic matter | Can mat when wet; moderate longevity |
| Compost | Around transplants, soil improvement | Adds nutrients and microbes; conditions soil | More costly; can heat if fresh and thick |
| Living mulch (cover crop) | Between rows, erosion control | Fixes nitrogen (legumes), reduces erosion | Competition for water/nutrients if not managed |
Key insight: Choose mulch that fits crop life-cycle—straw for quick annuals, wood chips for perennials, shredded leaves/compost for beds needing organic matter. Apply 2–4 inches for most mulches; avoid touching crowns to prevent rot.
Organic nutrient timing and practices that work with irrigation and mulch
Side-dressing: Apply compost or organic fertilizer in bands 2–3 weeks after transplant and again at early fruit set to support peak nutrient demand.
Compost tea: Use as a foliar or soil drench during active growth; make aerated tea and apply weekly to biweekly for microbial inoculation.
- Water deeply in the morning to encourage root growth and reduce nighttime disease.
- Apply mulch after beds warm (except on cool-season crops where earlier mulching preserves heat).
- Side-dress with compost or organic amendments when plants show rapid vegetative growth.
Maintaining this sequence—appropriate irrigation, correctly chosen mulch, and nutrient timing synchronized with growth stages—keeps plants productive and soil biology thriving. When implemented correctly, these practices reduce wasteful inputs and support stronger, more resilient crops.
Pest and Disease Management Without Chemicals
Effective pest and disease management begins with disciplined observation and preventive cultural practices; reactive spraying comes last. Start by monitoring regularly, then use cultural and biological controls to keep populations below economic or aesthetic thresholds. Organic-approved sprays are a tool of last resort and must be applied precisely to preserve beneficials and avoid resistance.
Daily/weekly monitoring checklist
- Daily visual sweep: inspect new growth, underside of leaves, and crown for eggs, larvae, or distortion.
- Weekly sticky traps: place yellow or blue sticky cards at canopy level to quantify flying pests.
- Weekly touch-test: gently run a white paper beneath branches and tap to dislodge small insects for identification.
- Record keeping: log pest sightings, weather, and crop stage to spot trends and trigger actions.
- Threshold decision: note the action threshold (e.g., percent defoliation or number of pests per plant) before intervening.
Cultural controls
Cultural controls reduce pest establishment and disease pressure.
Sanitation: Remove infested or diseased plant material immediately and destroy or compost properly to interrupt life cycles.
Spacing: Increase airflow and sunlight by adjusting plant spacing; denser canopies create humid microclimates that favor fungi.
Resistant varieties: Choose varieties with known resistance to local pathogens; sourcing certified organic, disease-resilient seed reduces initial risk.
Crop rotation: Rotate families to break specialist pest/disease cycles and improve soil microbiome balance.
Biological controls and how to attract beneficials
Biological control relies on predators, parasitoids, and microbial antagonists.
- Augmentative releases: release lacewings, predatory mites, or parasitic wasps where outbreaks are localized.
- Habitat enhancement: plant flowering strips (e.g., dill, alyssum, buckwheat) to supply nectar and pollen for adult beneficials.
- Provide refuge: maintain undisturbed ground cover or insect hotels for overwintering beneficials.
- Microbial agents: use
Bacillus thuringiensisfor caterpillars orBeauveria bassianafor some beetles when appropriate.
When and how to use organic-approved sprays safely
Organic sprays should be targeted, timed, and conservative.
- Identify the pest precisely and confirm that the spray is effective against that life stage.
- Apply at low wind, in early morning or late evening to reduce drift and protect pollinators.
- Use the least persistent option first (horticultural oils, insecticidal soaps) and avoid broad-spectrum products that kill natural enemies.
- Rotate modes of action and follow label rates to prevent resistance and phytotoxicity.
- Reassess 3–7 days after application and continue monitoring rather than assuming control is complete.
Sourcing high-quality, disease-resistant organic seeds helps reduce initial vulnerability and pairs well with these methods. Regular monitoring and deliberate cultural choices keep interventions minimal and effective, allowing crops to thrive without routine chemical inputs.
Seasonal Care: Planting Calendar and Maintenance Routines
Start with planting windows keyed to local frost dates and USDA hardiness zone ranges; timing drives success more than exact calendar dates. For temperate climates, tasks cluster into spring prep and planting, active summer maintenance, late-summer succession and pest control, fall harvest and cover-cropping, and winter soil-restoration. Adjust every activity forward or back by your average last-frost/first-frost dates and by one to four weeks across zones (earlier in warmer zones, later in colder ones). The following checklist and timeline make weekly and seasonal workloads predictable.
Seasonal Checklist and Timing (high-level)
- Spring: Soil warming and amendment, seed starting, bed preparation, early transplanting.
- Early Summer: Harden transplants, regular irrigation, mulching, first fertilizer/top-dress.
- Late Summer: Succession planting, increased pest scouting, shade or irrigation adjustments.
- Fall: Harvest, row-cover for cold-sensitive crops, plant garlic/onions, start cover crops.
- Winter/Off-season: Deep soil amendment, tool maintenance, planning and seed ordering.
A seasonal timeline of key tasks and approximate timing for temperate climates
| Season/Month | Primary Tasks | Time Estimate | Notes/Adaptations |
|---|---|---|---|
| Spring (Mar–May) | Start seeds indoors, soil test & amend, transplant hardy crops | 2–6 hours/week (peak) | Shift earlier in zones 8–10; later in zones 3–5 |
| Early Summer (Jun–Jul) | Mulch, water scheduling, pest monitoring, stake/support | 1–3 hours/week | Increase irrigation in hot climates; thin seedlings |
| Late Summer (Aug–Sep) | Succession sowing, disease control, shade for heat | 2–4 hours/week | Plant fall greens 6–8 weeks before first frost |
| Fall (Oct–Nov) | Harvest, clear spent beds, plant cover crops, add compost | 3–6 hours total/season | Use row covers for late crops; plant garlic before ground freezes |
| Winter/Off-season (Dec–Feb) | Soil building, tool repair, seed selection, planning | 1–4 hours/month | Cold-climate beds benefit from heavier compost/top-dress |
Key insight: Scheduling work by season reduces surprises and lets labor be concentrated into predictable peaks while off-seasons focus on soil health and planning.
- Choose your baseline: determine your average last-frost and first-frost dates from local extension or historical records.
- Map each crop to its days-to-maturity and count back from target harvest date to set sow/transplant dates.
- Create weekly blocks: maintenance (watering, pest check), cultural tasks (weeding, pruning), and administrative (seed orders, record-keeping).
- Off-season sequence: test soil → add organic amendments → plant cover crop → rest beds.
Each weekly session usually runs 1–4 hours; seasonal surges (spring planting, fall harvest) demand more concentrated labor. For organic systems, prioritize soil structure and microbial life during off-season so spring planting starts from a stronger foundation. When schedules align with climate patterns, maintenance becomes predictable and yields consistently improve.
📥 Download: Organic Gardening Checklist for Beginners (PDF)
Harvesting, Storage, and Extending Yields Organically
Harvest at peak maturity for best flavor, shelf life, and seed viability. Timing depends on crop physiology: fruits ripen, roots thicken, legumes dry, and leafy greens lose quality if left too long. Post-harvest care begins at harvest — gentle handling, rapid field cooling, and sorting preserve quality and reduce loss. Planning harvest windows and short-term storage buys time to process, sell, or consume produce while succession planting and seed saving extend productivity across the season and into the next year.
When to harvest common crops
Tomatoes: Harvest when color is full and fruit gives slightly to pressure; pick earlier for long transport. Peppers: Harvest at desired color stage; sweet peppers can be picked green or mature red/yellow for higher sugars. Leafy greens: Harvest outer leaves continuously or cut at the crown before bolting begins. Root crops (carrots, beets): Harvest when shoulders reach target diameter; cool soil extends storage life. Legumes (beans, peas): Pick pods when plump and seeds are juvenile for eating; leave to dry on vine for seed. Cucurbits (squash, pumpkins): Harvest summer squash early; winter squash when rind hardens and stem dries.
Short-term and long-term storage methods
- Cold storage: Store most vegetables at
32–40°Fwith high humidity to slow respiration. - Dry storage: Cure winter squash and onions in a warm, dry, ventilated place before cool storage.
- Root cellaring: Use insulated boxes with damp sand or sawdust for carrots and beets to maintain moisture.
- Fermentation: Sauerkraut and fermented pickles extend cabbage and cucumber yields while improving nutrition.
- Freezing and drying: Blanch then freeze vegetables; use low-temperature drying for herbs and tomatoes.
Succession planting to maximize seasonal yield
- Map the season with frost dates and daylength windows.
- Stagger sowing every 7–21 days for fast-maturing crops like lettuce and radish.
- Replace harvested blocks immediately with fall crops or a cover crop to maintain soil health.
- Use fast varieties and transplants to fill gaps created by weather or market demand.
Succession planting keeps harvests steady and reduces pressure on storage systems.
Intro to seed saving: basics and ethics
Isolation: Maintain distance or bag flowers to avoid cross-pollination for open-pollinated varieties.
Drying: Harvest seed when fully mature; dry thoroughly before storage to prevent mold.
Storage: Store seeds in cool, dark, dry conditions; relative humidity <8% preserves viability longer.
Legal/ethical notes: Save seeds only from permitted varieties; respect plant breeders’ rights and local regulations.
> Many small-scale farms reduce input costs and increase resilience by integrating seed saving and staggered harvests.
Using these practices cuts post-harvest loss, smooths market supply, and preserves genetics for future seasons. When implemented thoughtfully, they convert a single season’s success into ongoing productivity and resilience.
Conclusion
If soil that compacts after a rain, yellowing seedlings, or packets of seeds that never sprout have made you second‑guess gardening, the path forward is straightforward: focus on building living soil, start seeds with care, and adopt gentle pest controls. During planning and seed-starting stages, test and amend your soil with compost and aeration, choose high‑quality organic seed varieties, and keep seedlings in stable moisture and light—these steps address the three most common failure modes for beginner gardeners and demonstrate practical organic gardening techniques that produce reliable results. The article’s examples—seedlings rescued by a switch to a peat-free mix and a backyard bed that recovered after summer mulching—show how small, targeted changes yield measurable improvement.
Next actions: perform a basic soil test, prepare seed trays with sterile, nutrient-rich mix, and set a watering and mulching routine to stabilize moisture and suppress weeds. If pest or disease questions remain—are aphids because of overfertilizing or lack of predators?—start by adjusting fertility and encouraging beneficial insects before resorting to treatments. For sourcing dependable, organic seeds that align with these organic gardening methods, consult SeedConnect’s catalog for varieties suited to your climate and skill level. Take those three moves this weekend and the first healthy harvest will follow.