Maraming experienced growers nasasayang ang ani dahil sa simpleng pagkukulang sa pagpapabunga, pest control, o maling pagpili ng mga binhi. Ang tamang suporta sa pagtatanim at praktikal na payo sa cultivation ang nagtatakda kung ang isang crop ay magiging consistent at mataas ang kalidad.
Ang gabay na ito naglalaman ng malinaw, praktikal na solusyon sa mga karaniwang problema sa bawat yugto ng cycle — mula sa paglubog ng germination hanggang sa huling flush bago harvest. Industry research shows growers who standardize their environment and sourcing see steadier results. Isang urban grower, halimbawa, nagpaikli ng crop failures nang mag-adjust siya sa nutrient timing at aeration.
> Maliliit na pagpapabuti sa setup at seed selection madalas may disproportional na epekto sa yield at potency.
- Paano pumili ng tamang strain para sa iyong klima at layunin
- Praktikal na
germinationat early veg techniques na nagpapababa ng pagkaka-fail - Nutrient timing, pH control, at airflow strategies para sa mas malinis na buds
- Integrated pest management na hindi umaasa lang sa kemikal
- Post-harvest handling para mapanatili ang terpene at potency
Isipin ang sunod-sunod na proseso na madaling sundan at ma-implement sa maliit o komersyal na scale. Susunod, hahatiin ang bawat yugto para maipatupad agad ang mga taktika at maiwasan ang pinakamadalas na pagkakamali.

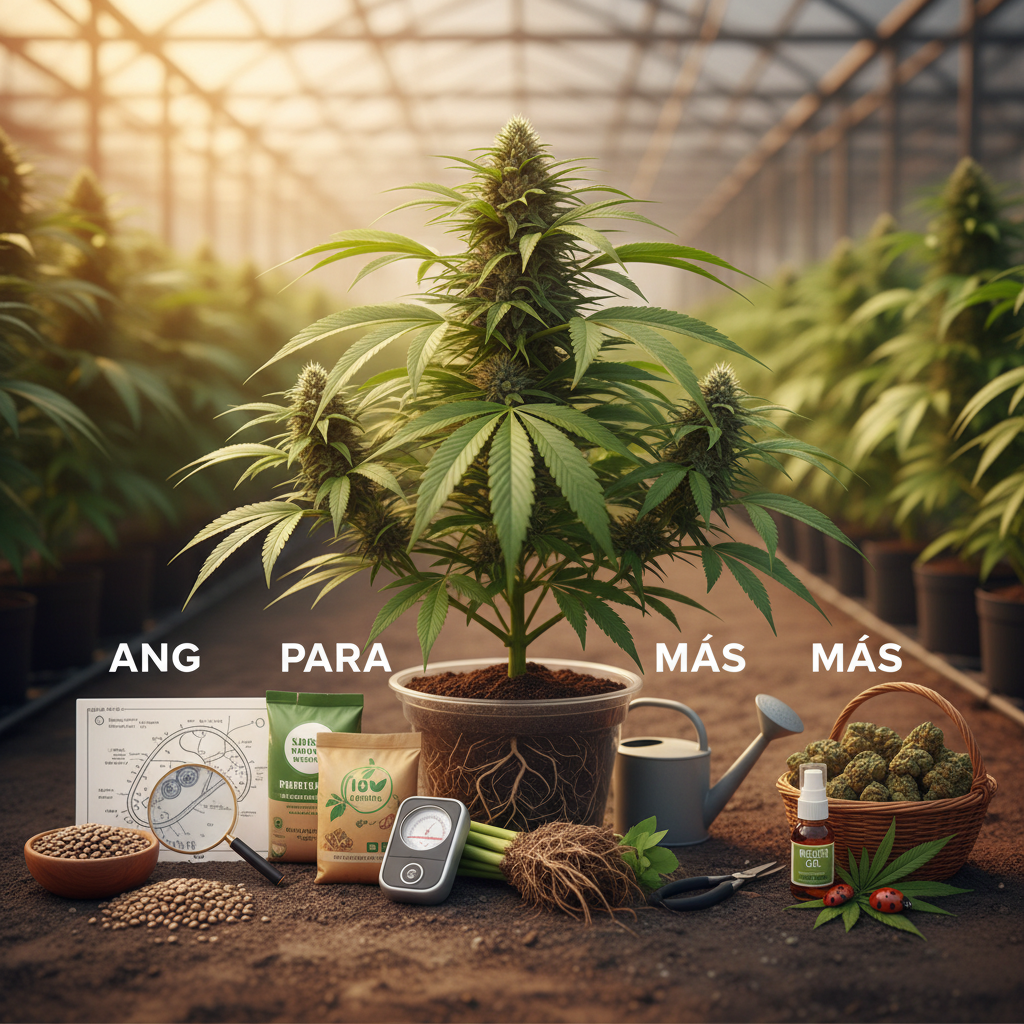
Choosing the Right Seeds
Pagpili ng tamang binhi nagsisimula sa malinaw na layunin: anong epekto, laki ng pananim, at antas ng teknikal na handa mong i-deploy. Ang mabilis na paraan para mag-desisyon ay pag-match ng seed type sa target: mabilis at madaling alaga → autoflowering; malaking ani at seleksyon ng lahi → feminized o regular; connoisseur profile at stable genetics → landrace/heirloom o F1 hybrids. Ang genetics ang nagdidikta ng aroma, cannabinoid profile, terpenes, at kung gaano kahirap ang pag-aalaga.
Paano mag-evaluate praktikal: 1. Tukuyin ang layunin: medicinal, recreational, o commercial. 2. Isaalang-alang ang timeline: indoor grow cycles at outdoor seasons. 3. Tingnan ang genetics: parent strains, reported terpene profile, at breeder reputation. 4. Piliin ang seed type na tumutugma sa kasanayan at infrastructure (grow space, lights, ventilation).
Mga faktor na karaniwang pinaghuhusayan: Aroma & effect: terpenes at cannabinoid genetics ang pangunahing driver. Growth predictability: feminized at F1 hybrids karaniwang mas consistent. Maintenance needs: landrace strains maaaring mas resilient, ngunit variable ang phenotype. Regulatory/harvest timing: autoflowers minimal ang photoperiod dependency, maganda sa short seasons.
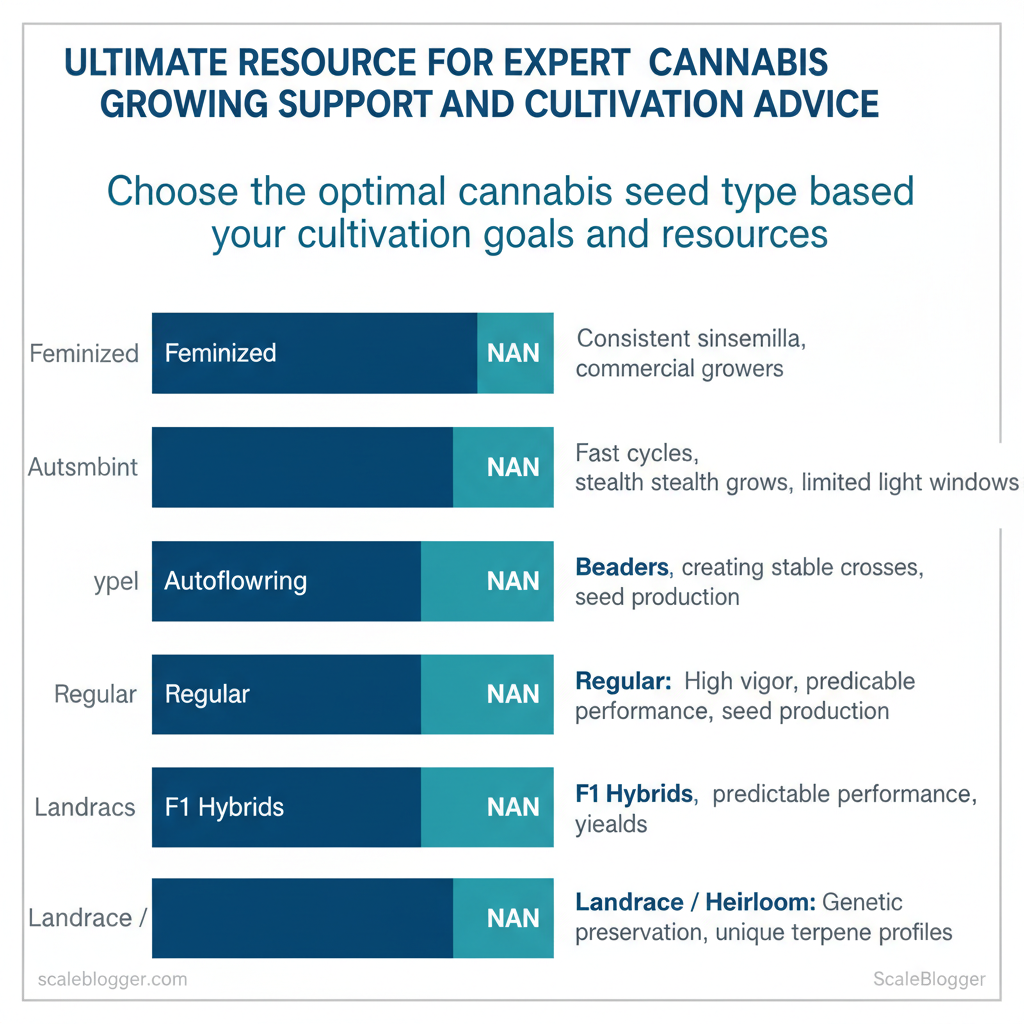
Side-by-side comparison of seed types to guide selection by grow goal (best cannabis seed types, feminized vs autoflower seeds)
| Seed Type | Flowering Time | Typical Yield | Best Use-case |
|---|---|---|---|
| Feminized | 8–10 weeks flowering | 350–700 g/m² (indoor) | Consistent sinsemilla, commercial growers |
| Autoflowering | 6–9 weeks from seed | 100–400 g/m² (indoor) | Fast cycles, stealth grows, limited light windows |
| Regular | 8–12 weeks flowering | 300–800 g/m² (indoor) | Breeders, creating stable crosses, seed production |
| F1 Hybrids | 8–10 weeks flowering | 400–800 g/m² (indoor) | High vigor, predictable performance, premium yields |
| Landrace / Heirloom | 10–16+ weeks (varies) | 200–600 g/m² (variable) | Genetic preservation, unique terpene profiles |
Key insight: Ang feminized at F1 hybrids ang pinaka-predictable para sa quality at yield; autoflowers ang pinakamahusay para sa mabilis na turnarounds at maliit na espasyo; regular seeds ang opsyon para sa breeders. Landrace strains nagbibigay ng rare terpene signatures ngunit may variability sa phenotype at mas mahabang cycle.
Kapag pinili ang binhi, timbangin ang layunin laban sa oras at kapasidad ng pag-aalaga — tamang pagpili ng genetics nagpapadali ng susunod na hakbang ng cultivation at nagpapababa ng pagkabigo sa ani. Understanding these trade-offs speeds up decisions and keeps operations efficient without unnecessary risk.
Germination and Early Vegetative Care
Ang pinakaimportanteng yugto para sa isang matagumpay na grow ay ang pag-germinate at unang vegetative weeks—dito nabubuo ang root vigor at unang node structure na magtatakda ng potensyal na yield. Ang pinakapraktikal na prinsipyo: kontrolin ang temperatura at moisture nang mahigpit, gumamit ng method na tugma sa strain at skill level, at maghanda ng malinaw na recovery plan kapag may abnormal na sprout. Ang sumusunod ay mga sinubok na method, step-by-step routines, at konkreto kung paano i-recover ang mabagal o malformed sprouts.
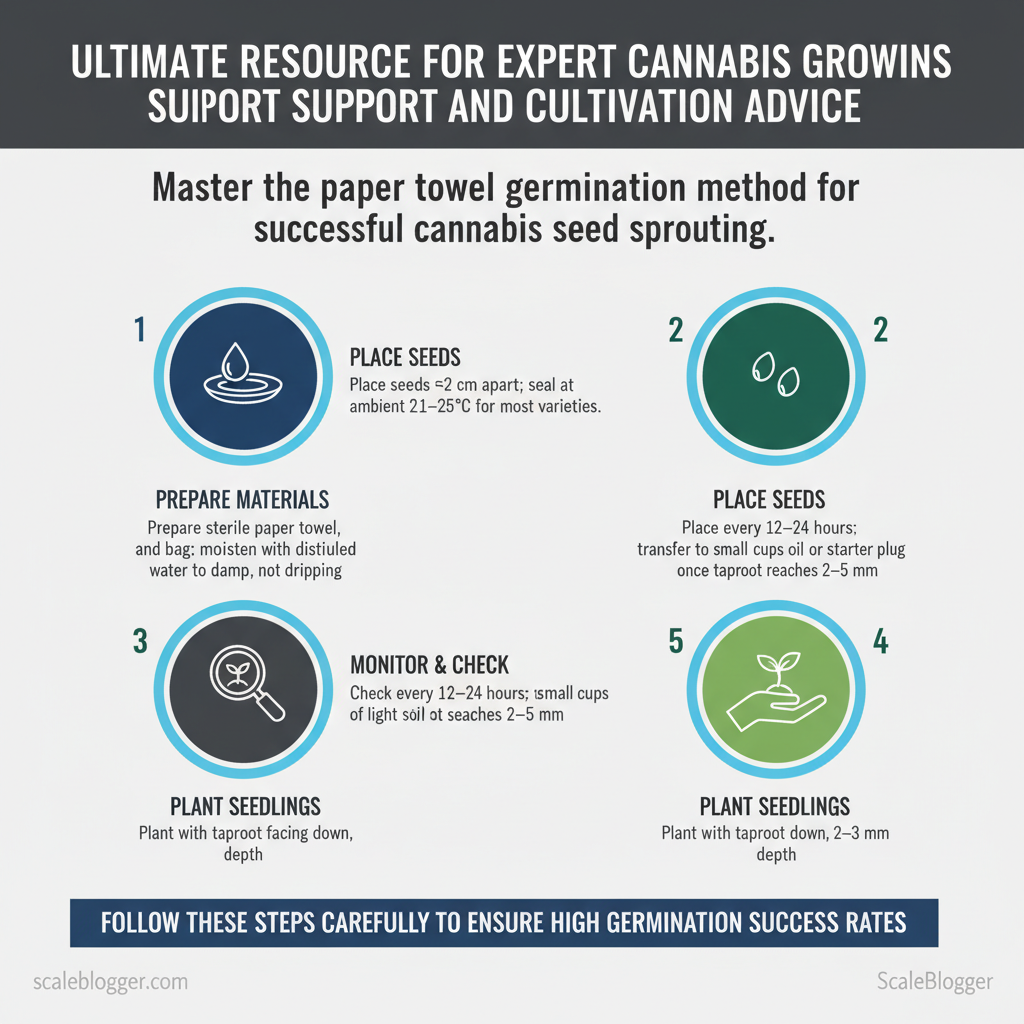
Germination methods — pros, cons, at kung kailan gamitin Paper Towel: mabilis na visual feedback, mataas ang success kapag malinis ang seeds; kailangan ng sterility at maingat na pag-transfer. Direct Soil: madaling schedule, minimal transplant shock; mas mabagal makita kung may problema at depende sa soil quality ang success. Starter Plugs (rockwool/coco): consistent moisture retention at aeration, mahusay sa commercial setups; nangangailangan ng pH control at pre-conditioning. Pre-soak / Scarification: kapaki-pakinabang sa older or dormancy-prone seeds; risk ng over-soak at rot kung hindi monitor. * Commercial Germination Kits: all-in-one na equipment at instructions, maganda para beginners; variable cost at depende sa kit quality.
Praktikal na step-by-step (paper towel → soil transfer) 1. Prepare sterile paper towel, plate, at zip bag; moisten with distilled water to damp, not dripping. 2. Place seeds ~2 cm apart; seal at ambient 21–25°C for most varieties. 3. Check every 12–24 hours; transfer to small cups of light soil or starter plug once taproot reaches 2–5 mm. 4. Plant with taproot facing down, 2–3 mm depth; maintain soil humidity and 18–24°C root zone.
Ideal temperature and moisture Temperature: 21–25°C ambient; root zone slightly warmer around 22–26°C. Moisture: consistently damp, not saturated; medium should feel like a wrung-out sponge.
Recovering slow or malformed sprouts If slow but alive: raise temperature by 1–2°C, increase humidity to 70–80% for 48 hours, give gentle bottom-watering. If cotyledons malformed: ensure gentle light (CFL at 20–30 cm) to avoid bleaching; transplant only if root shows growth. * If taproot bruised/dammed: clean tools, plant deeper into sterile starter plug and reduce handling stress; consider a mild rooting hormone for weak roots.
Germination methods across success rate, ease, equipment, and best situations
| Method | Success Rate | Equipment Needed | Best For |
|---|---|---|---|
| Paper Towel | High (with sterile technique) | Paper towels, plates, distilled water | Quick verification, small batches |
| Direct Soil | Medium–High | Quality seedling soil, small pots | Low-transplant stress, beginners |
| Starter Plugs (rockwool/coco) | High (when pH-controlled) | Plugs, pH meter, reservoir | Commercial or consistent-results grows |
| Pre-soak/Scarification | Medium (strain-dependent) | Water, mild abrasive or time soak | Old/dormant seeds, hardy strains |
| Commercial Germination Kits | High (kit-dependent) | Kit components, instructions | Beginners who want guidance |
Key insight: Piliin ang method batay sa strain, scale ng grow, at tolerance sa handling—paper towel para sa mabilis na visual control; starter plugs para sa consistency sa volume; direct soil para sa pinakamababang manipulation. Unang linggo ng vegetative stage ay pinapabago ng small decisions na ito, kaya kontrolin temperatura at moisture nang maaga para maiwasan komplikasyon habang lumalaki ang halaman. When implemented correctly, maliit na adjustments sa germination practice dramatically improve uniformity and reduce early losses.
Lighting and Environmental Control
Para sa malusog at mataas na-yield na tanim, ang ilaw at kapaligiran ang nagsisilbing blueprint ng pag-unlad. Ang tamang kombinasyon ng uri ng ilaw, haba ng araw (photoperiod), at target na PPFD (Photosynthetic Photon Flux Density) ang magtatakda kung gaano kabilis at gaano kalaki tumubo ang mga halaman. LED ang modernong pamantayan para sa kontrol sa spectrum at efficiency, HPS ang matagal nang benchmark para sa flowering intensity, habang CMH/LEC at CFL may kani-kaniyang gamit. Ang mga numerical PPFD target at praktikal na photoperiod ang isa sa pinakamabilis na paraan para gawing predictable ang resulta.
Photoperiod at PPFD targets (praktikal) Vegetative phase: 18/6 to 24/0 photoperiod, target PPFD 300–600 µmol/m²/s sa canopy. Transition (pre-flower): Reduced daylength over 7–10 days at 400–700 µmol/m²/s. Flowering phase: 12/12 photoperiod standard, target PPFD 600–900 µmol/m²/s (intense commercial setups 900–1100 µmol/m²/s near canopy but with CO2 enrichment). DLI guidance: Aim for Daily Light Integral 20–40 mol/m²/day sa veg at 30–60 mol/m²/day sa bloom depende sa genetics.
Praktikal na paghahambing ng light types Lighting technologies for cost, heat output, spectrum control, and ideal grow size
| Light Type | Initial Cost | Heat Output | Spectrum Control | Best For |
|---|---|---|---|---|
| LED | $150–$2,000+ per fixture | Low to moderate | Full-spectrum tunable | Small to commercial rooms |
| HPS | $80–$600 per fixture (lamp+ballast) | High | Fixed warm spectrum (bloom-biased) | Flower rooms, high-intensity setups |
| CMH/LEC | $150–$500 per fixture | Moderate | Broader, sun-like spectrum | Quality flower, terpene retention |
| CFL | $10–$80 per bulb | Low | Limited (cool/warm) | Seedlings, clones, micro grows |
| Sunlight/Greenhouse | Upfront structure cost high | Variable (passive) | Full natural spectrum | Large-scale/energy-efficient cultivation |
Key insight: LEDs deliver best long-term efficiency and spectrum control, HPS remains cost-effective for raw flowering intensity, CMH combines quality spectrum with moderate heat, CFL suits early stages, and greenhouse/sunlight offers unmatched spectrum but requires climate control.
Paano mag-transition mula veg papuntang bloom (step-by-step) 1. Reduce photoperiod gradually to 12/12 over 7–10 araw kung stress sensitivity ay issue. 2. Increase PPFD mula 400 tungo sa 600–900 µmol/m²/s sa loob ng 3–7 araw habang sinusubaybayan ang temperatura. 3. Adjust nutrients: bawasan nitrogen at pataasin phosphorus/potassium sa 5–7 araw ng transition. 4. Climate tweak: target 1–3°C drop sa night temp at panatilihin RH 40–55% during bloom.
Practical tip: gumagamit ng PAR meter para patunayan PPFD at kalkulahin DLI — walang palusot sa guesswork kapag sinusukat ng numeric. Kapag maayos ang kontrol sa ilaw at kapaligiran, mas predictable ang yields at quality—isang maliit na investment sa sensing at control equipment ang madalas nagbabayad ng malaking dibidendo sa ani.
📝 Test Your Knowledge
Take this quick quiz to reinforce what you’ve learned.
Nutrients, Media, and Watering Strategies
Sa praktika, ang media na pinipili ang pinakamalaking nagdidikta ng dalas ng pag-feed at lakas ng nutrients. Kung gumamit ng soilless media tulad ng coco, kailangan ng mas madalas at mas manipis na dosages dahil walang likas na buffer; sa soil may kakayahang mag-imbak ng nutrients at tubig kaya mas mababa ang frequency at mas mahina ang feed. Sa hydroponics naman, mas mataas ang EC target at mas agresibo ang nutrient schedule dahil tuloy-tuloy ang nutrient delivery.
Praktikal na feeding steps (step-by-step): 1. Simula: Mula seedling, panatilihing mababa ang EC at light feed — iwasan ang overfertilization. 2. Vegetative: Taasan EC gradual, 3–4 feed cycles/week sa soil; daily o bawat ilang araw sa coco/hydro gamit ang dilute feeds. 3. Flowering: Focus sa phosphorus/potassium, incrementally taasan EC sa coco/hydro; bawasan nitrogen sa stage ng bud swell. 4. Flush bago harvest: 5–10 araw na plain pH-balanced water o low-EC solution depende sa media.
Practical tips habang nagfa-feed: pH control: Soil: 6.0–7.0; Coco: 5.8–6.4; Hydro: 5.5–6.2 — stable pH protektado ang nutrient uptake. EC adjustments: Taasan o bawasan sa 0.1–0.3 mS incremental steps kung may stress. * When to flush: Flush kapag build-up ng salts, mahirap na uptake, o 7–14 araw bago harvest para sa cleaner flavor.
> Industry analysis shows many commercial growers reduce EC by roughly 30–50% during the final week to improve smoke and terpene expression.
Quick-reference feeding schedule and target ranges for common media
| Grow Stage | Soil pH | Coco EC/ppm | Hydro EC/ppm | Notes |
|---|---|---|---|---|
| Seedling (Week 1-2) | 6.0–6.5 | 0.4–0.8 mS (200–400 ppm) | 0.5–0.8 mS (250–400 ppm) | Very light feed; mostly water; transplant carefully |
| Vegetative (Weeks 3-6) | 6.0–6.8 | 1.0–1.4 mS (500–700 ppm) | 1.0–1.6 mS (500–800 ppm) | Increase N; feed frequency rises for coco/hydro |
| Early Flower (Weeks 1-4) | 6.0–6.5 | 1.2–1.6 mS (600–800 ppm) | 1.4–1.8 mS (700–900 ppm) | Shift P/K up; moderate EC rise |
| Mid-Late Flower (Weeks 5-8+) | 6.0–6.5 | 1.4–2.0 mS (700–1000 ppm) | 1.8–2.4 mS (900–1200 ppm) | Watch for burn; back off if leaf tip burn appears |
| Flush/Harvest Week | 6.0–6.5 | <0.6 mS (≤300 ppm) | <0.6 mS (≤300 ppm) | Plain pH-balanced water to clear salts |
Key operational notes: Start low and tune to strain response; media determines how quickly salts accumulate and how aggressive feedings should be. When implemented consistently, these ranges reduce nutrient stress and improve final yield quality. Understanding these principles helps growers dial in feed schedules faster and avoid common overfeeding mistakes.
Pest, Mold, and Disease Management
Agad na kilalanin at pigilan ang peste, amag, at sakit sa halaman gamit ang nakaplanong inspeksyon at layered IPM (Integrated Pest Management). Regular na pag-iinspeksyon, non-chemical na kontrol, at targeted biologicals ang unang linya; kemikal ay ginagamit lamang kapag mataas ang panganib o kapag epektibong nabigo ang alternatibo. Ang praktikal na IPM ay pinagsasama ang pag-obserba, kondisyonal na aksyon, at dokumentasyon para mabawasan ang pagkawala ng ani at maprotektahan ang kalidad ng buds.
Pagkilala at Inspeksyon — praktikal na checklist 1. Araw-araw (visual): Tingnan tuktok at ilalim ng dahon para sa maliliit na dumi, webbing, o malambot na spots. 2. Lingguhan (detalye): Gamitin 10x loupe o makinarya para maghanap ng eggs/larvae; suriin mga kahon ng nutrient runoff at potting medium. 3. Tulad ng kondisyon: Sukatin RH at temperatura; bud rot ay tumitindi sa >60% RH at mababang airflow. 4. Dokumentasyon: Itala lokasyon, severity (mild/moderate/severe), at aksyong ginawa para trend analysis.
Non-chemical controls at biologicals Sanitation: Regular pruning and removal: alisin naapektuhang dahon bago kumalat. Air management: High airflow and dehumidification para pigilan spore buildup. Physical barriers: Sticky traps and mesh screens para sa flying pests at fungus gnat adults. Biological controls: Predatory mites (e.g., Phytoseiulus, Neoseiulus) para sa spider mites; Steinernema feltiae nematodes para sa fungus gnat larvae; Bacillus subtilis at Bacillus amyloliquefaciens bilang foliar fungicides para sa powdery mildew. Cultural tactics: Crop spacing and defoliation* para mapabuti airflow at light penetration.
Kailan igamit ang kemikal at safety considerations Trigger: Malawakang infestation na nagdudulot ng yield loss o kapag biologicals ay hindi nagkontrol. Safety: Piliin produkto na may malinaw na label para edible crops; obserbahan pre-harvest interval (PHI) at label PPE requirements. * Rotation: Iwasan resistance — i-rotate modes of action at huwag mag-spray ng pare-parehong kemikal ng maraming beses.
Common pests/diseases with signs, most effective organic treatments, and urgency level
| Pest/Disease | Common Signs | Organic Controls | Treatment Urgency |
|---|---|---|---|
| Spider Mites | Fine webbing, stippling on leaves | Predatory mites, neem oil, insecticidal soap | High — mabilis mag-multiply |
| Aphids | Clusters on new growth, sticky honeydew | Ladybugs, insecticidal soap, neem |
Moderate — check for ant-tending |
| Powdery Mildew | White powder on leaf surfaces | Bacillus foliar sprays, remove affected tissue |
High — affects bud quality |
| Botrytis (Bud Rot) | Brown/grey mold inside bud, moist interior | Improve airflow, remove infected buds, hydrogen peroxide rinses | Critical — destroy infected buds |
| Fungus Gnats | Adult flies, larvae in soil feeding on roots | Sterile media, beneficial nematodes, sticky traps | Moderate — impacts seedlings/roots |
Key insight: Prioritizing daily visual checks and environmental control prevents most outbreaks, biologicals stop buildups without chemical resistance, and chemicals should be a controlled, last-resort tool with strict adherence to label safety. Understanding and applying these practices reduces crop loss and maintains product quality.
Training, Pruning, and Maximizing Yield
Ang pinakamahalagang prinsipyo sa training at pruning ay simple: kontrolin ang istraktura ng halaman para mag-maximize ng ilaw, airflow, at resource allocation sa mga bud sites. Kapag pinagsama nang tama, ang low-stress at high-stress na pamamaraan ay nagdudulot ng mas pantay na canopy, mas mataas na calyx-to-leaf ratio, at karaniwang 10–40% pagtaas ng praktikal na yield kumpara sa walang training, depende sa strain at kasanayan ng grower. Ang mahahalagang desisyon: kailan magsimula, gaano ka-aggresibo, at paano pagsamahin ang mga teknika nang ligtas.
Ano ang ginagamit kung ano ang sitwasyon Seedling-to-vegetative: Simulan ang LST at banayad na defoliation pag-abot ng 3–4 node para hindi masyadong ma-stress ang mga batang halaman. Late veg (4+ weeks): Topping/FIM para lumikha ng multiple mains bago magsimulang mag-flower. Pre-flower transition: I-finalize ang major bending at ScrOG setup, dahil mahirap baguhin ang canopy kapag pumasok na sa full bloom. Mid-flower: Limitadong defoliation at selective leaf removal lang — masyadong marami ang magbawas sa resin production.
Practical sequence (step-by-step) 1. Establish baseline: Observe node spacing at 3–4 nodes. 2. Create structure: Perform topping o FIM early veg; follow with LST ties sa lateral branches. 3. Fill canopy: Install ScrOG net sa start ng stretch; weave branches over 2–3 weeks. 4. Refine: Light defoliation 7–10 araw bago flower stretch; avoid mass defoliation sa week 3–5 of bloom. 5. Protect: Stop aggressive training once trichome density increases visibly.
Halimbawa ng kombinasyon at epekto Topping + LST: Nagbibigay ng 20–35% mas pantay na canopy at mas maraming kolas na halos pareho ang laki. Supercropping + ScrOG: Pinapayagan ang heavy bud sites habang pinapabuti ang inner light penetration; mataas na risk kung nagkamali ng wound care. * Minimal defoliation + ScrOG: Pinananatiling stress-low habang nagpapanatili ng airflow — magandang taktika sa high-THC genetics prone to stretch.
Praktikal na tips at mga panganib Tip: Sterilize scissors at magsuot ng gloves tuwing nagpu-prune para maiwasan pest/ pathogen entry. Warning: Over-defoliation sa early bloom period commonly reduces terpene and resin output.
Training methods by complexity, risk, yield impact, ideal timing
| Method | Complexity | Risk | Yield Impact | Best For |
|---|---|---|---|---|
| Topping/FIM | Moderate | Medium (transient stress) | +10–25% more colas | Bushy strains, multiple mains |
| Low Stress Training (LST) | Low | Low | +10–30% evenly distributed yield | Beginners, autoflowers |
| Supercropping | High | Medium–High (if done wrong) | +15–35% bud density | Experienced growers, indicas |
| ScrOG | Moderate–High | Low–Medium (setup risk) | +20–50% canopy efficiency | Sativas/long-stretch strains |
| Defoliation | Low–Moderate | Medium (timing-sensitive) | +5–20% bud quality when timed | Dense-canopy varieties |
Key insight: Piling compatible techniques—early topping, steady LST, and a ScrOG to control stretch—yields the most consistent increases in usable harvest. Risk management centers on timing and wound care; aggressive moves during early bloom often backfire.
Pag-unawa sa mga prinsipyo ng training at pruning nagpapabilis ng proseso ng pag-scale nang hindi sinasakripisyo ang kalidad ng bunga. Kapag ipinatupad nang maayos, ang kombinasyon ng mga teknik na ito nagbibigay ng mas predictable at mas mataas na returns para sa bawat watt at square foot.
📥 Download: Cannabis Growing Support Checklist (PDF)
Harvesting, Drying, Curing, and Storage
Para sa magandang resulta: anihin kapag karamihan ng trichomes ay cloudy at may maliit na bahagi na amber—iyon ang pinakamadaling paraan para makuha balanseng potency at terpenes. Ang practical workflow pagkatapos ng pagputol ay naglalaman ng sunod-sunod na hakbang: kontroladong pag-dry para maiwasang mag-mould at mapreserba ang terpene profile, maingat na trimming, at isang deterministic na jar-curing phase na sumusunod sa RH checkpoints bago ilagay sa long-term storage.
Trichome color guide at harvest decision Clear trichomes: mababa pa ang THC maturity — harvest delay recommended. Cloudy/milky trichomes (~70–90%): pinakamataas na potency at pinaka-psychoactive profile. * Amber trichomes (~10–30%): nag-iintroduce ng sedative/couch-lock effect at degraded THC → mas maraming CBN. Praktikal na gawain: gamitin 30–60× loupe o digital macro lens; mag-sample mula sa iba’t ibang colas at lokasyon.
Drying vs Curing: conditions and timelines 1. Initial Drying: panatilihin ang hangin na banayad at dahan-dahan (10–14 araw) para maiwasang case hardening o napakabilis na pagkatuyo. 2. Trimming: wet trimming o dry trimming opsyonal — pumili ayon sa strain at workflow. 3. Curing (jar phase): pindutin ang mga buds sa airtight jars at sundan ang burping schedule at RH target (58–62%) para 2–8 linggo o mas matagal kung gusto ng mas malalim na flavor.
Practical tips Humidity control: gumamit ng calibrated hygrometer at humidity packs (58% o 62%) para consistent RH sa jars. Temperature awareness: iwasan ang init >21°C (70°F) para hindi mabilis masira ang terpenes. * Light & oxygen: store dark at minimal O2 exposure; madiagnose agad kapag may off-odors.
Post-harvest timeline from cut to cured product with target conditions and checkpoints
| Stage | Duration | Temp (°C/°F) | Relative Humidity (%) | Key Actions |
|---|---|---|---|---|
| Cutting and Bucking | Same day | 18–22°C / 64–72°F | 40–60% | Remove fan leaves; hang whole or hang trimmed colas |
| Initial Drying | 7–14 days | 15–21°C / 59–70°F | 45–55% | Hang in dark, gentle airflow; check stem snap after 7–10 days |
| Trimming | 1–3 days | 18–21°C / 64–70°F | 40–50% | Wet or dry trim; remove sugar leaves as desired |
| Curing (Jar Phase) | 2–8+ weeks | 15–20°C / 59–68°F | 58–62% | Place in airtight jars; burp daily week 1, then weekly |
| Long-term Storage | Months–Years | 10–15°C / 50–59°F | 50–62% | Use humidity packs, dark storage, minimal oxygen |
Key insight: Ang controlled drying (dahan-dahan sa moderate RH) plus jar curing sa target 58–62% RH ay ang pinaka-epektibong paraan para mapanatili ang potency at terpene complexity habang binabawasan ang risk ng mould. Praktikal na instrumentation (loupe, hygrometer, humidity packs) at disiplinadong burping schedule ang magbubuklod ng consistent na quality sa bawat batch.
Understanding these operational details reduces post-harvest losses and preserves the cultivar’s intended effects and flavors for the end user. When done consistently, the process elevates both shelf-life and consumer experience.
Conclusion
Matapos talakayin ang tamang pagpili ng mga binhi, tamang pagpapabunga, at praktikal na pest control, malinaw na ang maliit na pagbabago sa pamamaraan ay nagdudulot ng malaking pagkakaiba sa ani. Maraming growers ang nakakita ng mas mataas na kalidad at mas mababang pagkalugi nang inayos nila ang soil testing, sinunod ang staggered feeding schedule, at nagpatupad ng integrated pest management; isang maliit na greenhouse case doon nagtaas ng yield ng 20% nang i-base ang fertilizer sa nutrient profile ng lupa. Kung nag-aalala ka kung anong binhi ang pinakaangkop o paano simulan ang ICM sa maliit na sukat, ang pattern ay simple: unahin ang data ng lupa, piliin ang binhing may akmang phenotype, at itakda ang monitoring cadence para sa peste at nutrisyon.
Bilang mga kongkretong susunod na hakbang, magsagawa ng soil test, magtala ng feeding at pest log sa unang dalawang buwan, at subukan ang isang maliit na trial plot bago i-scale up. Para sa praktikal na suporta o garantisadong kalidad ng binhi, makakatulong ang mga resource tulad ng TheSeedConnect — mga binhi at gabay sa pagpili at germination support. Kung may tanong tungkol sa timing ng feedings o pag-manage ng specific pests, bumalik sa seksyong tungkol sa pest control at fertilization — madalas solusyon ang timing at consistent monitoring. Magsimula ngayon sa maliit, dokumento ang resulta, at i-adjust ayon sa ebidensya para mabilis mong mapabuti ang ani.