
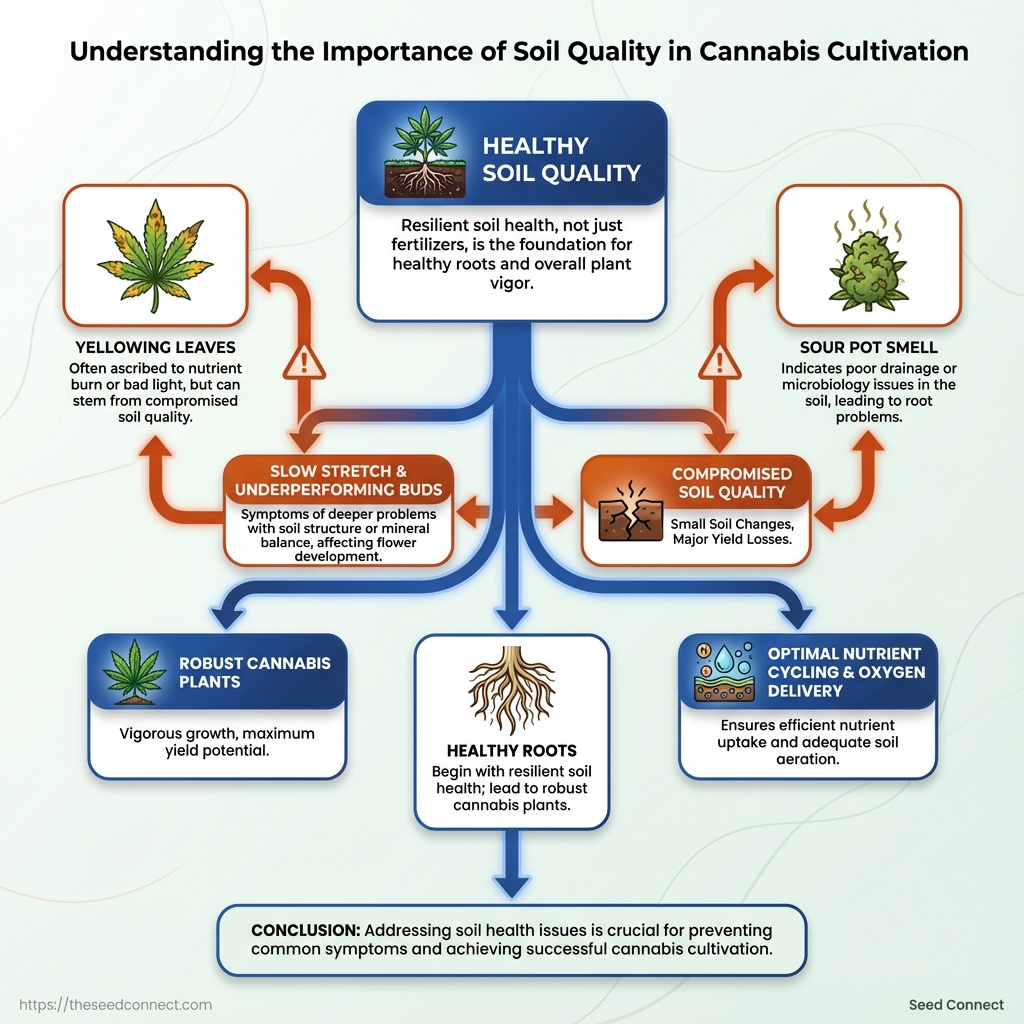
Most growers assume a nutrient burn or bad light when plants yellow, but the real culprit often hides below the surface: compromised soil quality that starves roots before leaves show it. Smelling a sour pot, seeing slow stretch, or watching buds underperform are classic moments when attention to the surface hides a deeper problem with drainage, microbiology, or mineral balance.
Healthy roots begin with resilient soil health, not just the right fertilizers, and small changes in texture or pH can cascade into major yield losses. Understanding how cannabis soil nutrients cycle, how structure affects oxygen and water delivery, and when to intervene separates hobbyist tweaks from reliable, repeatable harvests. []
What Is Soil Quality for Cannabis?
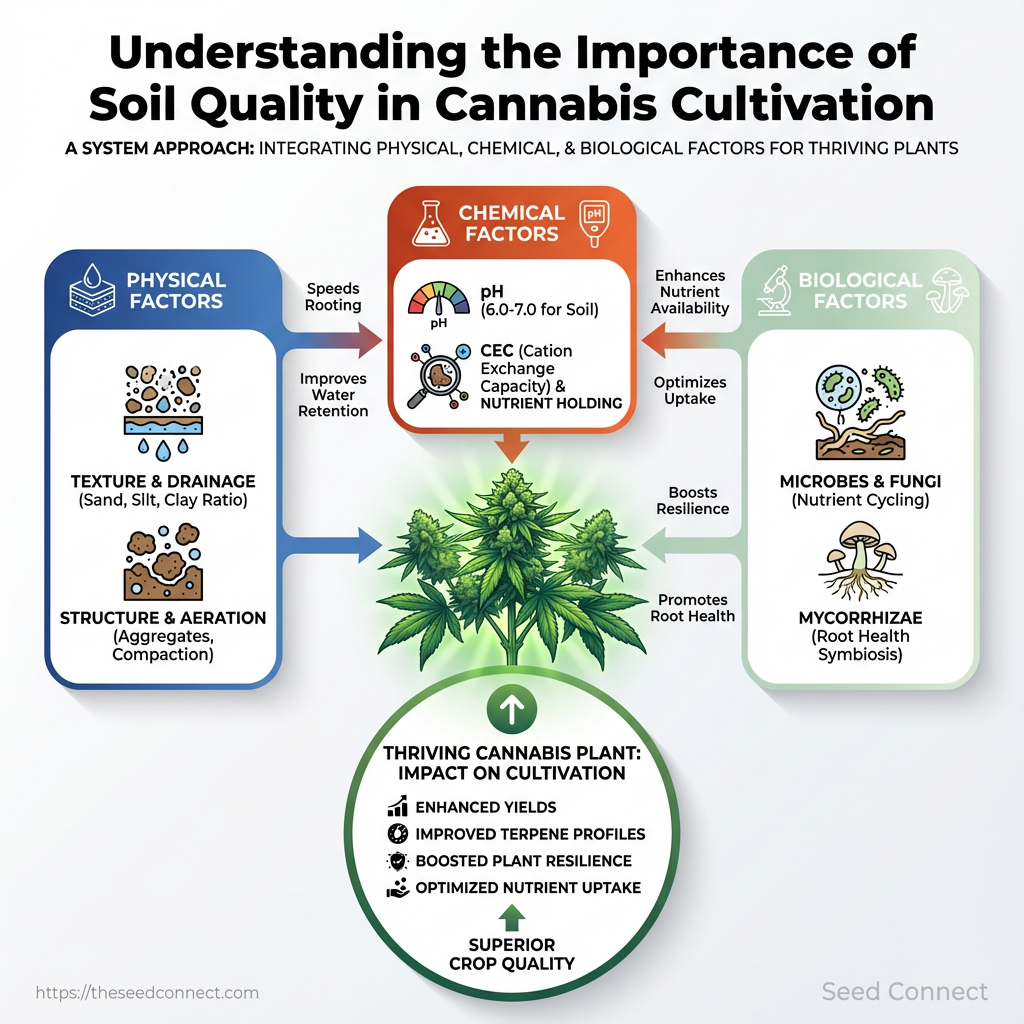
Soil quality is the combination of physical, chemical and biological conditions that let a plant grow, take up nutrients and shrug off stress. For cannabis, good soil is both the pantry and the lungs: it stores and delivers nutrients while giving roots enough air and structure to explore. Healthy soil speeds rooting, improves nutrient uptake and boosts resilience to pests, drought or heat—so small soil gains show up as bigger yields and cleaner terpene profiles.
Physical factors Texture: Ratio of sand, silt and clay determines drainage and water-holding.
Structure: Aggregate stability and compaction control root penetration and aeration.
Chemical factors pH: Affects nutrient availability; cannabis prefers slightly acidic soils.
CEC (Cation Exchange Capacity): Soil’s ability to hold and exchange nutrients with roots.
Biological factors Soil biology: Microbes, fungi and mycorrhizae that cycle nutrients and support root health.
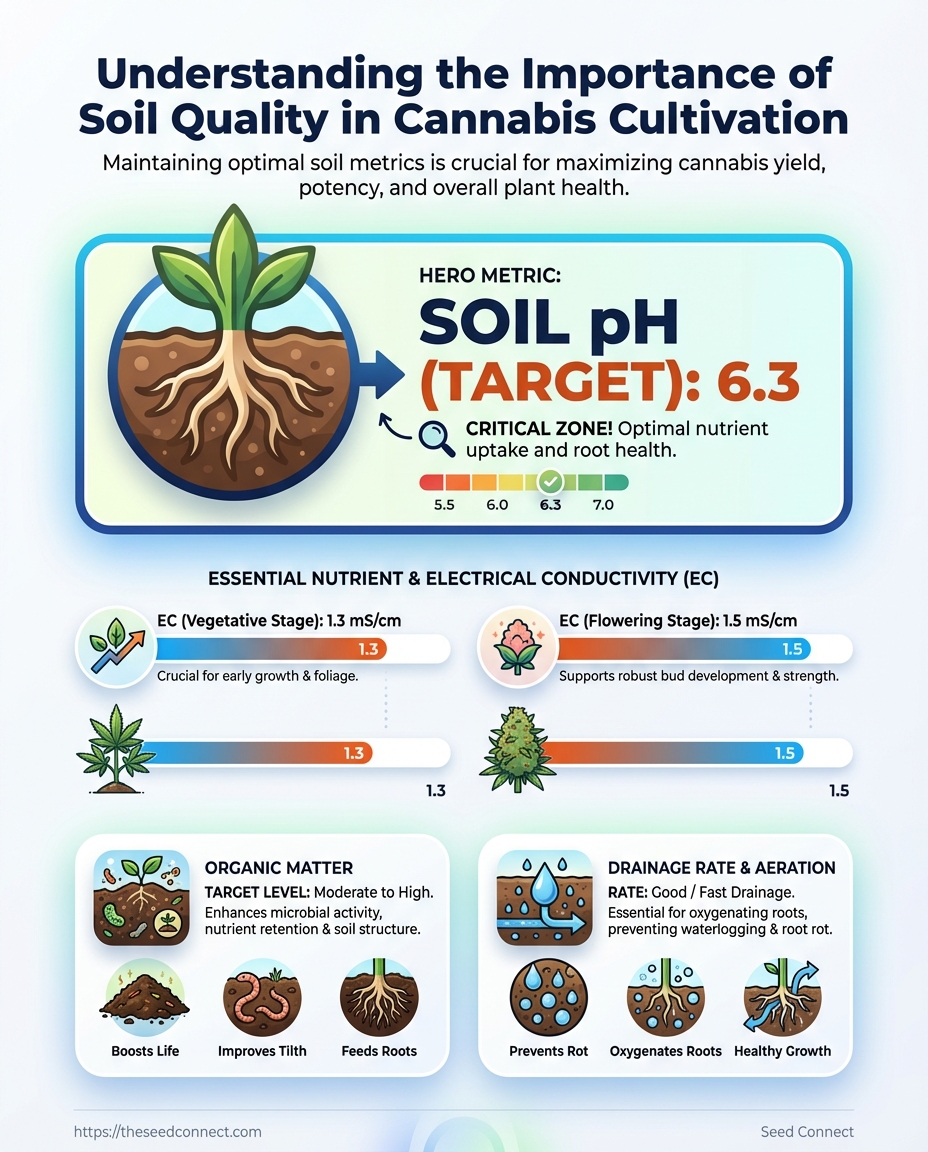
Practical soil metrics growers should track:
Target pH: Aim for 6.0–7.0 in soil. For soilless mixes like coco, 5.5–6.5; for hydroponics, 5.5–6.0. pH out of range locks out nutrients. EC/PPM ranges: Vegetative stage: EC 0.8–1.4 mS/cm (approx. 400–700 ppm depending on ppm scale). Flowering stage: EC 1.2–2.0 mS/cm (approx. 600–1000 ppm). Adjust gradually when transitioning stages to avoid nutrient shock. Organic matter: Aim for 3–8% organic matter in outdoor garden soils; potting mixes often contain higher percentages of composted organics. Organic matter improves water retention, CEC and food for microbes. Drainage rate: Good soil drains freely but retains moisture between waterings; test with a simple percolation check after watering. * Bulk density: Lower is better for root growth; compacted soils restrict root expansion.
Common tests and checks: soil pH meter, EC/ppm meter, simple squeeze test for texture, lab organic matter test or home loss-on-ignition kits, and a biological activity check (earthworms, root vigor).
Side-by-side summary of soil quality components and their function for cannabis growth
| Component | What it means | How it affects cannabis | How to measure/check |
|---|---|---|---|
| Texture (sand/silt/clay) | Particle-size mix that sets drainage and water retention | Controls how fast roots get oxygen and water; extremes limit growth | Hand-texture (ribbon) test; lab particle-size analysis |
| Structure (aggregates, compaction) | How particles bind into crumbs vs. compacted mass | Good structure allows roots to explore and access water/nutrients | Visual/tactile check for aggregates; penetrometer for compaction |
| Organic matter | Decomposed plant/animal material that feeds microbes | Improves CEC, moisture buffering and nutrient release | Loss-on-ignition test; percent OM from soil lab |
| pH and CEC | Acidity and nutrient-holding capacity | pH controls nutrient availability; CEC buffers fertilization needs | pH meter; soil test for CEC and base saturation |
| Soil biology (microbes, mycorrhizae) | Living community that cycles nutrients and defends roots | Enhances uptake, disease resistance and stress tolerance | Biology tests, root colonization assays, observation (earthworms) |
Key insight: These components interact—texture sets the stage, organic matter and biology build fertility, and pH/CEC control nutrient access—so assessing soil quality means looking at the whole system rather than a single number.
Getting these basics right makes the rest of cultivation—nutrient schedules, watering, and strain selection—work far better. Small improvements in soil quality repay themselves quickly in plant vigour and harvest quality.
How Does Soil Quality Work? (Mechanisms)
Soil quality comes down to three interacting systems: the physical space roots occupy, the chemical mix that feeds plants, and the biological engine that cycles nutrients. Think of soil as a living bank account where structure determines access, chemistry sets the currency, and biology handles deposits and withdrawals. Each mechanism affects cannabis growth in predictable ways, and small fixes often produce outsized gains.
Physical mechanisms: water, air and root environment
Soil texture and structure determine drainage and root penetration. Sandy soils drain fast but hold little water; clay holds water but can suffocate roots when compacted. Structure—the way particles form aggregates—creates pore networks for air and water.
- Simple garden test: dig a 6–8 inch hole and squeeze a handful of soil. If it forms a ribbon longer than 2 inches, it’s heavy in clay; if it falls apart, it’s sandy.
- Compaction problem: Overly compacted soil restricts oxygen, slowing root growth and microbial activity.
- Practical fix: add coarse amendments to improve aeration or organic matter to improve aggregation.
Chemical mechanisms: nutrients, pH, and CEC
pH dictates which nutrients are available to plants. Most cannabis prefers pH 6.0–7.0 in soil; outside that range, elements like iron or phosphorus become less available even if present.
Cation exchange capacity (CEC): a measure of how well soil holds and releases nutrient cations (Ca2+, Mg2+, K+, NH4+). Higher CEC soils buffer nutrients and reduce leaching; low CEC soils need more frequent feeding.
- Deficiency signs: yellowing between veins often signals N deficiency; purple stems can indicate P issues.
- Quick troubleshooting: test pH first; if pH is fine, correct deficiencies with targeted feeds and monitor response over 7–10 days.
Biological mechanisms: microbes, fungi, and nutrient cycling
Soil life converts organic matter into plant-available nutrients and improves structure. Bacteria mineralize nitrogen; fungi, especially mycorrhizae, extend root reach and improve phosphorus uptake.
Mycorrhizae: Symbiotic fungi that increase effective root surface area and drought tolerance.
- Healthy practices: minimal tilling, regular organic matter inputs, and cover crops preserve biological networks.
- Example: adding compost feeds microbial populations that release N and improve aggregate stability within weeks to months.
Common in-garden checks
- Test soil
pHand moisture at rooting depth. - Perform the squeeze test for texture and compaction.
- Inspect roots/plant vigor after small corrective amendments.
Common amendments
and how they change physical properties (drainage, water retention, aeration)
Common amendments and how they change physical properties (drainage, water retention, aeration)
| Amendment | Primary effect | Best use case | Application rate (general) |
|---|---|---|---|
| Perlite | Improves drainage and aeration | Heavy soils, container mixes | 10–30% by volume |
| Vermiculite | Increases water retention and some aeration | Seed starting, moisture-holding mixes | 5–15% by volume |
| Coco coir | Balances water retention and aeration, sustainable alternative to peat | Soilless mixes, hydro blends | 20–50% by volume (rehydrate first) |
| Composted bark | Adds structure and long-term organic matter | Improving clay soils, long-term beds | 10–25% by volume |
| Gypsum | Improves structure in sodic/clay soils without altering pH | Compacted clay with poor drainage | 50–200 g/m², per local recommendations |
Key insight: Choose amendments to correct the specific physical limitation—drainage, water-holding, or aeration—rather than applying them all at once. Perlite and coco coir quickly open mixes, vermiculite holds moisture for seedlings, and composted bark builds lasting structure.
Understanding these three mechanisms together makes interventions predictable: fix the physical space, correct chemical availability, and feed the biology for durable results. That approach produces stronger roots, more consistent nutrient uptake, and healthier cannabis plants.
Why Soil Quality Matters: Outcomes for Yield, Potency, and Plant Health
Healthy soil is the foundation that turns a good grow into a great one. Soils with balanced structure, active biology, and steady nutrient availability produce larger root systems, more vigorous canopies and more consistent flower development — all of which directly affect yield and cannabinoid/terpene expression. Conversely, compacted, nutrient-poor or biologically dead soils force plants into maintenance mode: energy goes to survival instead of building dense, resinous buds.
Vegetative vigor and yield scale with root volume and nutrient access. A well-aerated loam encourages roots to explore, increasing uptake of N, P, K and micronutrients; that translates to faster height and node development, fuller tops, and ultimately denser colas. Early vegetative indicators — stem thickness, node spacing, and new leaf expansion rate — reliably predict final yield if monitored and corrected in time.
Practical measurements growers can track: Root mass estimate: lift a sample or use root-rated pots to compare root-to-soil ratio weekly. Stem diameter: measure at 1–2 inches above soil; increases correlate with vigor. New node production rate: nodes per week during veg phase. SPAD or leaf chlorophyll: quick gauge of nitrogen status. EC/ppm of soil leachate: tracks soluble salts and nutrient availability. Soil moisture and bulk density: affect oxygen availability to roots.
Potency and terpene expression are tied to soil nutrient balance and biological activity. Balanced soils promote steady secondary metabolite synthesis because plants aren’t diverted by nutrient stress or pathogen pressure. Mild, well-timed stress (controlled water deficits or specific nutrient tapering) can sometimes concentrate cannabinoids, but overdoing stress — or inducing it at the wrong growth stage — reduces total resin and can alter terpene profiles unpredictably. Nutrient ratios, especially available phosphorus during early flower and adequate sulfur for terpene biosynthesis, matter more than absolute NPK numbers.
Observable plant outcomes between poor-quality and high-quality soil
| Outcome metric | Poor soil (symptoms/values) | Good soil (symptoms/values) | Grower action |
|---|---|---|---|
| Root mass | Sparse, shallow roots; root-bound in pots | Dense, fibrous roots penetrating medium | Use airy mix, add perlite/compost, repot early |
| Vegetative growth rate | Slow internode growth; thin stems | Rapid node production; thick stems | Monitor stem diameter, adjust feeding and light |
| Flower/bud density | Loose, airy buds; low calyx-to-leaf ratio | Dense, resinous colas; high calyx density | Maintain bloom nutrients, ensure stable pH |
| Incidence of nutrient deficiencies | Frequent yellowing, necrosis, micronutrient spots | Few deficiencies; quick recovery after correction | Test soil, correct micronutrients, inoculate microbial life |
| Watering frequency | Erratic: either waterlogged or dries fast | Predictable cycles; even moisture retention | Improve soil structure, add organic matter |
Key insight: Soils that support active roots and balanced nutrient availability consistently deliver higher yields and more reliable potency profiles; simple monitoring metrics let growers catch problems early and protect both yield and secondary metabolite quality.
Soil quality isn’t just an input — it’s the long-term health plan for the crop. Invest time in the medium and the plant rewards show up as bigger harvests and more complex, stable cannabinoid and terpene profiles.
Common Misconceptions About Cannabis Soil
Growers often pick soil based on a few loud myths rather than practical experience. Soil matters, but not in the dramatic ways some guides claim; small, correctable mistakes usually cause most problems. Below are the common myths and what actually happens in the tent or garden.
Myth: Heavy fertilizer equals faster growth. Reality: Overfeeding causes salt buildup and nutrient lockout, not bigger plants. When synthetic nutrients are used repeatedly without proper leaching, soluble salts accumulate and draw water out of roots. Plants stressed by salts show wilting, brown leaf tips, and a strong need for frequent flushing.
Practical example: A grower added a full-strength nutrient solution every week and stopped seeing growth after week four. Reducing concentration to 25–50% of manufacturer strength and flushing once every three to four weeks returned vigor within two cycles.
Myth: Sterile soil is always best. Reality: Completely sterile media strips away beneficial microbes that help nutrient uptake and disease resistance. Sterilization can be useful for reusing contaminated soil or killing persistent pathogens, but fresh sterile mixes often need re-inoculation with beneficial bacteria and fungi to perform well.
Soil inoculation: Reintroducing microbes using compost tea, mycorrhizal inoculants, or worm castings restores biological life and improves phosphorus uptake.
Myth: pH doesn’t matter across media. Reality: pH matters in all media, but the optimal range shifts slightly with substrate. In soil, aim for 6.0–6.8; hydroponic systems run lower. pH affects nutrient availability — a correct pH makes nutrients soluble and prevents lockout.
Common misconceptions list: All soils are interchangeable: Soils vary in texture, CEC, and organic content; match soil to plant stage. More drainage always better: Excessively fast-draining mixes can stress seedlings; use lighter mixes only for mature plants. * Organic means no monitoring: Organic soils still need pH and moisture checks; they can hide slow deficiencies.
Actionable steps 1. Test runoff EC and pH after feeding. 2. Cut nutrient strength to half for new soils. 3. Reintroduce microbes after sterilizing.
A bit of measurement and modest adjustments beat dramatic changes. Treat soil as a living system—manage salts, keep pH in the right band, and let beneficial biology do its work, and the plants will reward that steady care.
Real-World Examples and Case Studies
Three concise case studies show how soil-driven diagnosis and focused remediation convert struggling plants into predictable yields. Each example includes the baseline problem, a soil-focused diagnosis, the intervention steps taken, and measurable outcomes you can reproduce in your own grow.
Home grow — compact indoor closet
Baseline problem: Plants showing slow growth, yellowing lower leaves, and stunted internodes after week 4.
Soil-driven diagnosis
Soil pH: 6.0 (slightly acidic). EC: 900 ppm. Likely cause: Locked-out magnesium and calcium from uneven buffering; medium was a peat-heavy mix with no supplemental cal-mag.
Intervention
- Raised pH to 6.5 gradually over 3 days using diluted
calcium carbonatesolution. - Applied foliar
cal-magspray (0.5 g/L) twice within a week. - Switched to a balanced feed formulated for vegetative growth.
- Flushed high-EC tables with 2× container volume of runoff solution buffered to pH 6.3.
- Replaced the top 5 cm of medium and added dolomitic lime to underperforming tables.
- Standardized feed schedule; introduced regular media agitation and aeration to prevent compaction.
Outcome
Yield per plant: increased from an expected 20 g to 45 g (post-fix harvest). Visual recovery: new internodes elongated within 10 days; yellowing reversed in 2–3 new leaf sets. Repeatable action: Test pH weekly and keep a small cal-mag supplement on hand.
Small commercial — 40-plant greenhouse run
Baseline problem: Mid-cycle spike in tip necrosis and patchy canopy vigor across multiple tables.
Soil-driven diagnosis
Soil tests: Low soluble calcium and magnesium; potting medium EC varied table-to-table (700–1,400 ppm), indicating inconsistent nutrient loading. Root inspections showed compacted media and small root balls.
Intervention
Outcome
Average yield per plant: rose from 110 g to 150 g (36% increase). Deficiencies incidence: dropped from 28% to 6% across batches. Operational tip: Implement a table-by-table log for EC and pH to catch variability early.
Remediation case study — lab-verified before-and-after metrics
Before-and-after metrics for one remediation case (pH, EC, yield per plant)
| Metric | Before | After | Measurement method |
|---|---|---|---|
| Soil pH | 5.4 | 6.5 | 1:5 soil:water slurry, calibrated meter |
| EC (ppm) | 2,100 | 850 | Saturation extract, TDS meter |
| Average yield per plant (g) | 32 | 78 | Dry weight, per-plant harvest scales |
| Root volume / health score | 3/10 | 8/10 | Visual root scoring, photo log |
| Incidence of deficiencies (%) | 62% | 9% | Weekly scout reports, 40 plants |
Key insight: The remediation combined a targeted pH correction, conservative flushing to reduce salt load, and a reintroduction of balanced nutrients; that sequence restored root function and nearly doubled per-plant yields, showing how soil quality cannabis management produces measurable results.
> Grower logs showed recovery signs (new root growth and leaf expansion) within two weeks after correcting pH and EC, supporting the lab numbers.
These examples underline a simple truth: diagnose the soil first, apply small targeted corrections, and measure. The actions used here are practical, repeatable, and focused on restoring root function so plants can convert nutrients into predictable weight at harvest.
📥 Download: Practical Soil Health Checklist for Cannabis Cultivation (PDF)
Practical Soil Health Checklist and Action Plan
Healthy soil is the foundation for predictable, high-quality cannabis. Start by testing and addressing the biggest risk first, then run a lightweight maintenance rhythm through the grow cycle. The following action plan gives clear, stage-specific steps and the minimum toolkit to catch problems early and fix them without overcomplicating the grow.
Step-by-step checklist by growth stage
- Pre-plant
- Test
pH(target 6.0–6.8) and amend to reach range. - Add 2–4% by volume of well-rotted compost or worm castings and incorporate mycorrhizal inoculant.
- Check drainage; if slow, mix in perlite or aged bark.
- Vegetative
- Monitor nitrogen and electrical conductivity (
EC) weekly. - Keep surface moisture even; avoid waterlogging and puddles.
- Top-dress with a balanced organic feed if growth slows.
- Flower
- Shift feeding toward higher potassium and phosphorus ratios.
- Maintain stable
pHand avoid root disturbance when switching feed programs. - Flush gently only if salts buildup is detected by a conductivity spike.
- Post-harvest / Off-season
- Re-test
pHandECand add organic matter to rebuild soil biology. - Plant cover crops or apply deep compost to restore structure.
Tools and tests every grower should have
- pH meter or strips: Quick acidity checks; meters are more accurate.
- EC/TDS meter: Measures soluble salts; essential before flushing.
- Soil probe or moisture meter: Helps avoid overwatering and compaction.
- Hand lens (10–20x): Inspect roots and soil organisms.
- Basic kit for at-home tests:
pHstrips + vinegar/baking-soda drainage test (cheap diagnostics). - Lab soil test (annual): Comprehensive nutrient profile and CEC for complex problems.
- Thermometer: Soil temp affects biology and nutrient uptake.
Match common soil problems with quick and long-term fixes
| Problem | Quick fix | Long-term solution | When to apply |
|---|---|---|---|
| Slow drainage/compaction | Add coarse perlite or sharp sand to pot surface | Rebuild with chunky compost, biochar, and regular aeration | Pre-plant or at repot |
| pH out of range | Apply dolomite lime (raise) or elemental sulfur (lower) in small doses | Buffer with compost and maintain lime/sulfur schedule based on tests | Pre-plant; retest mid-cycle |
| Salt buildup from fertilizers | Flush with clean water until EC drops | Switch to lower-salt organics; use periodic leaching and cover crops | Immediate when EC high |
| Poor microbial activity | Add a teaspoon of worm castings tea or compost tea | Regular compost additions, mycorrhizal inoculants, and reduced sterile inputs | Pre-plant and veg stage |
| Low organic matter | Top-dress with compost or aged manure | Annual deep composting, cover crops, and mulches | Off-season and pre-plant |
Key insight: These actions prioritize the fastest interventions while building resilience over seasons—short fixes stop acute damage, long-term practices lower recurring risk.
A practical toolkit plus a stage-aligned checklist prevents many common failures and keeps nutrient management predictable for cannabis growers. Keep testing inexpensive and frequent, and save lab work for the puzzles that need deeper diagnostics.
Conclusion
Most yellowing, stunted growth, and surprise pest problems trace back to what’s happening beneath the pot. Remember the examples earlier where two growers with identical lights got wildly different results—one optimized soil structure and microbial life, the other kept adding synthetic feed—and the outcomes matched the soil care. Focus on the fundamentals: balanced texture, active microbiology, and staged feeding. Start by testing your soil and adjusting organic matter and irrigation before increasing nutrient doses; that single step often resolves issues that look like nutrient burn or light stress.
- Test soil structure and pH: adjust with compost, perlite, or lime as needed.
- Prioritize microbial life: use compost teas or mycorrhizal inoculants to unlock nutrients.
- Match feeding to plant stage: avoid blanket high-P fertilizers during vegetative growth.
If you’re asking whether yellow leaves mean overfeeding or poor soil, the pattern of symptoms plus a quick soil test usually tells the story. For practical tools and seeds backed by germination support, check the SeedConnect resources on soil and strain selection at SeedConnect germination guarantee and expert support. Next steps: test, amend, and monitor—those three moves will improve yield, potency, and plant resilience faster than chasing the next nutrient mix.