
You open a packet of seeds and everything looks the same: tiny, hard, and suspiciously anonymous. For anyone who’s wasted time and money on dud plants, that moment bites — and it’s exactly where good growers learn the difference between ordinary cannabis seeds and high-quality cannabis seeds.
A few quick visual checks will save a season: color, sheen, and the firmness of the seed tell more than a pretty label. Beyond looks, small cues about provenance and genetics separate reliable stock from gamble seeds, and knowing those cues changes how confidently you plan a grow.
This piece focuses on practical, hands-on signs for identifying cannabis seeds before you spend time germinating them, plus the sensible questions to ask sellers when something feels off.

Quick Primer: Why Seed Quality Matters
Seed quality determines how predictable a grow will be — from whether a seed even sprouts to how vigorously that seedling develops and what kind of yield and cannabinoid profile it can ultimately deliver. Good seeds shorten the learning curve: fewer lost pots, clearer decisions about planting density, and more consistent harvests. Poor-quality seeds increase risk across the board — uneven germination, male plants when feminized were expected, weak seedlings that succumb to stress, or unpredictable genetics that make strain selection a guessing game.
Viability: The probability a seed will germinate under normal conditions. Vigor: The expected strength and growth rate of a seedling after germination. Feminized seeds: Seed bred to produce only female plants, useful for maximizing flower-producing plants per square foot. Regular seeds: Seed that can produce males or females; favored by breeders and those making seeds. Genetic stability: How reliably a strain expresses its expected traits across generations. Provenance: The documented origin and breeding history of a seed lot.
Why those distinctions matter in practice: Germination certainty saves time: A high viability rate means fewer backup seeds and less wasted media and space. Vigor affects transplant timing: Vigorous seedlings tolerate earlier transplanting and brief environmental hiccups. Sex predictability influences layout: Using feminized seeds lets growers plan planting density without culling males. Stable genetics reduce surprises: Predictable terpene, THC/CBD ranges, and growth patterns let growers choose strains that fit their climate and goals.
Practical checks to screen seed quality: 1. Inspect visually for a hard shell, consistent color, and no cracks. 2. Perform a simple float test (not definitive) then a paper-towel germination to confirm viability. 3. Track germination time and seedling uniformity — fast, uniform sprouts indicate higher vigor and better genetics.
Buying from reputable sources matters. When selecting seeds, consider documented breeding info and any germination guarantees. For growers who want a straightforward place to start, vendor transparency and a guarantee can be decisive; see options like cannabis seeds for sale for clear provenance and support.
High-quality seeds aren’t glamorous, but they’re the most cost-effective risk-reduction tool a grower has — spend a bit more on reliable genetics and the rest of the grow becomes far more predictable and enjoyable.
What You’ll Need (Prerequisites) Before Inspecting Seeds
Start with a small, well-lit workspace and the right tools — inspecting seeds is mostly about eyesight, steadiness, and cleanliness. A magnifier reveals shell texture and tiny ridges that separate immature from viable seeds. A precise scale and a gentle pair of tweezers speed up quick checks. Finally, a clean surface and containment keep samples uncontaminated if germination testing follows.
Essential conditions
- Good, consistent light: Natural daylight or a daylight-balanced lamp prevents misreading color and sheen.
- Stable surface: A flat table prevents seeds from rolling and reduces handling errors.
- Minimal drafts and dust: Keeps samples dry and reduces contamination risk during any wet tests.
Tools & materials
- Magnifying loupe: 20–60x optical loupe or a pocket microscope to inspect shell texture and tiny fissures. Low-cost digital microscopes work if they show crisp detail at
20xmagnification. - Digital scale: Precision to
0.01 ghelps compare relative mass between seeds — a quick proxy for maturity and embryo development. - Tweezers: Fine-tipped, anti-static tweezers for safe handling without crushing.
- Paper towels or germination mat: Clean, lint-free paper or a dedicated germination mat for moisture-based tests and short-term containment.
- Clean container or sealable bag: Holds labeled samples; prevents cross-contamination during storage or transport.
Definitions
Viable seed: A seed likely to germinate because it reached full embryo development and has an intact, hard shell.
Immature seed: A soft or very lightweight seed with translucent shell or visible deformities.
- Set up lighting and clean surface.
- Arrange tools within reach and label small containers for each sample.
- Wear nitrile gloves if moving between lots to avoid oil transfer.
Provide a quick-reference checklist of tools, why each is needed, and recommended minimum specs
| Item | Purpose | Minimum Spec / Note | Estimated Cost |
|---|---|---|---|
| Magnifying loupe | Inspect shell texture, ridges, defects | 20x–60x optical or digital 20x min |
$15–$100 |
| Digital scale | Compare seed mass as maturity proxy | 0.01 g precision |
$20–$60 |
| Tweezers | Handle seeds without crushing | Fine-point, anti-static | $5–$20 |
| Paper towels / germination mat | Moisture tests, clean surface | Lint-free; sterile if possible | $5–$25 |
| Clean container / bag | Sample containment, labeling | Sealable, small clear bags or jars | $3–$15 |
The table shows where to invest: magnification and scale matter most for accurate inspection, while tweezers and clean surfaces are low-cost but high-impact.
When choosing genetics to inspect, keep realistic expectations: some varieties naturally have darker or smaller seeds. If browsing options, comparing cannabis seeds for sale against your inspection checklist saves time. A tidy setup and the right tools make seed inspection fast and reliable — the small upfront effort reduces surprises during germination testing.
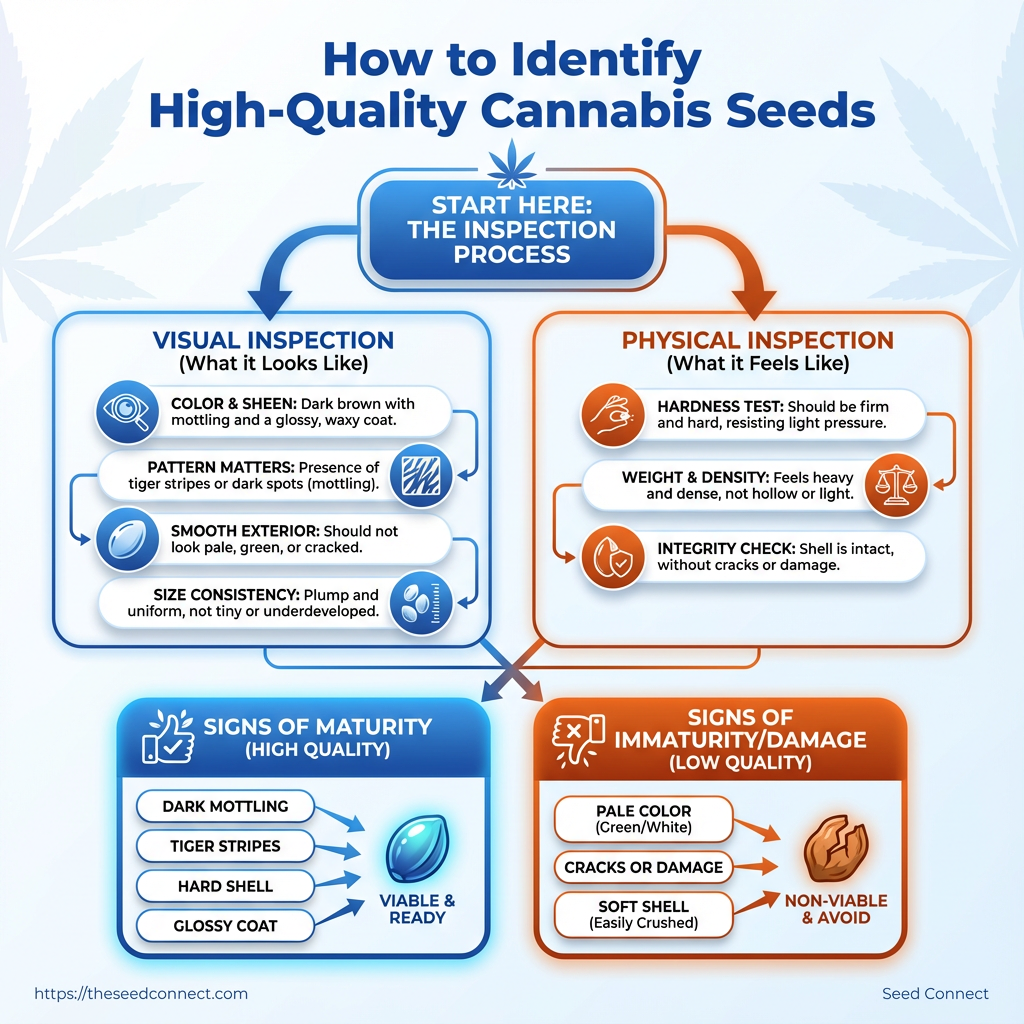
Step-by-Step: Visual and Physical Inspection of Seeds
Start by treating seed inspection like a mini forensic check: the goal is to separate clearly good, potentially viable seeds from the ones that should never reach a germination tray. Inspecting visually and by touch removes obvious losers and saves time and materials during germination testing.
Clean workspace: Clear, well-lit table and a tray to sort seeds.
Tools & materials
- Magnifier (10–20x)
- Soft tweezer
- Small digital scale (optional, 0.01 g)
- Notebook or spreadsheet for lot notes
- Gloves (optional, keeps oils off seeds)
- Sort and separate seeds.
- Use a magnifier to inspect shell patterns and check for fungal spotting.
- Perform a firmness and weight check to infer maturity.
- Identify color and sheen characteristics tied to maturity.
- Record provenance and lot information from packaging.
- Decide immediate discard vs proceed to viability testing.
Quickly move seeds into three piles: obviously damaged, uncertain, and likely good. Discard shells with cracks, holes, or obvious mold stains immediately.
Look for the classic tiger-striping, intact seams, and any fuzzy growth. Fungal spotting usually appears as powdery or cottony patches and should lead to discard.
Gently squeeze between thumb and forefinger; high-quality seeds feel hard and resist pressure. On a scale, immature or hollow seeds often weigh noticeably less.
Mature seeds tend to be darker brown with a subtle sheen; very pale or green seeds are immature and lower-probability.
Note strain name, batch/lot number, and date. Good record-keeping makes it easy to correlate inspection outcomes with germination results.
Seeds in the “likely good” pile go to a float test or pre-soak and then to paper towel germination. Anything with damage, active mold, or soft shells should be discarded.
Provide a quick visual guide comparing ‘High-quality seed’ vs ‘Low-quality seed’ by observable attributes and recommended action
| Attribute | High-quality seed (what to see) | Low-quality seed (what to see) | Recommended action |
|---|---|---|---|
| Color and sheen | Even brown, subtle sheen | Pale green or mottled, dull | Proceed / test vs discard |
| Surface texture | Smooth, patterned shell | Cracked, pitted, fuzzy | Test vs discard |
| Firmness/weight | Hard, relatively heavy | Soft, lightweight | Proceed vs discard |
| Size uniformity | Consistent within lot | Widely variable | Proceed cautiously |
| Packaging/labeling | Clear lot info, sealed | Missing/unclear info | Trust documented lots; avoid unlabeled |
Key insight: Visual and tactile cues correlate strongly with later germination success, so a quick inspection raises effective germination rates and reduces wasted time.
If seeds pass this stage, move them to small-scale viability tests. For growers sourcing seeds, browsing reputable selections like cannabis seeds for sale helps reduce the chance of ending up with lots that fail inspection. Trust your hands and eyes — catching problems early saves an entire grow cycle’s worth of effort.
Simple Viability Tests (Wet Paper Test, Float Test, and Germination Trials)
A quick screen plus a real-world trial saves time and money: use the float test to weed out obviously dead seed lots, run a paper-towel germination to check potential, and finish with a soil tray trial to confirm performance under growing conditions. The float test is fast but noisy—some viable seeds sit on the surface because of air pockets, and some non-viable seeds sink after absorbing water. The paper-towel (wet paper) method gives a controlled environment for radicle emergence and normally shows results within 3–10 days when kept at steady warmth and moisture. The soil tray is the closest predictor of what will actually happen in a grow tent or garden because it replicates the microbiome, drainage, and mechanical resistance seeds face when planted. Record germination percentages and compare them to vendor claims; consistent shortfalls can indicate storage or genetics issues.
Tools & materials
Scale: For large batches, track sample size accurately.
Clean water: Use room-temperature, low-chlorine water.
Paper towels: Lint-free, folded twice for even moisture.
Tray/zip bags: To hold damp towels and conserve humidity.
Seed-starting mix or pots: For soil tray trials.
Thermometer: Keep germination area at target temperature.
How to run the three tests (practical steps)
- Soak seeds for 4–12 hours in room-temperature water, then perform the float test.
- Place seeds on a folded damp paper towel, fold over, seal in a tray or bag, and keep at
21–25°C (70–77°F). - Check paper towels every 24 hours; keep moist but not waterlogged.
- After radicles appear (or after 10 days with no sign), transplant viable seeds to a soil tray and monitor for true leaf development.
Quick tip: Run tests with at least 20 seeds for a reliable percentage; smaller samples are noisy.
Expected results and actions across days for each test (day 1–10) so readers know when to expect radicle emergence and when to act
| Day | Float Test (what to check) | Paper Towel Test (what to check) | Soil Tray Test (what to check) |
|---|---|---|---|
| Day 1 | After soak, sinking suggests intact seed coat; floating seeds may be aged or air-filled | Seeds placed on moist towel; no visible change | Seeds planted; check even planting depth and moisture |
| Day 2–3 | Re-check float—persistent floaters are suspect | First signs: swelling, softening; some show tiny white tips | Cotyledon swelling visible in strongest seedlings |
| Day 4–5 | Fluid stabilized; few seeds change position | Radicle emergence common for vigorous seeds | Seedlings breaking soil; thin or slow seedlings noted |
| Day 6–7 | Float test largely uninformative now—discard as primary metric | Most viable seeds show 1–2 cm radicles; record germ% | Strong seedlings have true leaves; weak ones may fail |
| Day 8–10 | Not applicable—float test concluded | If no radicle by day 10, consider seed non-viable | Transplantable seedlings ready; tally final germination rate |
Key insight: The float test is a convenient first-pass but should never replace a paper-towel or soil trial; tracking timing across these methods reveals both seed viability and vigor, and helps compare observed germination rates against vendor guarantees (for example, seeds bought from Running these three methods together gives a clear picture: quick triage with the float test, controlled confirmation with a paper towel, and practical validation in soil. That layered approach prevents surprises when seedlings hit the grow medium and protects crop planning and resource allocation.
Assessing Genetic and Vendor Quality (Provenance, Lab Testing, and Packaging)
Good genetics start with traceable provenance. Treat each seed purchase like buying a pedigree: ask for documentation, check batch identifiers, and verify independent lab work before committing. Vendors who make that information easy to find are signalling confidence; those who hide it are asking you to take a leap of faith with your grow.
Start by requesting these items from the breeder or vendor:
- Germination guarantee: Understand coverage (percentage, time window, replacement policy).
- Certificates of Analysis (CoA): Look for pathogen screens, pesticide panels, and any genetic verification.
- Batch codes and production dates: Confirm seeds aren’t old stock and can be traced to a specific lot.
- Packaging traceability: Tamper-evident seals, lot codes, and UV-resistant packaging preserve viability.
- Support responsiveness: Fast, clear replies about a batch are a proxy for good QA practices.
- Ask for the germination guarantee details and get them in writing (email or order page).
- Request the CoA that matches the batch code on the packet; confirm testing lab name and date.
- Compare production date on the packet to shipping date to ensure seeds weren’t stored excessively long.
- Cross-check customer reviews and forum threads for recurring batch-specific complaints.
Real examples to use when evaluating a vendor:
- If a vendor offers a 90% germination guarantee for 30 days: verify whether replacements are free or pro-rated and whether shipping costs are covered.
- If a CoA lists microbial loads: ensure results show absence of common seed-borne pathogens rather than vague “passed” language.
- If a packet has no batch code or production date: consider it a red flag — treat the purchase as higher risk.
Signals of trustworthy vendors vs risky vendors across transparency, lab testing, guarantees, and customer support
| Signal | Trustworthy vendor | Risky vendor | Action for buyer |
|---|---|---|---|
| Lab testing / CoA | CoA from accredited lab, batch-specific, recent date | No CoA or generic lab claims | Request CoA; refuse if none |
| Germination guarantee | Clear %, time window, written policy | Vague or no guarantee | Get terms in writing before buying |
| Customer reviews / forum presence | Consistent positive feedback, batch-level threads | Little/no feedback or many unresolved complaints | Search forums; ask about specific batch codes |
| Packaging & traceability | Lot codes, production dates, tamper seals | Plain packaging, no traceability | Reject packets lacking identifiers |
| Support responsiveness | Fast, documented answers about batches | Slow/no response or evasive replies | Test support with specific questions pre-purchase |
Key insight: Vendors that publish batch-specific CoAs, clear guarantees, and visible traceability materially reduce the buyer’s risk — those signals are worth paying for.
For reliable sourcing consider vendors that publish this data up front; when in doubt, prioritize traceability over price. If ready to shop, compare options for cannabis seeds for sale only after confirming the batch-level documents above.
Record-Keeping, Labeling, and Storage Best Practices
Treat seed inventory like lab samples: immediate, consistent labeling; a linked digital record; and storage that controls temperature, humidity, light, and oxygen. That combination preserves genetics, makes germination troubleshooting possible, and keeps batches traceable across seasons.
Batch code: Short alphanumeric identifier used on every physical packet and in the digital log.
Germination log: Digital file or database that records test dates, method, and percent germination for each batch code.
Tools & materials
- Label printer: Durable, smudge-resistant labels.
- Desiccant packs: Silica gel, food-grade, individually sized.
- Humidity indicator cards: Quick RH checks without opening containers.
- Vacuum sealer or airtight jars: For long-term oxygen control.
- Refrigerator or dedicated seed cooler: Capable of
2–8°Cconsistently. - Digital tracking tool: Spreadsheet, grow-management app, or simple database.
Labeling templates
Start every new receipt by labeling the packet immediately. Use the same template across the operation.
- Batch: ABC123
- Variety: Blueberry #2
- Type: feminized / autoflower
- Received: 2026-01-05
- Qty: 50 seeds
- Storage: Jar A, Shelf 2
- Germ test: 2026-03-01 → 92%
Place one label on the outer packet and one on an internal slip if the outer packaging could be damaged. Attach small waterproof labels to jars or mylar pouches; write batch codes in permanent marker on desiccant bags as backup.
Step-by-step long-term storage
- Clean seeds gently and let them air-dry completely.
- Place seeds in a small paper envelope, then into a moisture-barrier container (mylar bag or glass jar).
- Add an appropriate desiccant pack sized for the container volume.
- Insert a humidity indicator card to confirm relative humidity (
RH) stays below 10–12%. - Vacuum-seal bags when possible, or close jars tightly; label container with batch code and date.
- Store containers in a stable cool environment at
2–8°Caway from light and vibration. - Record each action in the digital germination log and note the storage location.
Keep a running schedule of germination tests tied to batch codes—record method, sample size, and percent germination. That traceability makes it easy to claim a germination guarantee or diagnose decline over time.
Consistent labels and a tight storage routine make seed management simple and defensible. A clear digital trail tied to every physical packet saves time, prevents mistakes, and protects the value of your genetics.
📥 Download: Checklist Template for Identifying High-Quality Cannabis Seeds (PDF)
Troubleshooting Common Issues During Seed Inspection and Testing
When inspections go off-script, the fastest way back on track is a calm, diagnostic approach: identify the symptom, isolate variables, then run a controlled retest. Below are the most frequent problems encountered during seed inspection and paper-towel or tray germination tests, with concrete fixes and quick checks to avoid repeating the same mistake.
Mold: Visible white, gray, or green growth on towels or seeds during testing. Mold comes from excessive moisture, lack of airflow, or contaminated materials.
- Replace contaminated materials immediately.
- Reduce ambient humidity and improve airflow around test samples.
- Use fresh, sterile paper towels and distilled water for retests.
- Check and stabilize temperature to an even range appropriate for the genetics (generally 20–25°C).
- Verify seed age and storage conditions; older seeds may need longer observation.
- Repeat the test using the paper-towel method with controlled conditions and document each variable.
- Perform a careful paper-towel germination for any suspicious seeds.
- If sprout emerges with a healthy taproot, transplant cautiously into starter medium.
- Log the seed lot and inspect other seeds from the same batch.
Low germination: Few or no seeds sprout within the expected window (typically 3–10 days depending on genetics). Common causes are suboptimal temperature, old or poorly stored seeds, and incorrect depth or moisture during planting.
Damaged-looking but viable seeds: Seeds with cracks, soft spots, or scuffs can still germinate. Handle them gently and confirm viability before discarding.
Common misreads and operator errors:
- Contamination from hands: Always wash or wear gloves before handling seeds.
- Overwatering: Towels that stay soaking wet promote rot—aim for damp, not dripping.
- Temperature swings: Night/day swings over 5–7°C can slow or abort germination.
Example checklist to run a retest: 1. Clean workspace and fresh, sterile towels.
- Label each seed and record lot/date.
- Maintain
20–25°Cand keep towels damp with distilled water. - Check daily; remove any moldy samples immediately.
When problems appear, disciplined isolation and a repeat under controlled conditions usually reveal the culprit. A careful retest often salvages viable seeds and prevents discarding good genetics, especially if they came from a reputable source like cannabis seeds for sale. Taking notes during every test turns troubleshooting into a predictable process rather than a guessing game.
Tips for Success and Advanced Checks
Start small, keep careful records, and only escalate to lab testing when the stakes or signs demand it. Running a few controlled pilot lots, logging humidity and temperature during germination, and doing a handful of advanced checks will catch most supply or quality issues before they turn into expensive problems.
Pilot lot: A small, representative sample (10–50 seeds) from any new vendor or new cultivar.
Basic kit: Thermometer/hygrometer, seedling dome, paper towels, and a clear labeling system.
Practical pro tips to tighten quality control
- Buy pilot lots first: Test a small batch before committing to large orders; validate germination rates, vigor, and phenotype stability.
- Keep detailed germination logs: Record start time, temp, RH, medium, and outcome for each seed; track germination percentage and days-to-emerge.
- Use environmental baselines: Aim for
20–25°Cand70–90%RH during the first 48–72 hours for most cannabis strains; record deviations. - Visual seed checks: Inspect for mold, cracks, or abnormal discoloration before planting; reject seeds with soft, mushy shells.
- Batch tagging: Label seed packets with vendor, lot number, date received, and who inspected them.
Step-by-step for a pilot germination test
- Soak each seed in a labeled container of distilled water for 12–24 hours, tossing any that float after 24 hours.
- Place seeds between moist paper towels inside a sealed container, set in a stable
22°Cspot, and check twice daily. - Log each seed’s emergence date, root length at first unroll, and any abnormal growth; transplant uniformly when radicle reaches ~1–2 cm.
- Run a vigor comparison across vendors or lots after 7–10 days and rank performance.
When to escalate to lab testing
- Large-scale purchases: If planning to buy hundreds or thousands of seeds, run lab tests for viability, fungal/bacterial pathogens, and genetic verification.
- Disease suspicion: Persistent damping-off, unusual leaf spots, or consistent poor vigor across multiple batches warrants microbial or mycoplasma testing.
- Vendor disputes: If germination claims don’t match observed results and the vendor won’t resolve it, lab reports provide objective evidence.
Germination guarantee: Keep paperwork and photos of failed lots; many suppliers will honor guarantees when presented with clear logs and images. For seed sourcing, consider trying cannabis seeds for sale as one option during pilot tests.
A few extra checks that pay off: run a small pathogen swab on suspect seedlings, compare phenotype ratios across 20–30 plants, and rotate vendors annually to avoid single-source risk. These practices turn guesswork into reproducible decisions and protect large buys from hidden losses.
Putting It Together: Decision Flow for Accepting or Rejecting Seed Batches
Start by setting objective pass/fail rules before any seed box is opened. That prevents confirmation bias, speeds decisions, and protects relationships with vendors when problems arise. A practical decision flow reduces argument and keeps action steps clear: test to your thresholds, document results, then accept, request remediation, or reject.
Decision Checklist
- Batch ID documented: record vendor lot number, delivery date, and photos of packaging.
- Pre-test thresholds set: define a germination threshold like
85–90%and a maximum allowable discoloration or physical damage percentage. - Standardized test protocol: use the same germination test method, substrate, temperature, and timing every time.
- Time-stamped evidence: take dated photos and maintain a simple lab sheet with counts and outcomes.
- Vendor contact plan: know who to call and what compensation/replace policy applies.
- Escalation criteria: when to open a formal claim vs. accept partial credit.
> A common industry threshold is 85–90% germination for commercial seed lots; use whatever number matches your operation and put it in writing before testing.
Step-by-step Decision Flow
- Receive and inspect the shipment. Photograph packaging and seed condition immediately.
- Record batch metadata in your log (vendor, lot, shipping temp, arrival date).
- Run a standardized germination test for the agreed period.
- Compare results to the pre-set threshold. If germination ≥ threshold, accept the batch.
- If germination < threshold, compile evidence (photos, counts, test protocol) and contact vendor with findings.
- Negotiate remediation: replacement, partial credit, or refund per vendor guarantee.
- If vendor responses are inadequate, escalate with documented claim and return procedure.
Definitions
Germination threshold: The minimum percentage of seeds that must sprout within the test window to accept a lot.
Standardized test protocol: A written procedure specifying substrate, temperature, light, and timing for germination tests.
Practical example: if a 100-seed sample yields 78 sprouts after your standard 7-day test and your threshold is 90%, begin the vendor contact step immediately with full documentation.
A clear, enforced flow saves time and money—measure first, document everything, then act. This keeps vendor relationships professional and makes disputes easy to resolve. If using certified genetics, consider linking the acceptance criteria to your purchasing terms so expectations are aligned from day one.
Conclusion
After walking through visual inspection, simple viability tests and provenance checks, the practical way forward is clear: trust observable signs and keep good records. Dark, firm seeds that sink in the float test and sprout reliably in a wet-paper trial are the ones worth planting; seeds that are soft, misshapen, moldy, or come with sketchy vendor info should be quarantined or rejected. Remember the example of a small grower who batch-tested ten packets and saved weeks by discarding two bad lots early—that kind of quick validation pays for itself in time and fewer failed plants.
If the immediate questions are “How will I know a seed is viable?” or “When should I reject a batch?” rely on the simple checks described: visual firmness, the wet-paper germination trial, and vendor provenance or lab data. For the next step, organize the seeds you trust, label them, and plan a small starter run before committing a full crop. To streamline sourcing and reduce uncertainty, consider purchasing seeds with documented germination guarantees—one useful option is to Browse high-quality cannabis seeds with germination guarantees. That link can serve as one resource among others as you move from inspection to planting.