
The smell of nutrient burn in a grow tent, the slow yellowing of lower leaves, and the mountain of single-use plastic trays in the compost bin are familiar to many cultivators. Those symptoms point to deeper sustainability challenges—wasted inputs, inefficient water use, and reliance on disposable materials—that quietly inflate costs and environmental impact. Recognizing the specific operational choices that cause those leaks is the first corrective move.
Practical, measurable cannabis cultivation solutions exist that trim waste without sacrificing yield or potency, from water-reuse workflows to low-waste propagation and integrated pest strategies. Adopting eco-friendly practices means redesigning routines, not accepting trade-offs between sustainability and productivity. Small changes—timing nutrient feeds to plant demand, swapping to compostable media, or optimizing run-times for lights and HVAC—compound quickly into meaningful savings and reduced footprint. []

Understanding the Sustainability Challenges in Cannabis Cultivation
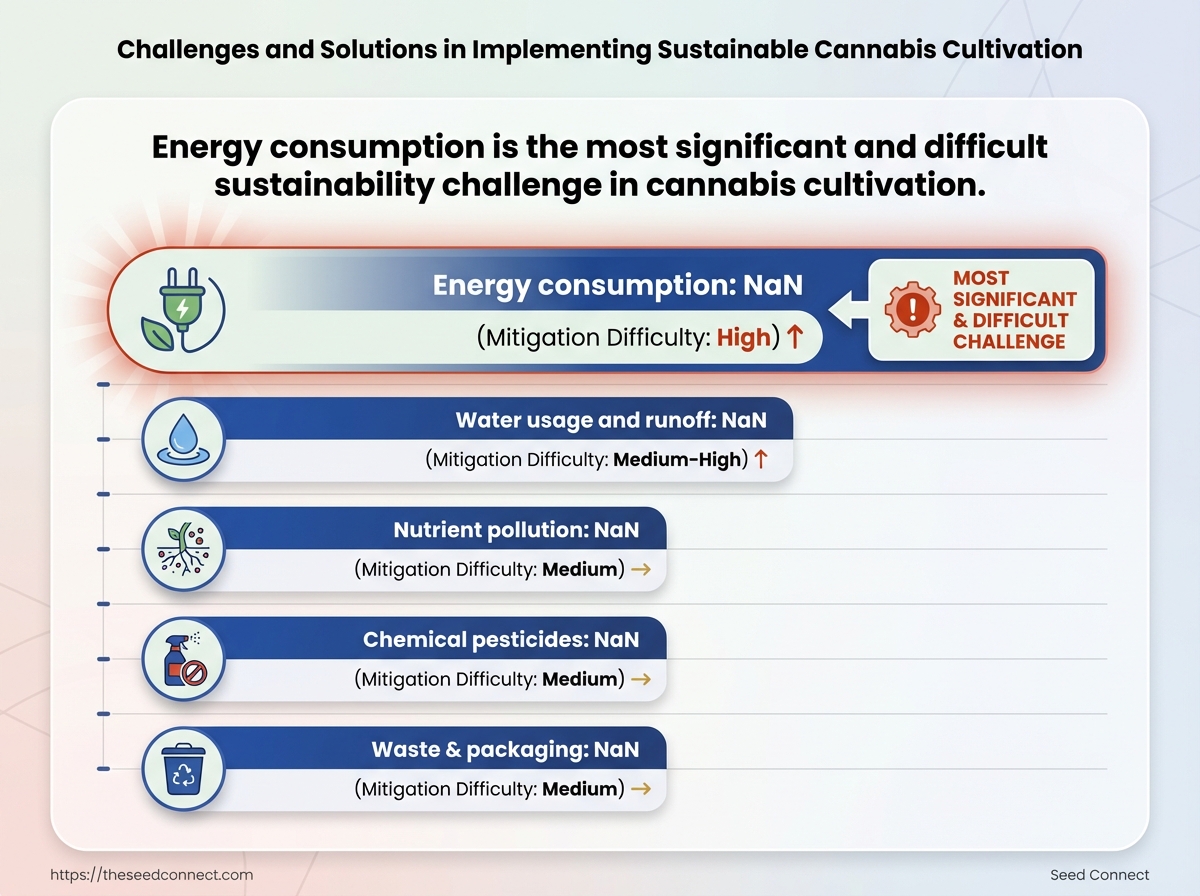
Cannabis cultivation faces a cluster of environmental and operational constraints that make sustainability both urgent and technically demanding. Energy use for lighting, HVAC, and dehumidification dominates operational costs and carbon footprints in indoor grows. Water handling—both the volume required and the risk of nutrient-laden runoff—creates regulatory and ecological exposure. Reliance on chemical pesticides and single-use plastics compounds waste streams, while the learning curve and capital intensity of sustainable technologies impede adoption at scale.
Root causes explained
- Energy intensity: Indoor lighting (HPS/LED), climate control, and dehumidifiers run continuously and scale with canopy size.
- Water and runoff risks: High-frequency irrigation plus nutrient solutions increase the chance of leaching into local waterways.
- Chemical dependence: Pesticide and fungicide use often results from tight production schedules and limited integrated pest management (IPM) expertise.
- Waste streams: Trimmings, spent soil/media, and packaging plastics accumulate rapidly without diversion programs.
- Operational barriers: Sustainable tech needs upfront capital, and growing teams frequently lack the expertise to optimize systems for efficiency.
Energy intensity: Energy consumption from grow lighting and HVAC is the single largest operational sustainability challenge, driven by long photoperiods and indoor climate control.
Water usage and runoff: Heavy irrigation and fertigation practices increase total water use and raise the risk of nutrient-rich runoff entering stormwater systems.
Nutrient pollution: Over-application and improper disposal of nutrient solutions create eutrophication risks for nearby water bodies.
Chemical pesticides: Routine chemical treatments can harm beneficial insects, degrade local biodiversity, and complicate market access in regions with strict residue rules.
Waste & packaging: Single-use plastics, non-compostable packaging, and large volumes of plant waste create disposal and reputational issues.
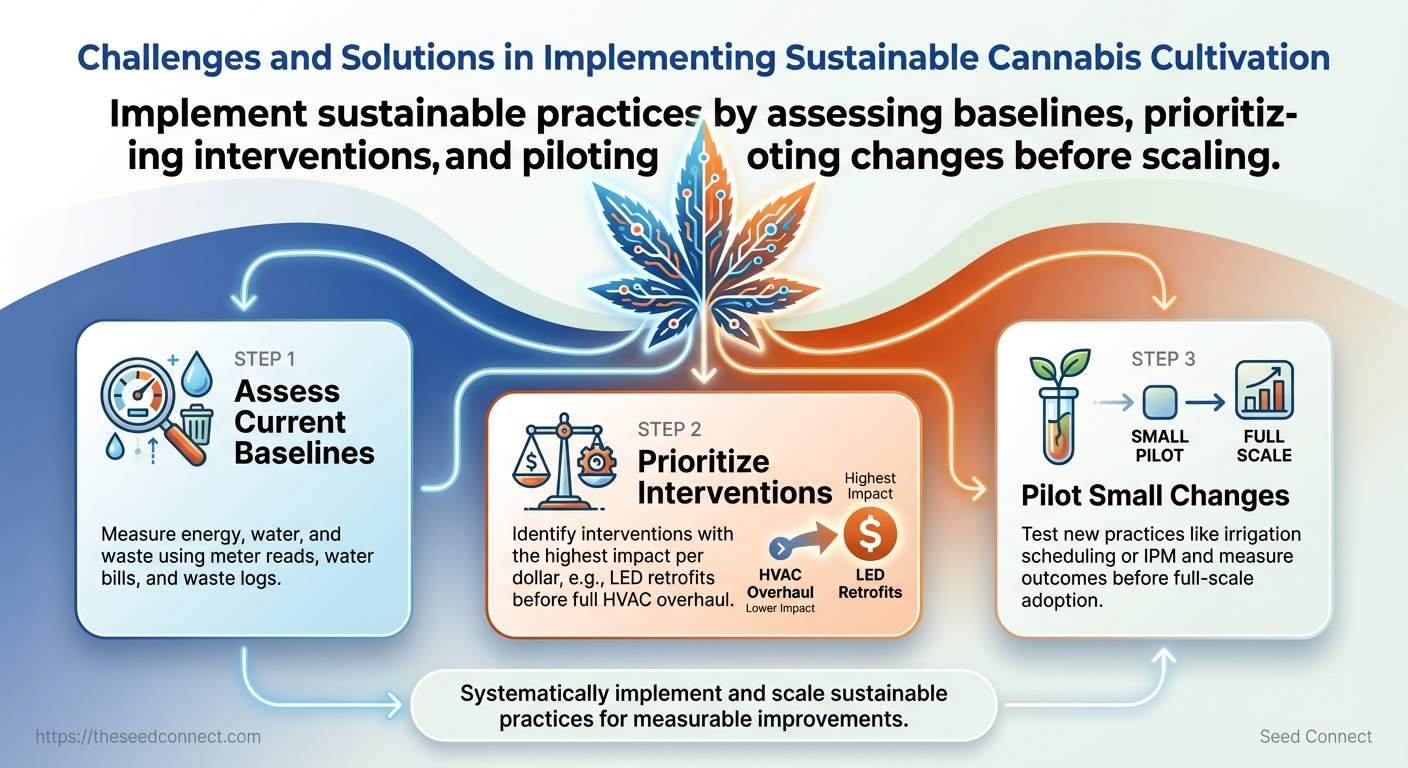
- Assess current baselines for energy, water, and waste (meter reads, water bills, and waste logs).
- Prioritize interventions by impact per dollar (e.g., LED retrofit before full HVAC overhaul).
- Pilot small changes (irrigation scheduling, IPM practices) and measure outcomes before scaling.
Side-by-side comparison of major sustainability challenges with impacts and typical mitigation difficulty
| Challenge | Typical Impact | Primary Cause | Mitigation Difficulty |
|---|---|---|---|
| Energy consumption | High operating costs, large carbon footprint | Continuous lighting and HVAC loads | High |
| Water usage and runoff | Local water stress, regulatory risk | Frequent irrigation, fertigation systems | Medium-High |
| Nutrient pollution | Eutrophication, fines | Over-application, poor runoff control | Medium |
| Chemical pesticides | Biodiversity harm, market limitations | Conventional pest protocols | Medium |
| Waste & packaging | Disposal costs, landfill pressure | Single-use plastics, plant waste | Medium |
Key insight: Energy represents the largest and most technically difficult challenge to mitigate, while water and waste issues often yield faster wins through operational changes and better materials choices. Targeted pilots and simple monitoring unlock disproportionate improvements.
Understanding these constraints clarifies where investment and training deliver the fastest returns, and highlights practical levers growers can use to reduce environmental impact without sacrificing yield or quality. When teams focus on measurable, incremental changes, operational resilience improves and sustainability becomes a competitive advantage.
What You’ll Need (Prerequisites)
Successful, sustainable cannabis cultivation starts by matching the right equipment, materials, and basic skills to the scale and regulatory environment of the grow. For small medicinal grows the priority is reliable environmental control and clean inputs; for larger commercial operations, redundancy, compliance systems, and waste management become non-negotiable. Below are the concrete items and capabilities that shorten the learning curve and reduce costly mistakes.
Tools & materials to acquire first
- LED grow lights: energy-efficient, spectrally tunable fixtures sized to your canopy.
- Timers and controllers: reliable scheduling for lights, fans, and pumps.
- Drip irrigation system: precise delivery reduces runoff and nutrient waste.
- Soil testing kit: pH, EC/TDS, and nutrient tests to track media health.
- Composting setup: closed-loop source for organic amendments and reduced waste.
- HEPA ventilation/filtration: particulate control and odor management for compliance.
- Biodegradable packaging: for seed handling and small-batch product stewardship.
Practical skills to develop
- Monitor environmental reads daily and log
PPFD, temperature, and RH. - Test media and runoff weekly for
pHand electrical conductivity. - Keep a running record of inputs, feeding schedules, and pest observations.
- Interpret soil test results to balance N-P-K and micronutrients.
- Implement basic sanitation protocols and local waste disposal procedures.
LED grow lights: High-efficiency photosynthetic lighting with spectral control for veg and flower stages.
Drip irrigation system: Automated water delivery that reduces human error and conserves water.
Soil testing kit: Handheld meters and reagent tests to measure pH, EC, and key nutrients.
Composting setup: Aerobic bin or tumbler sized for your organic waste and amendment needs.
HEPA ventilation/filtration: Inline filtration for particulate and odor control to meet local codes.
Compliance & operational prerequisites
- Local licensing: Verify cultivation licenses, facility zoning, and recordkeeping mandates.
- Waste disposal plan: Ensure compliant organic and chemical waste routes.
- Safety equipment: PPE, fire suppression where required, and electrical safety inspections.
Checklist mapping prerequisites to purpose, estimated cost, and difficulty
Prerequisites: Tools, Materials, and Skills
| Item | Purpose | Estimated Cost Range | Skill Level Required |
|---|---|---|---|
| LED grow lights | Provide full-spectrum photosynthetic light | $200–$2,000 per fixture | Intermediate |
| Drip irrigation system | Precise, automated watering and fertigation | $150–$800 (small to med) | Intermediate |
| Soil testing kit | Measure pH, EC/TDS, nutrient levels |
$20–$200 | Beginner |
| Composting setup | Convert organic waste into amendments | $50–$500 | Beginner |
| HEPA ventilation/filtration | Control particulates and odors for compliance | $300–$2,500 | Advanced |
Key insight: Prioritize durable environmental controls (lighting, ventilation) and simple feedback loops (testing, recordkeeping). Initial investment skews toward lighting and filtration, while routine costs and risk reduction come from monitoring and composting systems.
Understanding and assembling these prerequisites reduces variability and regulatory friction, letting growers focus on genetics and operational refinement. When equipment, materials, and basic skills are in place, problems are easier to diagnose and wins scale predictably.
Step-by-Step Implementation: Convert a Conventional Grow to Sustainable Practices
Start by treating sustainability as a project with clear scope: reduce energy and water use, cut waste, and preserve or improve yield quality. Begin with a rapid audit, set measurable targets, run a small pilot, then scale changes only after validating results. This approach limits disruption to crop cycles while delivering quantifiable wins.
Prerequisites
Operational baseline: Recent electricity, water, and consumables bills plus a log of current yields and runtimes.
Staff alignment: One project lead and a cross-functional grow tech to own tests and documentation.
Budget envelope: A defined capital and operational budget with a 6–18 month ROI horizon.
Tools & materials
- Energy monitoring: Inline meters or smart breakers to track kW in real time.
- Water meters & flow sensors for per-room usage tracking.
- Environmental controllers capable of scheduling setpoints and data logging.
- High-efficiency lighting for pilots (e.g., modern LED arrays).
- Seed selection options such as feminized or autoflower genetics to shorten cycles or increase uniformity.
- Audit existing operations and set targets.
- Prioritize interventions by ROI and risk.
- Design a small-scale pilot.
- Execute the pilot and document everything.
- Analyze results and iterate.
- Scale and monitor long-term.
Conduct a room-by-room energy and water audit over 2–4 weeks. Record baseline PPFD, run-hours, HVAC loads, and nutrient usage. Set measurable targets like 20% energy reduction, 30% water savings, or maintained yield per square metre within 12 months.
Rank actions: lighting retrofit, HVAC optimization, irrigation upgrades, waste reduction, and genetics changes. Prioritize low-disruption, high-ROI items first (often lighting and irrigation).
Choose one room or 10–20% of canopy. Define control and test groups, schedule, and metrics: kWh/m², water L/kg, crop uniformity, and THC/CBD if testing genetics.
Run the pilot for a full growth cycle. Log environmental setpoints, energy graphs, nutrient recipes, and harvest weights. Use photos and time-stamped notes for anomalies.
Compare pilot vs control on the defined metrics. Adjust variables—PPFD, DLI, root zone temps—based on outcomes. Repeat one more cycle if results are mixed.
Deploy successful changes across rooms in phases, monitor via dashboards, and lock protocols into SOPs. Set quarterly review cadence with clear KPIs.
Practical examples: switching to optimized LED schedules often cuts lighting kWh by 30% without yield loss; swapping to drip reclaim systems can reduce runoff by 40–60%.
Understanding these steps lets teams convert a conventional grow into a resilient, efficient operation while preserving product quality and operational continuity. When implemented thoughtfully, sustainable changes become the new baseline for predictable performance.
Energy and Climate Control Solutions
Effective energy and climate control reduces operating costs while stabilizing plant environments—start by targeting the largest energy draws (lighting, HVAC) and then layer controls and renewables to shave emissions without risking yield. LEDs typically cut lighting energy by 30–60% versus older HID systems, while HVAC optimization delivers recurring savings by reducing load through better sequencing, setpoints, and heat recovery. For growers with capital constraints, staged renewable integration (start with solar PV, add batteries later) balances cashflow with long-term emissions reductions.
Core components and benefits LED lighting: Lower heat output, dimmable spectrum control, and lower wattage per μmol. HVAC optimization: Variable-speed drives and zone control cut runtime and peak demand. Heat recovery ventilation: Recovers waste heat from exhaust air to precondition incoming air. Solar PV panels: Reduces grid consumption and demand charges during daylight operations. * Battery backup: Enables peak shaving and resilience during outages.
Planning steps for implementation
- Run an energy audit to profile loads, demand charges, and runtime patterns.
- Prioritize low-cost/high-impact retrofits: install LED retrofit fixtures and tune lighting schedules.
- Implement HVAC controls: add variable-frequency drives, set sensible temp/humidity bands, and establish night setbacks.
- Evaluate staged renewables: size solar to daytime load first; design battery capacity for critical systems.
- Monitor and iterate using interval data from submeters and BMS dashboards.
LED retrofit: Replace HID fixtures with LED fixtures rated for canopy PPFD and efficacy ≥2.5 μmol/J.
HVAC sequencing: Use deadband settings to avoid short-cycling and enable economizer mode when outdoor conditions permit.
> Industry tests show lighting is often the single largest electrical load in indoor grows, making LEDs the fastest payback for many operations.
Practical examples and tips Small grows: Start with LED retrofits and basic thermostats. Medium grows: Add VFDs and zoned ventilation to reduce runtime. * Large grows: Combine heat recovery, advanced controls, and on-site solar with energy storage.
Energy-saving options by upfront cost, typical payback, maintenance needs, and suitability for small/medium/large grows
| Solution | Upfront Cost | Estimated Payback | Suitability (size) |
|---|---|---|---|
| LED retrofit | $60–$250 per fixture | 1–3 years | Small/Medium/Large |
| HVAC efficiency upgrade | $5,000–$50,000 | 2–5 years | Medium/Large |
| Heat recovery ventilation | $3,000–$25,000 | 3–6 years | Medium/Large |
| Solar PV panels | $1.50–$3.00 per W installed | 5–10 years | Small/Medium/Large |
| Battery backup | $400–$1,000 per kWh | 6–12 years | Medium/Large |
Key insight: LEDs offer the quickest payback and immediate energy reduction, HVAC and heat recovery produce steady operational savings, and solar plus batteries require more capital but lock in long-term cost stability and emissions reductions.
Understanding these options allows teams to sequence investments so operational funds cover immediate wins while capital projects (solar, batteries) are phased in for durable emission cuts. When implemented correctly, this approach reduces energy spend and stabilizes growing conditions without disrupting production.
Water and Nutrient Management
Efficient water and nutrient management begins with matching delivery method to the plant’s stage and the medium’s capacity. In practice that means using recirculating irrigation where possible, monitoring EC and pH for every run, and building soil organic matter so the substrate buffers moisture and nutrients between irrigations. These three moves reduce waste, stabilize root-zone chemistry, and lower the frequency of corrective interventions.
Why recirculating systems matter
Recirculating systems recover run-off nutrients and return them to the reservoir, dramatically cutting both water and fertilizer consumption for medium-to-large grows. They work best when paired with reliable filtration and scheduled reservoir turnovers to prevent salt buildup and microbial issues.
> Industry analysis shows recirculating systems can reduce water use and nutrient waste substantially in controlled environments.
Practical monitoring and controls
- Regular EC checks: Measure
ECbefore and after feed to track uptake and detect salt accumulation. - Frequent pH checks: Keep pH in the target band for your medium to ensure nutrient availability.
- Reservoir management: Swap or partially drain reservoirs on a schedule tied to growth stage and EC drift.
- Calibrate meters weekly.
- Record
ECand pH for each reservoir and each irrigation cycle. - Adjust fertilizer concentration only after confirming pH is in range.
Soil health levers
- Increase organic matter: Compost, biochar, and well-composted amendments increase water-holding capacity and microbial stability.
- Use mycorrhizae when appropriate: They improve nutrient uptake efficiency and reduce required feed levels.
- Avoid compaction: Looser soils promote even wetting and reduce anaerobic zones that cause root disease.
EC (electrical conductivity): The measure of dissolved salts in solution; used as a proxy for nutrient concentration.
pH: The acidity/alkalinity of the root zone; controls nutrient solubility and uptake.
Soil organic matter: Decomposed plant and microbial material that improves water retention and nutrient buffering.
Provide target EC and pH ranges across veg/flower stages and corresponding irrigation frequency guidelines
| Growth Stage | Target EC (mS/cm) | Target pH | Irrigation Cadence |
|---|---|---|---|
| Seedling | 0.2–0.5 | 5.8–6.2 | Light misting or small feeds every 2–3 days |
| Vegetative | 0.8–1.2 | 5.8–6.5 | Daily to alternate-day full irrigations |
| Early Flower | 1.2–1.6 | 6.0–6.3 | Daily feeds; monitor runoff EC weekly |
| Peak Flower | 1.6–2.0 | 6.0–6.3 | Daily feeds; flush or partial reservoir change weekly |
| Flush/Finish | 0.5–0.8 | 6.0–6.5 | Reduce frequency; allow mild dry-back 2–3 days before harvest |
Key insight: These ranges balance uptake and salt control—keep EC within stage bands and manage pH first; irrigation cadence then follows substrate retention and plant demand.
Understanding and applying these principles reduces run-off, stabilizes nutrient delivery, and gives predictable plant responses. When soil biology and irrigation systems are tuned together, labor and inputs drop while crop consistency improves.
Integrated Pest Management and Reduced-Chemical Strategies
Integrated Pest Management (IPM) prioritizes prevention and monitoring, using targeted interventions only when thresholds are exceeded. For cannabis cultivation, that means designing a system where cultural practices, biological controls, and documentation reduce reliance on synthetic pesticides while protecting yield and quality. Practical decision rules are simple: prevent first, detect early, respond proportionally, and document everything so responses improve over time.
Practical IPM Steps and Decision Rules
1. Establish baseline monitoring: map the facility, record normal pest/beneficial presence, and set action thresholds for each pest species.
2. Prioritize exclusion and sanitation: seal entry points, use sticky traps, clean tools between rooms, and manage incoming plant material.
3. Optimize environmental controls: use humidity and temperature setpoints that favor plant health and discourage pests; rotate airflows and maintain filtration.
4. Deploy biologicals and cultural controls as first-line interventions when thresholds are reached.
5. Escalate to low-toxicity products only when biological and cultural measures fail, and always follow re-entry and residue guidelines.
6. Document outbreak, actions taken, and outcomes in a centralized log for continuous improvement.
Biologicals, Cultural Controls and Decision Logic
- Biologicals: introduce predatory mites, beneficial nematodes, or microbial inoculants to suppress targets without collateral damage.
- Cultural controls: crop rotation in substrate beds, pruning to improve airflow, and targeted fertilization to reduce plant stress.
- Selective chemistry: choose pheromone disruptors or narrow-spectrum miticides as last-resort options.
Decision rules to apply:
- Threshold rule: treat only when pest counts exceed the economic or quality threshold established in the baseline.
- Proportionality rule: use the least disruptive measure likely to solve the problem.
- Rotation rule: alternate control modes to prevent resistance — biologicals → cultural tweaks → targeted chemistry.
Documentation and Continuous Improvement
Outbreak Log: Record date, affected strain, pest ID, counts, interventions, and outcome.
Post-action Review: Within 7–14 days, evaluate efficacy and adjust thresholds or cultural practices.
Practical example: When spider mite counts on a single flowering room cross threshold, isolate HVAC, release predatory mites, increase humidity slightly, and postpone chemical treatment pending 7-day reassessment.
Implementing these steps reduces chemical inputs while preserving crop quality and compliance, and creates a knowledge base that improves response speed and accuracy over time. Understanding and documenting IPM decisions makes it possible to reduce overhead and maintain consistent, marketable harvests.
Waste Reduction, Circularity and Packaging
Reducing waste and designing circular packaging are practical levers that lower cost, improve brand trust, and make compliance simpler for cannabis businesses. Start by treating plant waste as a resource: compost biomass to return nutrients to the soil, redirect trims into value streams like extracts or nutrient products, and standardize packaging choices to align with regulatory needs while minimizing environmental footprint. Practical action at the operational level—measurement, segregation, and iterative improvement—yields measurable diversion from landfill and recurring savings.
Practical waste-handling strategies
- Segregate at source: Separate organic waste, recyclables, and regulated waste at daily collection points.
- Compost on-site or partner: Composting returns carbon and nutrients; partner with local composters when space or permits are limited.
- Reuse trims strategically: Convert trim into
hash,solventless extracts, or nutrient-rich compost feedstock. - Switch packaging types: Prioritize recyclable or certified compostable formats compatible with local waste streams.
- Measure and report: Track
waste diversion rateand disposal costs monthly to identify high-impact improvements.
Step-by-step composting & reuse process
- Assess local regulations and permitting for
on-site composting. - Set up dedicated collection bins labeled for organics, recyclables, and hazardous material.
- Shred plant material and mix with carbon sources (wood chips, shredded paper) at ~30:1 carbon:nitrogen.
- Monitor moisture and temperature; turn piles weekly until stable compost is achieved.
- Test finished compost for contaminants before using as soil amendment or selling.
Each step reduces disposal fees and captures value from previously wasted biomass.
Operational metrics and monitoring
- Waste diversion rate: Percentage of total waste diverted from landfill or incineration.
- Cost per pound disposed: Direct disposal costs drive prioritization.
- Packaging reclaim rate: Percentage of packaging returned or recycled by customers.
Packaging options (plastic, recycled plastic, compostable, glass) by environmental impact, cost, and regulatory suitability
Packaging options (plastic, recycled plastic, compostable, glass) by environmental impact, cost, and regulatory suitability
| Packaging Type | Environmental Impact | Cost Relative | Regulatory/Storage Notes |
|---|---|---|---|
| Single-use plastic | Low recycling value, persistent pollution | Low | Often compliant; watch terpene permeability |
| Recycled plastic | Reduced virgin plastic use, still petroleum-based | Medium | More acceptable to regulators; verify food-grade source |
| Compostable bioplastic | Breaks down in industrial composting, limited home composting | Medium–High | Must match local composting capabilities; label accordingly |
| Glass jars | Highly recyclable, long lifecycle | High | Excellent inert storage for terpenes; heavier for shipping |
| Paper-based | Renewable, recyclable or compostable depending on coatings | Low–Medium | Avoid wax/foil coatings to remain compostable and compliant |
Key insight: Compostable options reduce landfill impact only when local industrial composting exists; recycled plastics lower virgin material use but may not solve contamination issues; glass provides inert storage with higher shipping costs and carbon footprint. Prioritize options that match local end-of-life infrastructure and regulatory storage requirements.
Understanding these practical steps and matching packaging to available waste systems makes sustainability achievable without disrupting operations. When teams measure impact and reuse resources thoughtfully, sustainability becomes a continuous improvement that also protects margins.
Monitoring, Reporting, and Scaling Sustainable Practices
Begin with a tight set of measurable indicators and a repeatable rollout path. Track a small group of high-value KPIs continuously, pair them with low-cost sensing and logging, validate improvements in a pilot, then update SOPs and train teams before scaling. This approach keeps data actionable and avoids the trap of collecting noise without follow-through.
KPIs to track (focus on quality, resource use, and yield)
- Water use per gram: Liters used divided by dried grams produced; reveals irrigation efficiency.
- Energy per gram: kWh consumed divided by dried grams; includes HVAC and lighting.
- Germination success rate: Percentage of seeds that reach transplant stage; critical for seed suppliers.
- Pest incidence rate: Number of pest outbreaks per production cycle; drives IPM cost decisions.
- Yield per square meter: Dried grams per m²; outcome metric tying inputs to revenue.
- Nutrient use efficiency: Ratio of applied nutrients to plant uptake; track with
ppmandEC. - Cycle time: Average days seed-to-harvest; shorter cycles reduce overhead.
Tools that make monitoring practical
- Basic sensors: Affordable
soil moistureandCO2probes for real-time data. - Power submeters: Per-circuit
kWhlogging to attribute energy to rooms/equipment. - Environmental controllers: Systems that log
RH, temperature, andPARfor crop modeling. - Cloud logging platforms: Low-cost telemetry with CSV export for analysis.
- Plant-tracking software: Batch records and traceability for germination and pest events.
- Mobile inspection apps: Quick photo-based reporting for scouters and IPM teams.
Scaling checklist: pilot → SOPs → rollout
| Phase | Duration | Key Activities | Success Criteria |
|---|---|---|---|
| Pilot | 4–8 weeks | Install sensors in one room, run parallel control crop, collect baseline | >10% data coverage, reliable sensor uptime |
| Evaluation | 2–4 weeks | Analyze KPI changes, flag anomalies, calculate ROI per metric | Statistically relevant improvement in 1–2 KPIs |
| SOP Development | 1–2 weeks | Document procedures, thresholds, escalation paths, training materials | SOPs written, reviewed, and approved by operations |
| Full Rollout | 4–12 weeks | Deploy sensors and workflows across facilities, run weekly audits | Facility-wide KPI alignment within target ranges |
| Continuous Improvement | Ongoing | Monthly KPI review, quarterly technology reassessment | Sustained KPI trends and documented optimizations |
Key insight: Piloting reduces operational risk and clarifies which KPIs correlate to real business outcomes; SOP updates and training lock improvements into day-to-day practice.
- Install monitoring in a limited area and collect 4–8 weeks of continuous data.
- Compare pilot KPIs against a control and calculate practical ROI for each intervention.
- Convert validated actions into step-by-step SOPs and train frontline staff.
- Roll out incrementally, auditing adherence and revising SOPs after each wave.
- Maintain a continuous improvement cadence with monthly KPI reviews.
A practical habit: keep the KPI set lean, automate data capture where possible, and tie any dashboard metric to a concrete operational action. Implementing this flow reduces guesswork and accelerates sustainable improvements while preserving crop quality.
📥 Download: Sustainable Cannabis Cultivation Checklist (PDF)
Troubleshooting Common Issues
Start by diagnosing the symptom clearly: note what went wrong, when it began, and what changed in the environment or process immediately beforehand. Rapid, disciplined triage prevents chasing phantom causes and restores consistent results faster.
Diagnose systematically
- Observe and record the symptom precisely (leaf curl, slow germination, yellowing).
- Check recent changes: seed batch, nutrient mix, light schedule, substrate, or watering frequency.
- Measure objectively:
pH,EC/ppm, temperature, and relative humidity. - Compare readings to your target ranges and flag anything outside tolerance.
- Rule one: change only one variable at a time. This isolates cause and shows whether the correction worked.
- Rule two: document every corrective action and outcome in a simple log.
Common problems and targeted fixes
Stunted or slow growth: Often caused by compacted medium or root-bound pots. Repot to a lighter medium or a larger pot, loosen the root ball, and flush with water at target pH (typically 5.8–6.5 for soil-less mixes).
Seed germination failures: Confirm seed age and storage. Use gentle warmth (20–25°C) and steady humidity; consider a germination medium like moist paper towel or rapid-propagation cubes. For guaranteed seed quality, supplier germination policies and expert support can save weeks of troubleshooting.
Yellow leaves (nutrient deficiency vs. overwatering): Measure EC first. Low EC with interveinal yellowing points to nutrient deficiency; raise feed gradually. High EC or soggy medium points to overwatering or salt build-up; flush and reduce feed strength by 25%.
Pests and molds: Isolate affected plants immediately. For low-level infestations, use targeted biological controls and improve air movement. For systemic outbreaks, remove severely affected material and consider expert intervention.
When to escalate
Threshold for expert intervention: if corrective steps fail after two documented iterations, if multiple plants show identical rapid decline, or if pathogens (root rot, pervasive mold) appear despite standard controls. Call for lab testing or professional diagnostics when cause is ambiguous and losses exceed acceptable limits.
Understanding and documenting a methodical troubleshooting workflow reduces repeat problems and shortens recovery time. When the steps above are followed, teams resolve most common issues without guesswork and preserve productive runs.
Tips for Success and Pro Tips
Start with small, measurable changes that produce immediate returns and build from there. Low-cost interventions—better seed selection, tighter germination practices, and clearer SOPs—deliver outsized gains in yield consistency and quality. Combine those with staff incentives and targeted capital de-risking (rebates, grants, tax credits) to scale performance without exposing the operation to excessive risk.
SOP: Standardize routine tasks so variability is predictable and fixable.
Germination guarantee: A supplier commitment that reduces seed risk and protects early-stage crop economics.
High-impact, low-cost measures to implement now Buy proven genetics: Use feminized or autoflower seeds with documented stability to reduce rework and male weeding. Validate germination: Run simple paper-towel or tray germ tests and log rates for each batch. Tighten environmental setpoints: Small adjustments—±2°C, ±5% RH—often stop stress-related hermaphroditism and slow growth. Optimize light scheduling: For veg, use 18/6; for autos, maintain consistent daily PAR levels rather than strict day-count. * Active pest scouting: Weekly checks catch issues before they need chemical interventions.
Step-by-step SOP rollout for a grow room
- Draft one-page SOP for a single routine (watering, nutrient mix, or pruning).
- Pilot the SOP with one team for two crop cycles and collect time and error metrics.
- Revise instructions, add photos or short
30–60svideo clips, and secure sign-off. - Roll out across rooms with a small incentive (productivity bonus or time-off) tied to adherence and outcomes.
Engage staff with incentives and clear metrics Clear KPIs: Track germination rate, transplant survival, and week-over-week growth uniformity. Small, frequent rewards: Weekly recognition or micro-bonuses keep teams focused. * Training minutes: Short, scheduled skill sessions beat long, infrequent workshops.
Leverage incentives and grants to de-risk upgrades Rebate-first approach: Prioritize LED or HVAC upgrades where rebates cover a meaningful percent of capital. Phased capital: Replace one zone, measure ROI, then scale. * Document performance: Use utility-grade meters and simple before/after yield logs to qualify for programs.
Adopt these practices iteratively: optimize a single variable, measure the result, then lock it into an SOP. When executed consistently, these steps reduce surprises and free resources for strategic upgrades and higher-value genetics.
Conclusion
After converting a conventional grow to sustainable practices, the visible wins come quickly: lower energy bills from climate-control upgrades, steadier yields once nutrient regimens are dialed in, and far less waste heading to the compost bin. That practical path—audit first, swap inefficient lighting and HVAC, stabilize water and nutrient delivery, and adopt integrated pest management—was illustrated earlier by a mid-size indoor operation that cut energy use by roughly 30% after an LED retrofit and by a greenhouse that reduced runoff through closed-loop irrigation. These changes preserve crop quality while addressing the sustainability challenges that most cultivators face.
Take these immediate next steps: – Perform an energy and water audit to find the biggest wins. – Prioritize LED and HVAC upgrades for rapid cost and emissions reductions. – Implement a simple closed-loop nutrient plan and start integrated pest monitoring.
For hands-on support with seed selection or to align cultivar choices with lower-input systems, explore resources like The Seed Connect’s growing guides and germination guarantee at https://theseedconnect.com. Adopting these measures will reduce operating risk, improve product consistency, and make scaling sustainable practices feasible—start with the audit this week and schedule incremental upgrades so improvements compound without disrupting the crop cycle.