Many growers feel that long growth times and uneven buds are just part of the process.
Sometimes, a simple dry starter or a shift in pH can set back weeks of dedicated effort.
Switching to hydroponics changes that math.
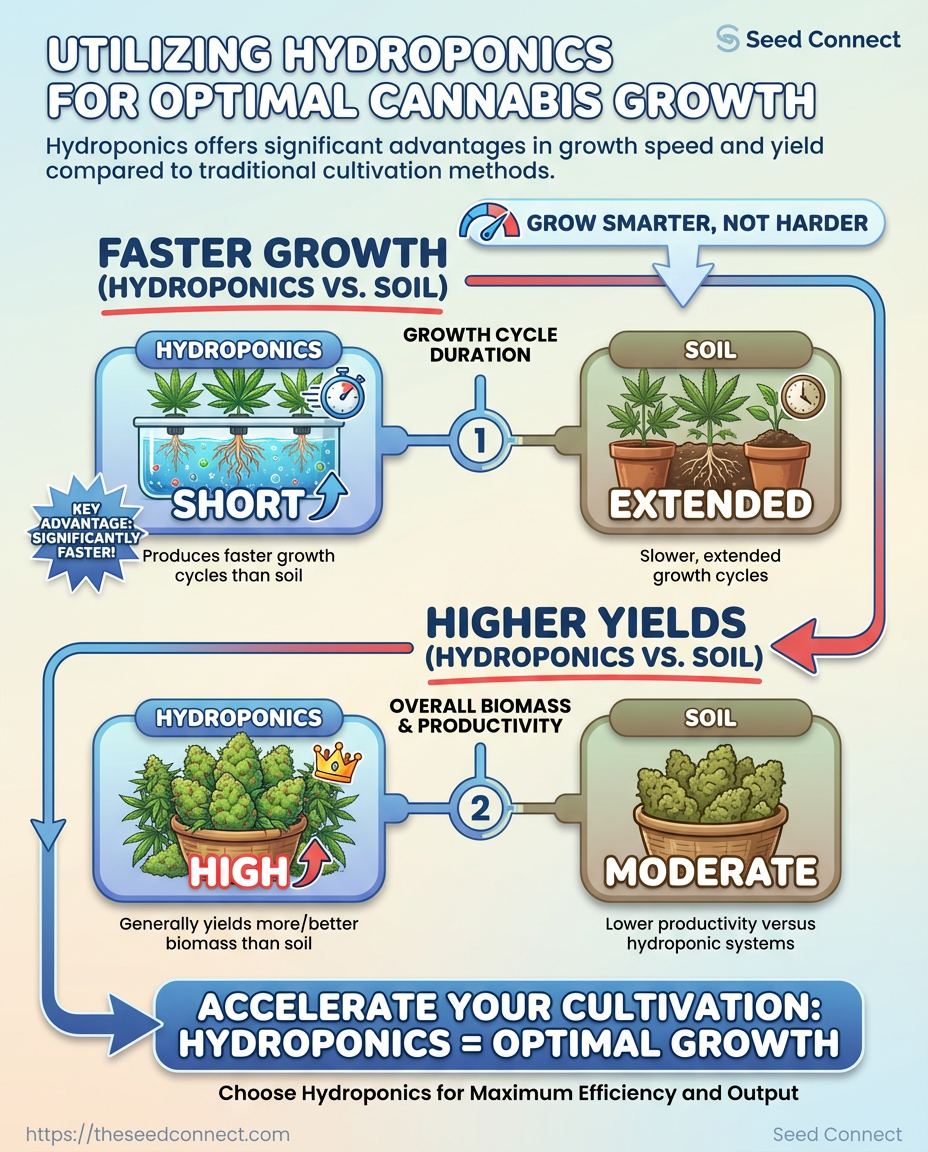
Plants can often go from seedling to harvest much faster.
Reports suggest growth may be about 50% quicker by 2025.
That speed comes from constant nutrient delivery and higher oxygen at the roots.
Yields jump too — hydroponic cultivation can deliver 20–25% higher harvests, according to 2026 agritech reports.
Keeping pH between 5.5 and 6.5 and temperatures around 70–85°F helps roots take in nutrients effectively.
Plants use less energy for searching roots and more for developing flowers.
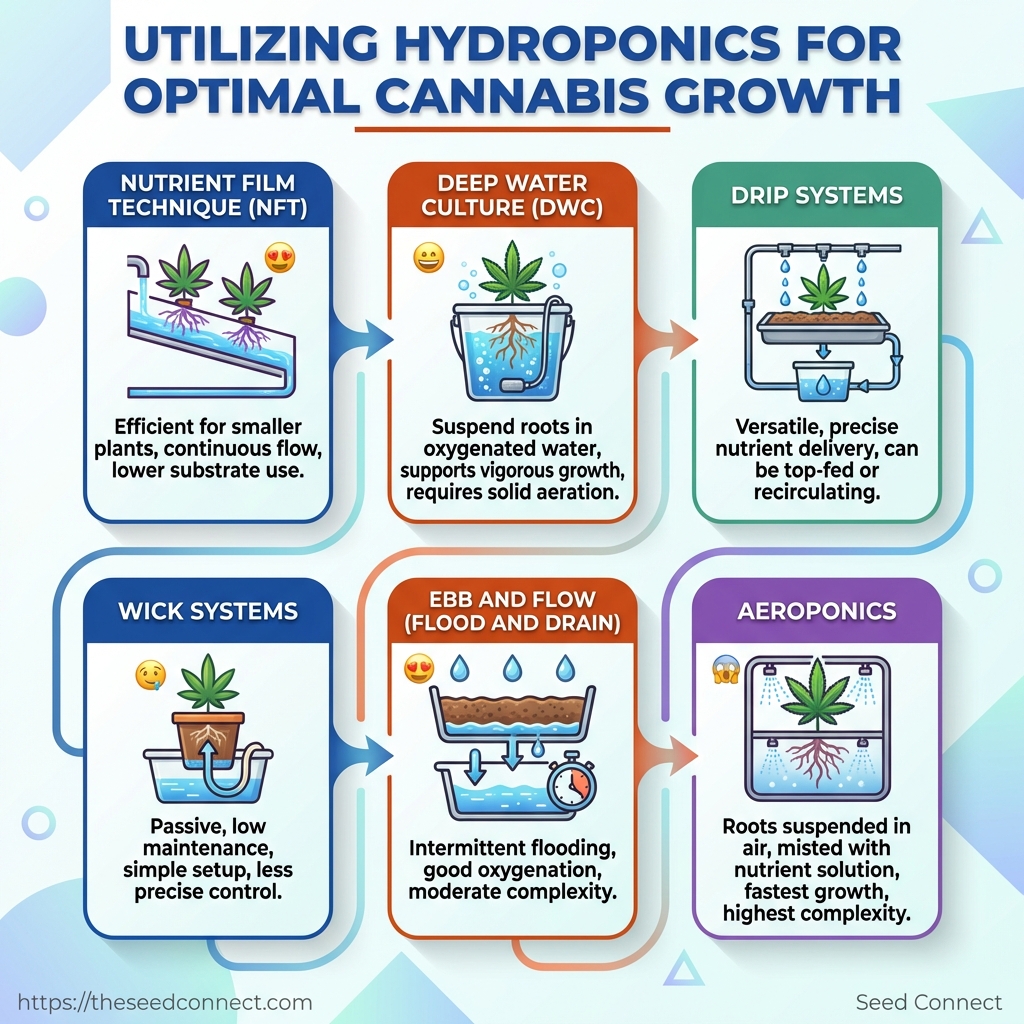
Common systems like Nutrient Film Technique and Deep Water Culture offer different trade-offs for space, cost, and labor.
Choosing the right system depends on your goals and how much hands-on time you want to spend.
There is a learning curve, but the payoff is consistent, repeatable cycles.
For anyone tired of guesswork, controlled water-based systems make results measurable.
Why choose hydroponics for cannabis
What if your plants could grow faster and cleaner than in soil? Hydroponic cultivation makes that possible by delivering nutrients directly to roots in a controlled water environment.
That control removes a lot of variability found in soil and speeds up growth cycles.
Hydroponics also increases yield because it allows growers to adjust nutrients, pH, and oxygen precisely.
It’s not magic — it’s engineering applied to plant nutrition, and the results show up in faster veg times and denser flowers.
Faster growth and higher yields come with trade-offs.
Systems need monitoring, water needs management, and the initial setup costs are higher than basic soil grows.
Still, many experienced growers switch because the efficiency gains are tangible and repeatable.
Faster, cleaner growth
Hydroponic systems cut lag between nutrient delivery and uptake, which means plants use what they need more efficiently.
That efficiency translates into measurable performance gains for cannabis.
> According to a 2025 study by the Cannabis Research Institute, hydroponic cannabis can grow 30–50% faster than soil-grown plants. > 2026 agritech reports show 20–25% higher yields per cycle for well-managed hydroponic setups.
Those numbers are why commercial producers lean on hydroponics.
Tools like Growlink’s automation platforms help keep environmental variables stable, while brands such as Advanced Nutrients make formulas tailored for water-based systems.
Consulting teams like the American Cannabis Company help scale and troubleshoot when a grow moves from hobby to commercial.
Key benefits and trade-offs
Hydroponics shines when space, time, and consistency matter.
It’s excellent for controlled indoor rooms and stacked vertical grows.
That said, expect more technical skills and audible maintenance compared with potting soil.
The infographic above shows pros and cons side-by-side: growth rate, space efficiency, water use, and system complexity.
It helps decide whether hydroponics fits your goals and scale before you invest time or money.
- Faster growth: Shorter veg cycles and quicker harvests when tuned correctly.
- Higher yields: More grams per square foot versus typical soil runs.
- Water efficiency: Uses less water overall, but requires careful recirculation.
- Higher complexity: Pumps, timers, and nutrient dosing add operational overhead.
- Upfront cost: Initial equipment and sensors raise the entry price.
Common myths and realistic expectations for new growers
Some people assume hydroponics is automatically “plug-and-play.” It isn’t.
Success depends on consistent monitoring and rapid response to problems like pH swings or pump failures.
Expect to learn pH management (pH 5.5–6.5) and temperature control (70–85°F / 21–29°C) quickly.
Small mistakes compound fast in a soilless system, but the learning curve flattens once routines and alarms are in place.
NFT: Nutrient Film Technique delivers a thin flowing film of nutrient solution across roots — efficient for smaller plants and continuous flow systems.
DWC: Deep Water Culture suspends roots in oxygenated nutrient water and supports very vigorous growth when aeration is solid.
Hydroponics pays off when precision and repeatability matter.
Start small, build monitoring habits, and expect better control over growth timelines and yields as you gain experience.
Choosing the right hydroponic system
When selecting a hydroponic system, think about how much control you desire and the time and budget you can commit.
Systems range from simple tubs that teach the basics to high-tech rigs that automatically dose nutrients and log environment data.
Match the system to your available space, your experience level, and the size of the crop you plan to run.
You’ll notice faster growth and better yields with more advanced setups.
Recent findings show hydroponic cannabis can deliver up to 50% faster growth (2025) and 20–25% higher yields per cycle (2026).
Those gains come with trade-offs: complexity, equipment cost, and daily maintenance increase as systems get more advanced.
Practical choices split into five familiar categories.
Below are concise definitions and what each system favors in real grow scenarios.
Overview of system types
Deep Water Culture (DWC): Roots sit in oxygenated nutrient solution, producing rapid vegetative growth and thick root mass.
Best for growers who want strong, fast plants and can manage oxygenation and water temperatures.
Ebb and Flow (Flood & Drain): Periodic flooding gives roots nutrient access, then drains to let oxygen return.
It’s forgiving for beginners and scales well for medium-sized grows.
Nutrient Film Technique (NFT): A thin film of nutrient solution constantly flows over roots in sloped channels.
Great for efficient nutrient uptake but less tolerant of pump failure and root mass—better for experienced cultivators.
Drip System: Timed drippers apply nutrients to individual pots or coco.
Highly modular, easy to automate, and common in commercial setups that want redundancy.
Aeroponics: Roots are misted with nutrient solution, maximizing oxygen-to-root contact and growth rates.
Yields and speed are high, but uptime and precise environmental control are critical.
Which system fits your space, budget, and skill level?
Comparative table
| System | Ideal grower level | Initial cost range | Daily maintenance | Yield potential | Best use case |
|---|---|---|---|---|---|
| Deep Water Culture (DWC) | Beginner → Intermediate | $100–$500 | Daily oxygen and temp checks | High | Small bench grows, fast veg |
| Ebb and Flow (Flood & Drain) | Beginner → Intermediate | $150–$700 | Pump cycles, media checks | Moderate–High | Multi-plant tents, hobbyists |
| Nutrient Film Technique (NFT) | Intermediate → Advanced | $200–$1,200 | Monitor flow, troubleshoot blockages | Moderate–High | Space-efficient commercial racks |
| Drip System | Intermediate → Advanced | $200–$1,500 | Line flushing, emitter checks | High | Scalable commercial or multi-tent |
| Aeroponics | Advanced | $800–$3,500+ | Mist system upkeep, strict sanitation | Very High | High-performance, experimental grows |
Grow choices should reflect risk tolerance.
Aeroponics and NFT reward precision but punish failure quickly.
Ebb and Flow and DWC offer easier recovery and lower upfront risk.
Commercial players often run drip or NFT for redundancy.
Growlink and consultancies like the American Cannabis Company can help automate and systems as you scale, while nutrient lines such as Advanced Nutrients are formulated for hydroponic feeding.
Essential equipment checklist for your first build
- Reservoir: Holds nutrient solution; size depends on system and plant count.
- Pump(s): Submersible or air pumps to move water and oxygen.
- Growing medium / trays: Net pots, clay pebbles, or flood trays depending on system.
- Air stone / oxygenation: Keeps dissolved oxygen high in DWC and reservoirs.
- pH & EC meters: Monitor
pH(aim for5.5–6.5) and nutrient strength. - Timers & fittings: Reliable timers, tubing, and backups for pumps and lights.
Choose the simplest system that gives the performance you need.
Start small, master one setup, then scale with automation and better controls as confidence grows.
Selecting high-quality seeds and legal considerations
Healthy plants start with good genetics, and in hydroponic systems that truth gets amplified.
Seed quality directly affects germination speed, root vigor, and how well seedlings tolerate the precise nutrient regimes used in hydroponic cultivation.
Poor seeds slow growth, invite root problems, and waste the advantages hydroponics delivers.
Reliable seed providers offer more than genetics; they back their stock with guarantees and grower support.
When a vendor promises a germination guarantee and technical help, that reduces risk and speeds troubleshooting during the crucial early weeks of a hydroponic crop.
Growers who pair strong genetics with careful environmental control typically realize the performance gains hydroponics promises — as much as 30–50% faster growth (2025) and 20–25% higher yields per cycle (2026) when systems and inputs match plant needs.
How seed quality shapes hydroponic outcomes
Seed quality determines how quickly a seedling moves from root initiation to stable vegetative growth in water-based systems.
Seeds with higher vigor establish roots that cope better with pH swings and rapid nutrient uptake typical of hydroponic cultivation.
Strong genetics reduce transplant shock when shifting from clones or seedlings into NFT, DWC, or similar systems.
Companies such as Growlink and Advanced Nutrients supply tools and formulations that assume consistent plant response; inconsistent seed batches make those investments less effective.
Practical example: a grower using vigorous feminized seeds and a DWC setup often sees earlier node development and steadier nutrient uptake, which shortens time to flower and improves canopy uniformity.
What to look for in a seed provider
Start with the guarantees and support offered before price or catalog size.
Reliable promises and accessible expertise are worth more than a slightly cheaper seed pack.
- Guarantee: Sellers should offer a clear germination guarantee and outline the claim process.
- Support: Look for live or documented grower support for hydroponic cultivation.
- Reputation: Read grow journals and community feedback focused on hydroponic success.
- Shipping transparency: Clear timelines and discreet packaging matter for legal safety.
The visual shows provider promises as badge icons: germination guarantee, shipping support, and expert help.
Use it to compare vendors quickly when vetting options like platforms such as https://theseedconnect.com.
International shipping and regulatory tips
Cross-border orders require research before checkout.
Start by confirming local laws on seed import, and whether seeds are classified differently from finished cannabis products.
- Check the importing country’s agriculture and narcotics rules first.
- Use registered courier services with clear traceability.
- Keep purchase records and vendor support emails in case customs questions arise.
Germination guarantee: A vendor promise to replace defective seeds or refund when seeds fail to sprout under stated conditions.
Expert support: Accessible technical help that covers hydroponic cultivation specifics, such as pH and oxygenation adjustments for NFT or DWC setups.
Choosing trustworthy seeds and a provider that stands behind them removes the biggest variable in hydroponic cannabis success.
Take the time to vet guarantees and legal status; it pays off in faster, cleaner cycles and fewer surprises.
Water, pH, and nutrients: the core of hydroponic cannabis
Good water chemistry separates a hobby crop from a professional yield.
In hydroponic cultivation, roots sit in water that must carry the right nutrients at the right acidity.
Small shifts in pH or electrical conductivity translate directly into nutrient lockouts, slowed growth, and lower potency.
Hydroponic systems can deliver the speed and yield advantages often cited in recent studies — growers reported up to 30–50% faster growth in 2025 and 20–25% higher yields in 2026 when systems were tuned correctly.
That performance depends on precise control of pH, EC/PPM, and nutrient ratios throughout the plant’s lifecycle.
Maintain pH between 5.5 and 6.5 and keep reservoir temperatures near 70–85°F (21–29°C) for best uptake.
Calibrate meters weekly and adjust slowly; rapid swings are worse than small steady errors.
Term: pH — measurement of acidity; controls nutrient availability.
Aim for 5.5–6.5.
EC/PPM: Electrical conductivity and parts-per-million — measures dissolved salts.
Use EC 0.5–2.0 or corresponding ppm 350–1400 depending on stage and solution.
TDS scale: PPM conversion — many growers use EC × 700 to approximate ppm; know which scale your meter uses.
- Measure often: Check
pHandECdaily during transitions and after nutrient top-ups. - Correct gradually: Use
pH down(phosphoric or citric acid) orpH up(potassium hydroxide) in small doses. - Keep a log: Record readings, doses, and plant responses for repeatable success.
- Buffer with calcium/magnesium: Add
cal-magwhen EC rises but calcium or magnesium deficiencies appear.
Sample nutrient schedules for veg and flower
| Growth stage | Weeks | Target pH | EC/PPM range | Key nutrients / ratios | Notes |
|---|---|---|---|---|---|
| Seedling (clones) | 0–2 | 5.8–6.0 | EC 0.4–0.6 / PPM 280–420 | Low N: balanced micro mix; gentle NPK (1-0.5-1) | Keep EC low; frequent water changes; plenty of oxygen |
| Early vegetative | 2–4 | 5.8–6.0 | EC 0.8–1.0 / PPM 560–700 | Higher N: NPK (3-1-2); add cal-mag |
Increase feed gradually; monitor stretch |
| Late vegetative | 4–6 | 5.8–6.2 | EC 1.0–1.4 / PPM 700–980 | Strong N: NPK (4-1.5-2); trace elements | Ramp EC before flip; avoid sudden pH shifts |
| Early flowering | 1–3 after flip | 5.6–6.0 | EC 1.2–1.6 / PPM 840–1120 | Lower N, higher P/K: NPK (2-4-3); bloom boosters | Support bud set; keep humidity and temp stable |
| Mid flowering | 4–7 after flip | 5.5–6.0 | EC 1.4–1.8 / PPM 980–1260 | High P/K: NPK (1.5-4-4); silica and PK supplements | Watch for salt build-up; consider partial reservoir changes |
| Late flowering / flush | 8–10 after flip | 5.8–6.2 (flush pH 6.0) | EC 0.5–0.8 / PPM 350–560 (flush to <200 ppm) | Low feed / flush: minimal NPK; final feed low EC | Begin flush 7–14 days before harvest; lower EC slowly |
Careful increases in EC and a tight pH window are the through-line in this schedule.
Advanced Nutrients and other manufacturers provide formulas aligned to these ranges, and Growlink-like controllers automate the monitoring process for consistent results.
Common nutrient issues and quick fixes
Nutrient burn (leaf tips brown, curling): cut EC by 10–25% and do a 20–50% reservoir replacement.
Nitrogen deficiency (older leaves yellowing): raise N slightly, check pH first — many deficiencies are lockouts.
Calcium or magnesium deficiency (interveinal yellowing, tip curl): add cal-mag at recommended dose; check pH and raise slightly toward 6.0 if necessary.
Phosphorus lockout (stunted growth, dark leaves): flush with fresh water at pH 6.0, lower EC to 0.6–0.8, then reintroduce P gradually.
Root oxygenation issues (slow growth, root browning): increase aeration, cool reservoir to 70–75°F, and keep EC in range.
Getting water chemistry right is the fastest way to protect yield and potency.
Small, measured changes beat big corrections every time.
Environment control: light, temperature, humidity, and airflow
Controlling the grow environment turns potential into performance.
With precise light schedules, stable temperatures, correct humidity bands, and steady airflow, hydroponic setups can hit the faster growth and higher-yield figures researchers reported — for example, a 2025 Cannabis Research Institute study found up to 30–50% faster growth in hydroponic systems, and 2026 agritech reports show 20–25% higher yields per cycle when environment control is dialed in.
Practical control means matching equipment and routines to plant stages.
That includes choosing the right lamp type for your space, setting set points for temp and RH, and designing airflow so leaves dry quickly and CO2 distributes evenly.
Automation tools from companies like Growlink make this repeatable, while consultants such as the American Cannabis Company can help tune systems for commercial rooms.
What follows are concrete settings, management steps, and simple fixes to keep plants productive and healthy.
Lighting: HPS vs LED and schedules for veg vs flower
For veg, favor 18/6 or 24/0 light schedules depending on stretch control and energy budgets.
For flowering, switch to 12/12 to trigger bud formation.
HPS: Higher initial lumen output and lower upfront cost, but produces more heat and raises AC/dehumidifier loads.
LED: Better spectrum control, greater efficiency, and lower canopy heat.
LEDs often reduce electricity and cooling needs over a full cycle.
Growlink-style controllers can automate dimming and schedules to mimic sunrise/sunset, which reduces plant stress and smooths transitions.
Temperature and humidity targets — and how to manage them
Keep veg temperatures around 70–85°F (21–29°C) and flowering around 65–80°F (18–26°C).
Seedlings and clones prefer higher RH (65–70%), vegetative plants do well at 40–60%, and late flower should be 30–45% to limit bud rot.
Manage with these tactics:
- Climate control: Use AC or heaters with tight
±1–2°Fcontrol and a deadband to avoid oscillation. - Moisture control: Add humidifiers or desiccant dehumidifiers depending on room size.
- Automation: Link sensors to controllers for automated adjustments.
Airflow, CO2 basics, and preventing mold and pests
Air should move through the canopy without creating windburn.
Place oscillating fans above and below the canopy and run exhaust to exchange air every 1–3 minutes in sealed rooms.
CO2 supplementation helps when light and nutrients are non-limiting.
Target 800–1200 ppm during lights-on for sealed, high-light rooms.
Don’t add CO2 to poorly ventilated spaces; it will waste gas and invite problems.
Prevent mold and pests by keeping late-flower RH low, ensuring leaf surfaces dry within 30–60 minutes after condensation, and using clean intake filters.
Products and nutrient programs from Advanced Nutrients work best when environmental variables stay steady.
Dialing the environment to the crop stage pays off in growth speed and bud quality.
Small, consistent adjustments beat large swings every time.
Practical daily and weekly workflows
Hydroponic grows thrive on rhythm.
A tight daily routine keeps small problems from turning into crop-wide failures, and a predictable weekly cadence protects root health and nutrient balance.
We’ll share a practical daily checklist, a simple weekly maintenance guide, and a troubleshooting path to help you move from symptoms to solutions.
These workflows are designed for busy growers who want repeatable, low-drift operations that support the faster growth and higher yields hydroponics can deliver — remember studies showing up to 50% faster growth (2025) and 20–25% higher yields (2026).
Use these steps as habits rather than rules.
Adjust frequency and detail to your system size, crop stage, and any automation tools you run.
Daily checklist: what to inspect and log
A quick daily sweep prevents surprises.
Spend 10–20 minutes each morning on these checks and record everything in a simple log (digital or paper).
- Visual plant check: Scan leaves and stems for spots, droop, or new discoloration.
- Reservoir glance: Note pump operation and unusual smells.
EC/ph spot measure: Record one reading from the reservoir and one from a runoff or sampler.- Runoff and drip checks: Confirm emitters, drippers, and nozzles are delivering evenly.
- Environmental snapshot: Log light hours, ambient temp, and relative humidity from your controller.
- Action note: If anything is off, write the immediate corrective step and who will follow up.
Keeping concise, timestamped logs makes trends visible and speeds diagnosis.
Automation platforms like Growlink can reduce manual entries while preserving a searchable history.
Weekly maintenance: reservoir care, nutrient changes, and system checks
Treat one weekday as maintenance day.
Change and sanitize the reservoir on a predictable weekly or biweekly schedule depending on crop load and water quality.
The flowchart shows when to measure, when to drain and refill, and decision points for topping off versus full changes.
Follow the sequence to reduce microbial buildup and nutrient drift.
- Drain reservoir and inspect roots visually for color and odor.
- Rinse lines and scrub reservoir; sanitize surfaces if biofilm appears.
- Refill with fresh water, mix nutrients to target
EC, and aerate for 15–30 minutes. - Run the system and verify even flow; log new
EC/pH and starting volume.
Advanced Nutrients schedules can be a useful baseline for mixing orders and ppm targets.
When in doubt, smaller, more frequent changes beat large swings.
Troubleshooting flow: diagnosing yellowing, root issues, and slow growth
Start with the simplest explanation and eliminate it quickly.
Symptoms often link to one of three areas: nutrient imbalance, oxygen/root health, or delivery issues.
Yellowing: Often nutrient deficiency or lockout; check EC/pH and recent nutrient additions.
Root browning/odor: Suggests rot from low oxygen or contamination; inspect oxygenation and perform a reservoir change.
Slow growth: Could be light cycle, nutrient strength, or root restriction; compare growth rate to last cycle logs and check root zone space.
- Recreate the symptom in the log: when it began, what changed, and recent measurements.
- Verify pump/air pump operation and
EC/pH immediately. - Isolate one variable (e.g., swap nutrient batch or replace air stone) and observe 48–72 hours for change.
- If symptoms persist, consult an expert such as American Cannabis Company for a systems-level review.
Routine checks and clear notes shorten the path from symptom to fix.
A disciplined daily habit and a predictable weekly ritual keep hydroponic grows stable and productive.
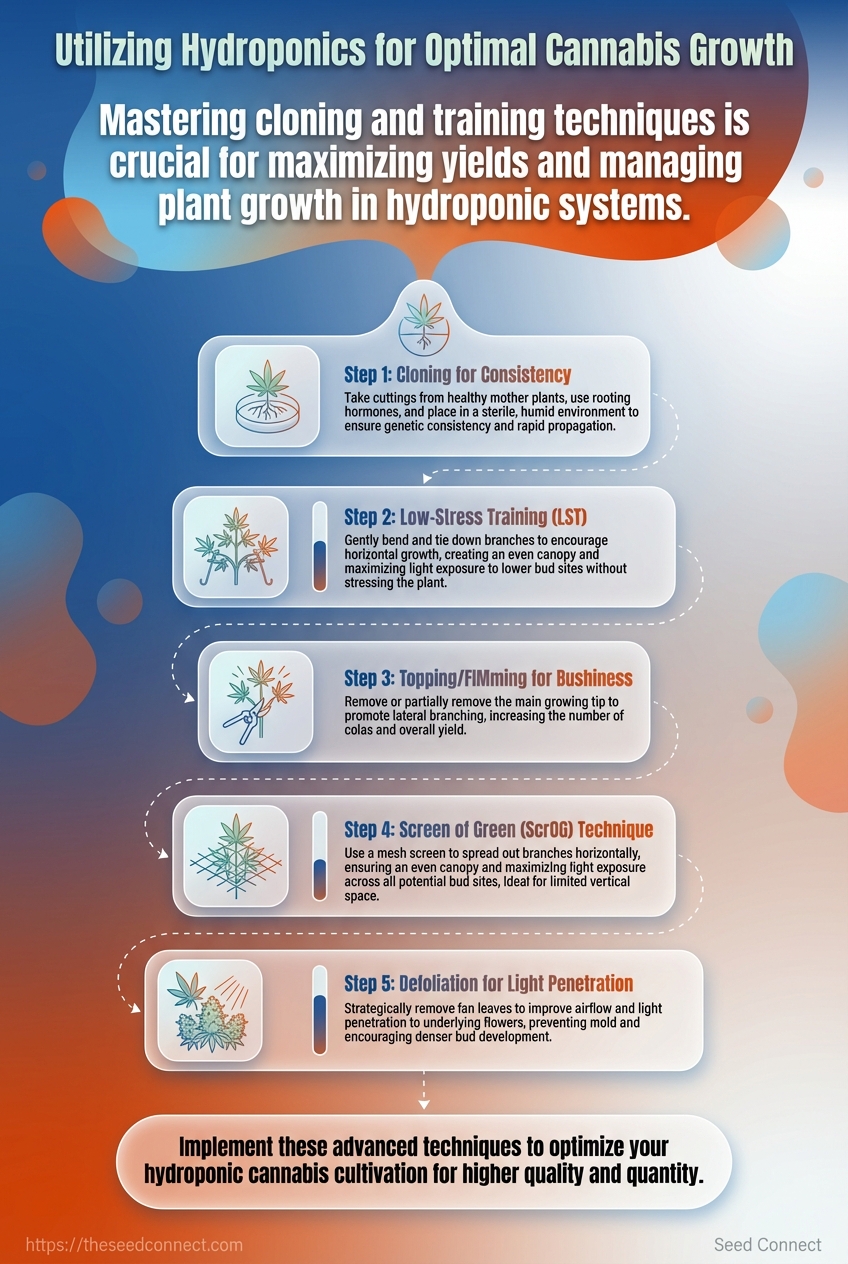
Cloning, training, and maximizing yields in hydroponics
Want more predictable, vigorous crops? Cloning in hydroponic systems shortens time to harvest and preserves elite genetics, while targeted training shapes plants to make the most of light and space.
Hydroponic clones root fast when you control oxygenation, sterility, and gentle hormone use, and combining that with low-stress and selective high-stress training multiplies usable bud sites.
Hydroponic grows already show big advantages: research from 2025 found up to 30–50% faster growth, and 2026 reports show 20–25% higher yields compared with soil.
Use those advantages deliberately—start with clean cuttings, push vegetative branching with LST, and time the flip to flower around node count and trichome development rather than calendar days.
Cloning best practices for hydroponic setups
Cloning in hydro systems favors oxygen and cleanliness over heavy media.
Use a timed aeration source, sterile tools, and a gentle root stimulant to avoid rot and speed rooting.
- Sterile cuts: Sterilize shears and take 3–4 node cuttings; trim lower leaves to reduce transpiration.
- Rooting medium: Use rockwool cubes or rapid-drain neoprene collars in an aeroponic cloner for the quickest rootouts.
- Gentle hormones: Apply low-dose IBA gel or a soft misting of auxin solution—avoid overuse, which can cause callusing without roots.
- Oxygenation: Ensure strong air stones or mist cycles; clones need high root-zone oxygen more than steady nutrient feed.
- Take cuttings in the morning when plants are turgid.
- Dip in rooting hormone and place under 80–90% humidity dome with indirect light.
- Move to shallow nutrient exposure once 1–2 cm of white roots appear.
Expected outcome: healthy clones ready for transplant in 7–14 days depending on strain.
Training techniques that work in hydroponics
Hydro systems magnify the effects of canopy architecture because light-to-yield conversion is efficient.
Low-stress training amplifies bud sites without shocking nutrient delivery.
- Low-stress training (LST): Tie down branches early to create an even canopy; repeat weekly as new nodes form.
- Super cropping (HST): Pinch-and-bend single stems during late veg to thicken stems and redirect hormones—apply to 1–2 branches only to limit shock.
- Screen of Green (SCROG): Weave and maintain the canopy under a net; hydroponics shortens recovery time, so screen-timed flips are easier.
Practical tip: combine LST for canopy spread with one targeted HST per main cola to boost stem girth and nutrient flow.
When to switch to flower and how to predict harvest timing
Flip to 12/12 when plants have a stable, even canopy and at least 5–8 well-spaced main nodes for most strains.
For photoperiod varieties, watch branch development rather than strict veg weeks.
- Flower switch indicators: Node count (5–8 nodes), canopy fill, and root health—avoid flipping if root growth is still establishing.
Predicting harvest relies on pistil color and trichome maturity, not calendar math.
Use a 30–60× loupe and check:
- Pistils: Move from white to amber/bent back.
- Trichomes: Clear → cloudy (peak THC) → amber (more sedative cannabinoids).
- Start close visual checks at week 6 of flower for most hybrids.
- Sample a mid-canopy bud and inspect trichomes every 3–4 days.
- Plan a 7–14 day flush if aiming for cleaner smoke, adjusting nutrient ppm beforehand.
common issues:
- Slow rooting: Increase mist frequency and check dissolved oxygen; reduce humidity slightly to encourage root searching.
- Canopy lag after HST: Give 3–7 days recovery with stable EC and minimal pruning.
- Uneven flower set after flip: Add selective defoliation to expose shaded nodes; use targeted LST to redistribute light.
Growlink-style automation helps keep recovery windows tight, and bloom-specific formulas like those from Advanced Nutrients can support heavy flowering phases.
For hands-on consulting, organizations such as the American Cannabis Company offer tailored hydroponic support.
Maximizing yields in hydroponics comes down to clean clones, purposeful training, and harvesting by plant signals rather than the calendar.
Stay observant and make small, timed interventions to compound the system’s natural speed and output.
Harvest, drying, and post-harvest care tailored to hydroponics
Hydroponic plants often hit harvest windows faster and cleaner than soil grows, so timing and handling matter more.
Expect tighter windows for peak terpene expression and faster senescence; that changes how you plan cuts, drying, and seed preservation.
Look at trichomes, pistil color, and plant vigor together rather than one metric by itself.
Small timing errors in hydroponic cultivation can blunt terpenes or push THC into degradation within days, so plan harvest as a sequence, not a single moment.
Pre-harvest environment control is worth the effort: lowering humidity and slightly reducing nighttime temps 3–7 days before cut helps pre-dry the canopy and protects terpenes.
Systems like Growlink can automate those micro-adjustments if you want repeatable results across cycles.
Signs your crop is ready and how to time the cut
Trichome check is central.
Use a 30–60x loupe: cloudy trichomes with a few amber ones means peak THC; mostly cloudy, few amber favors energetic profiles; mostly amber shifts toward sedative effects.
Pistil color matters too.
When 60–80% of pistils have darkened and curled, most strains are in the prime harvest window.
Combine that with trichome inspection for confidence.
Watch plant vigor.
A sudden drop in upward turgor or widespread leaf yellowing signals the final ripening stage; that often lines up with peak cannabinoid/t terpene levels in hydroponics because of faster nutrient turnover.
Drying and curing to preserve terpenes and cannabinoids
- Hang whole branches or cola sections in a dark room at 60–65°F (15–18°C) and 45–55% RH for an even, slow dry.
- Target a stem snap (not crumble) in 7–12 days; too fast and terpenes are lost, too slow and mold risk rises.
- After drying, trim buds and move to 62–64°F and 55–62% RH for burping jars during the first two weeks.
- Gentle airflow: low-speed fans to exchange air without blowing directly on buds.
- Minimal light: UV and visible light accelerate THC breakdown, so keep drying rooms dark.
- Controlled flush: a mild final feed or plain water flush from Advanced Nutrients can reduce residual salts and improve flavor before cut.
Storing seeds and preserving genetics for future hydroponic runs
Store seeds in a cool, dry, dark place—vacuum-sealed if possible—and aim for 3–6% moisture content.
Refrigeration at 34–41°F (1–5°C) with stable humidity preserves viability for years.
Label packets with strain, breeder, and date.
For long-term backup, keep a duplicate in a separate location and document parent phenotypes and nutrient regimens used.
Consider buying or cataloging elite lines from reputable sources like Costs, ROI, and scaling from one plant to a commercial tent
Starting small makes the math manageable. Expect two cost buckets: one-time startup purchases and recurring operating expenses. Startup covers tent/structure, lights, a hydroponic system, a reservoir, and basic environmental controls; operating costs include power, nutrients, media replacements, and consumables. Your return on investment depends on how quickly you can cycle and increase your yields. Hydroponic systems tend to shorten crop cycles and increase output, which accelerates revenue — studies show up to 30–50% faster growth (2025) and 20–25% higher yields (2026) compared with soil. Those performance gains shorten break-even timeframes, but actual ROI hinges on local flower prices, legal constraints, and scale. Begin with realistic ranges and adjust for quality and region. The numbers below are illustrative estimates to plan around; get vendor quotes for exact figures. Estimate total startup for a serious hobby tent at roughly $1,000–$3,500. Expect operating costs to scale with light intensity and cycle frequency. Move deliberately and validate at each stage. Bring in help when problems repeat, when capital grows, or when regulatory risk increases. Consulting firms such as the American Cannabis Company offer operational audits and scaling plans. Nutrient companies and automation vendors can cost-per-gram. For genetics and germination certainty, platforms like https://theseedconnect.com provide seed options and grower support that reduce early-cycle losses. Use expert input to shorten your learning curve and protect margins. Scaling smart beats scaling fast. Take incremental steps, measure unit economics, and call in specialists when variability starts eating profit.Estimating startup and operating costs
Scaling steps: from hobby to multi-plant rooms
When to seek expert support and how Seed Connect can help
Turn predictable inputs into predictable harvests
Controlled water, steady pH, and the right nutrient rhythm are what separate hopeful grows from repeatable success.
A single dry starter or a swing in pH can erase weeks of work, and the whole article argues that switching to hydroponic cultivation tightens that margin for error.
When those variables are managed, plants respond predictably and you stop guessing at yield and quality.
The rest comes down to systems and routines: pick the right hydroponic system, set simple daily checks, and use training and cloning to stack healthy nodes.
One concrete action to start today is check and record your reservoir pH and EC right now and note any drift for the next three days.
Small, consistent adjustments are the most powerful cannabis growth techniques you’ll use.
If you want a practical next step, build a seven-day workflow that lists lights, feed, pH, and airflow checks, then run it for a full cycle.
Tools like The Seed Connect can help source reliable genetics while you dial in your system — then see whether you can shave a week off your veg next round.