

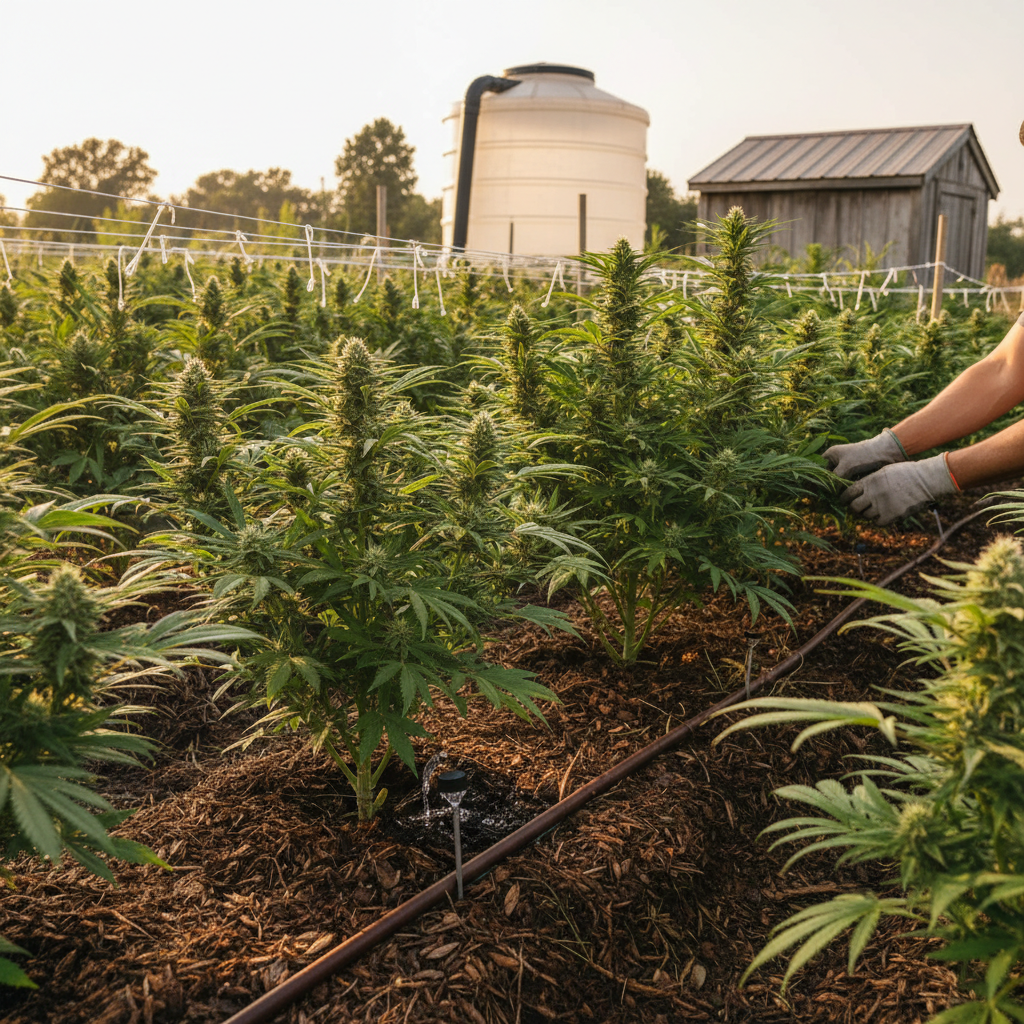
Most small-scale growers notice when the meter jumps. Water use increases during flowering, but yields hardly change. This mismatch highlights why it’s crucial for you to conserve water. It’s not just for appearances; it helps manage crops and protects finances and local resources.
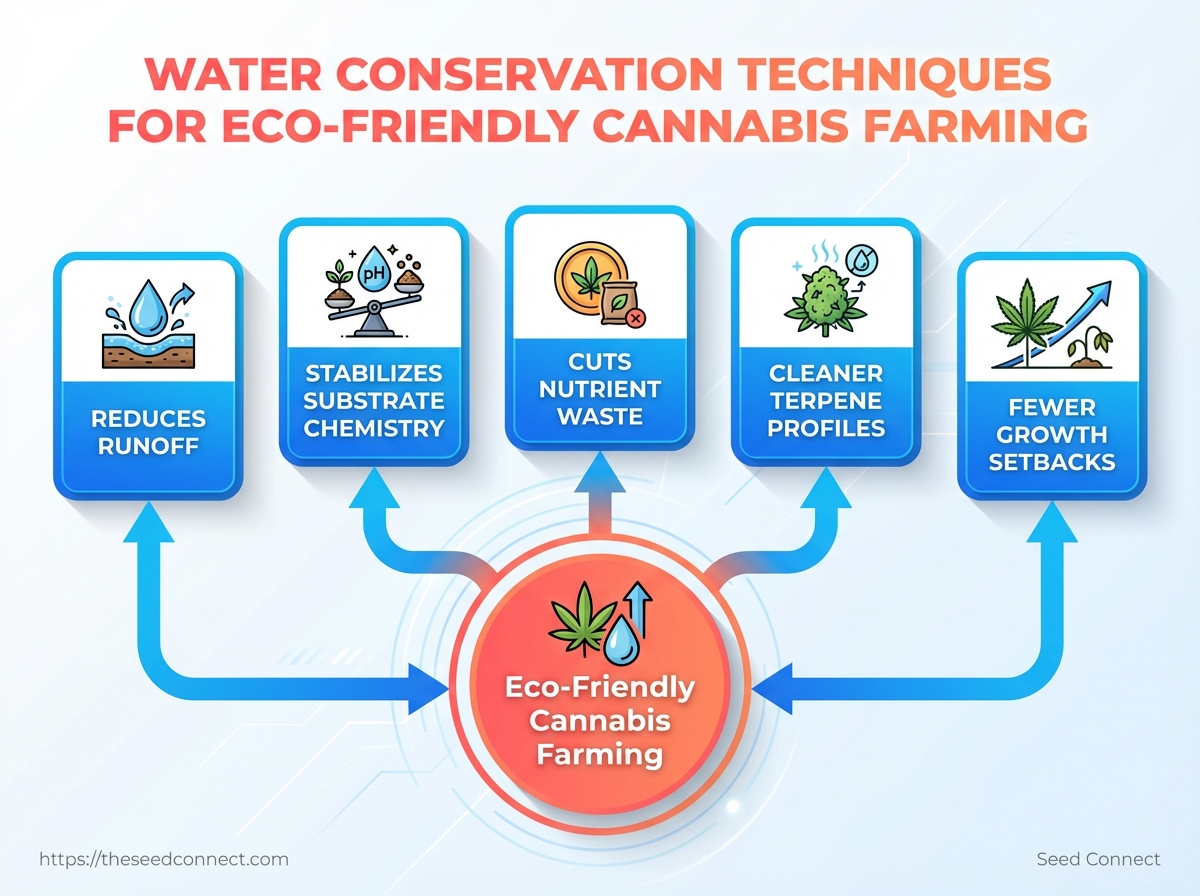
Switching to eco-friendly cannabis practices starts with rethinking how water reaches roots, and which irrigation techniques actually deliver moisture where plants need it most. Precise delivery reduces runoff, stabilizes substrate chemistry, and cuts nutrient waste, which quickly shows up as cleaner terpene profiles and fewer growth setbacks.
What You’ll Need (Prerequisites)
Begin by establishing your baseline. This means measuring the area and canopy accurately, knowing when…
What You’ll Need (Prerequisites)
Start by creating a clear baseline. Measure the area and canopy accurately. Also, know when water is available and record the current irrigation capacity. These basics help you plan the size and schedule of irrigation.
They also help you determine which water-saving strategies will succeed. Without them, your estimates will be guesses, and your conservation goals might fail.
Measure and document the following before planning irrigation or retrofits:
- Measure the grow area and canopy size.
- Identify seasonal water limits and local regulatory constraints.
- Document existing irrigation equipment and measure flow rates.
- List all available water sources and their treatment needs.
Practical checklist (tools and quick methods)
- Tape measure or laser measure: for accurate room and canopy footprint. Bucket and stopwatch: to measure flow in
L/minfrom emitters or taps. pH/EC meter: for baseline water quality checks.
- Notepad or spreadsheet: to capture site notes, supplier contacts, and flow numbers. * Local utility contact: for municipal usage limits and off-season restrictions.
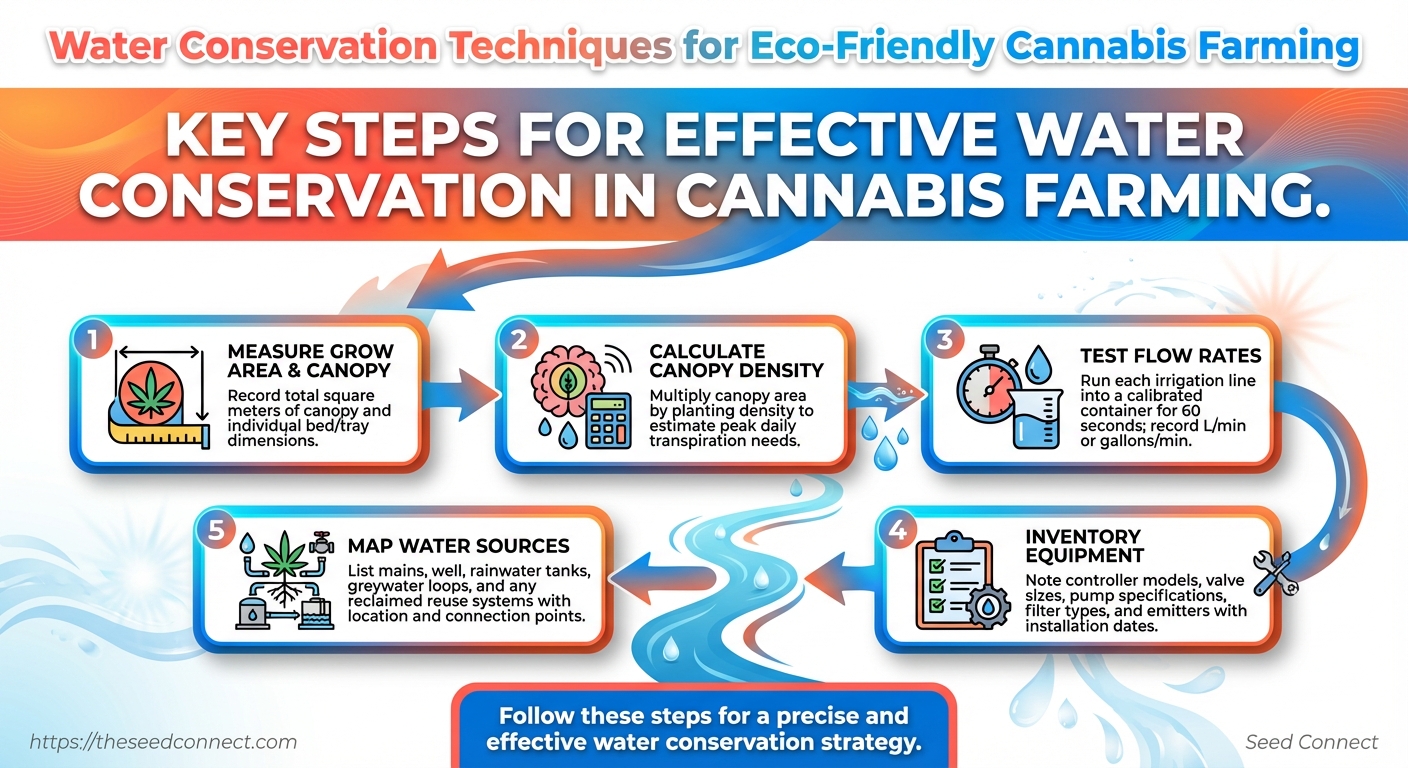
Step-by-step baseline assessment
- Measure grow area: Record total square meters of canopy and individual bed/tray dimensions.
- Calculate typical canopy density: Multiply canopy area by planting density to estimate peak daily transpiration needs.
- Test flow rates: Run each irrigation line into a calibrated container for 60 seconds; record
L/minorgallons/min.
- Inventory equipment: Note controller models, valve sizes, pump specifications, filter types, and emitters with installation dates.
- Map water sources: List mains, well, rainwater tanks, greywater loops, and any reclaimed reuse systems with location and connection points.
Definitions you should record Canopy area: Square meters covered by plant foliage at peak fullness.
Flow rate: Volume of water delivered per unit time, recorded in L/min or gpm.
Water seasonality: Months with supply restrictions or drought risk for your location.
Irrigation head: Sum of emitters, valves, and pump capacity on a single circuit.
Common on-site findings and what they imply
- Low mains pressure but high flow: May need pressure boosters and pressure-regulated emitters.
- High mineral content (EC): Requires filtration or reverse osmosis before hydroponic use.
- Intermittent supply: Rainwater harvesting or storage tanks become high priority.
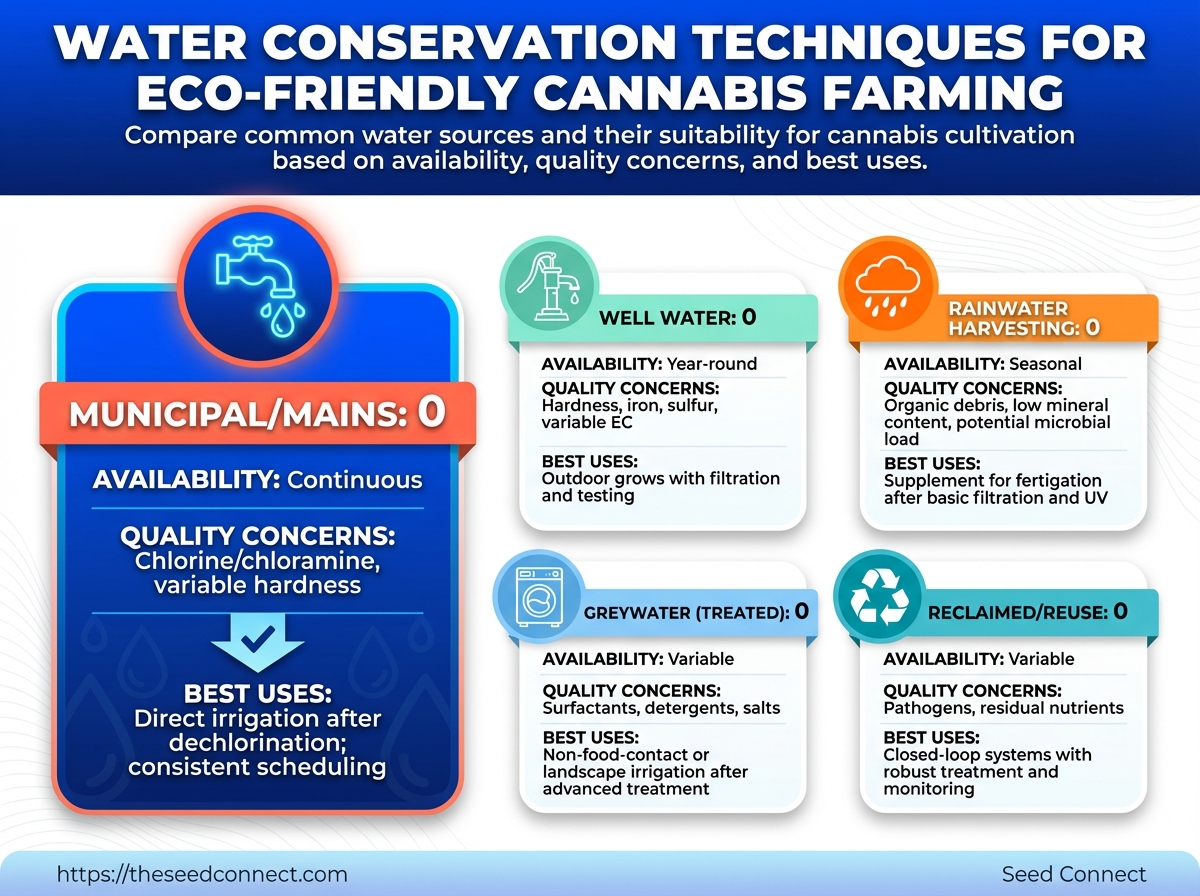
Quickly compare common water sources and their suitability for cannabis cultivation
Table: What You’ll Need (Prerequisites) — Water Source, Typical Availability, Water Quality Concerns & more
| Water Source | Typical Availability | Water Quality Concerns | Best Uses |
|---|---|---|---|
| Municipal/Mains | Continuous in most urban areas | Chlorine/chloramine, variable hardness | Direct irrigation after dechlorination; consistent scheduling |
| Well Water | Year-round but sensitive to pump failures | Hardness, iron, sulfur, variable EC | Excellent for outdoor grows with filtration and testing |
| Rainwater Harvesting | Seasonal; high during wet months | Organic debris, low mineral content, potential microbial load | Supplement for fertigation after basic filtration and UV |
| Greywater (treated) | Depends on household/processing availability | Surfactants, detergents, salts — needs treatment | Non-food-contact applications or landscape irrigation after advanced treatment |
| Reclaimed/Reuse | Variable; requires on-site treatment systems | Pathogens, residual nutrients, variable chemistry | Closed-loop systems with treatment and monitoring |
Understanding and documenting these prerequisites makes irrigation design precise rather than speculative and paves the way for real water conservation and smarter irrigation techniques. When these fundamentals are in place, project timelines shorten and performance targets become measurable.
Step-by-Step Irrigation Techniques (Core How-To)
First, match your irrigation choice to the scale,…
Step-by-Step Irrigation Techniques (Core How-To)
First, match your irrigation choice to what you’re growing, the substrate, and how much water you have. that single decision drives installation, scheduling and long‑term water conservation. Below are six practical steps with clear actions, calibration routines and monitoring cadence that experienced growers use to cut water use and improve uniformity.
- Select the Right Irrigation System
Measure available water pressure (psi) and flow (L/min or gpm) at the point of use before choosing hardware. Match system to scale and water source: municipal supply favors drip with pressure regulation; low-pressure or storage-fed systems may need gravity-fed subirrigation or low-flow emitters. Choose filtration (screen + media) and pressure regulation at the source.
Estimate emitter spacing based on container diameter: typical 2–4″ pots = single emitter, 5–15L containers = 2–3 emitters spaced around root ball.
- Quick checks: measure flow with a bucket, note static pressure on a gauge, select filters rated ≥130 micron for recirculated water.
- Install and Calibrate Drip or Micro‑Irrigation
Map lines and mark trenches before any digging. Install filtration and a pressure regulator adjacent to the source; place backflow prevention if required by code. Calibrate emitter output by running each zone for a set time and measuring volume delivered.
Set run times based on emitter output and target volume per pot. Perform a uniformity test: run a 10–15 minute cycle and compare volumes across a representative sample of pots.
- Implement Smart Scheduling and Soil Moisture Targets
Use reference evapotranspiration (ET) adjusted for canopy and plant stage to set a base schedule. Define moisture targets per stage and substrate and integrate timers with soil moisture sensors for feedback control. Document baseline schedules and iterate weekly during transitions (vegetative → flower).
- Common features to include: smart timers, soil moisture probes, logging controller
- Retrofit Existing Systems for Water Savings
Prioritize leak repair, then convert to pressure‑compensating emitters to improve uniformity. Zone by crop type and age to avoid overwatering mixed-age benches. For high-value plots, consider subsurface drip to reduce evaporation.
- Harvest and Reuse Water Safely
Size storage based on rainfall estimates and crop demand; include first‑flush diverters to reduce roof debris. Filter and disinfect reuse water (sediment → carbon → UV/chlorination) before applying, and verify compliance with local greywater rules.
- Monitor, Log, and
Perform daily sensor and controller checks, weekly uniformity and leak inspections, maintain a monthly water budget and run an annual efficiency audit to plan upgrades.
When implemented consistently, these steps reduce waste and improve yield uniformity—concrete changes that pay for themselves through lower water costs and healthier crops.
Side-by-side pros and cons of common irrigation systems for cannabis growers
Table: Step-by-Step Irrigation Techniques (Core How-To) — System Type, Water Efficiency, Installation Complexity & more
| System Type | Water Efficiency | Installation Complexity | Best For |
|---|---|---|---|
| Drip irrigation (emitters) | High (✓✓) | Moderate | Medium-to-large pots, greenhouse benches |
| Sub-irrigation (ebb-and-flow) | High (✓✓) | High | Controlled rooms, soilless trays |
| Soaker hoses | Moderate (✓) | Low | Outdoor beds, temporary runs |
| Micro-sprinklers | Low-Moderate (✗/✓) | Moderate | Young canopy establishment, cooling |
| Hand watering | Low (✗) | Low |
Key insight: Drip and subirrigation lead water conservation in most commercial contexts; choose based on labor constraints and substrate. Micro-sprinklers and hand watering have roles during propagation or small-scale runs.
Provide target soil moisture ranges for different growth stages and substrate types
Table: Step-by-Step Irrigation Techniques (Core How-To) — Growth Stage, Volumetric Water Content (%), Tension (kPa) & more
| Growth Stage | Volumetric Water Content (%) | Tension (kPa) | Notes |
|---|---|---|---|
| Seedling | 10–20% | 2–8 kPa | Keep light moisture; avoid saturation |
| Early Vegetative | 20–30% | 5–12 kPa | Encourage root expansion |
| Late Vegetative | 30–40% | 10–18 kPa | Higher uptake, maintain buffer |
| Early Flowering | 25–35% | 12–22 kPa | Slight deficit improves gas exchange |
| Late Flowering | 20–30% | 15–30 kPa | Reduce excessive moisture to prevent rot |
Quick guide to steps and timelines for setting up rainwater harvesting and reuse
Table: Step-by-Step Irrigation Techniques (Core How-To) — Task, Estimated Time, Key Materials & more
| Task | Estimated Time | Key Materials | Compliance Notes |
|---|---|---|---|
| Site assessment and sizing | 1–3 days | Flow data, roof area calc | Check local rainwater codes |
| Install gutters and downspouts | 1–2 days | Gutters, flashing, fasteners | Consider debris guards |
| Install first-flush and pre-filters | 0.5–1 day | First-flush diverter, sediment filter | Reduces contaminants |
| Install storage & pump | 1–3 days | Tank, pump, level switch | Secure permits if needed |
| Implement treatment & testing | 1–5 days | Filters, UV/chlorination, test kits | Routine microbial testing advised |
Soil, Substrate and Mulching Strategies
Start with the substrate selection that matches grow style, then tune additives to…
Soil, Substrate and Mulching Strategies
Start with the substrate selection that matches grow style, then tune additives to balance water retention and aeration. For high-yield cannabis, aim for a substrate that holds moisture between irrigation cycles while leaving plenty of pore space for oxygen. Below are practical substrate recipes, amendment ratios, a simple field-capacity test you can run in the tent or field, and warnings about compaction and oxygen loss.
Prerequisites
- Grow style decided: indoor potted, auto pots, above-ground beds, or hydroponic.
- pH testing kit and a basic moisture meter.
- Clean water source (adjusted to run-off pH ~6.0–6.8 for soil/coco).
Tools & materials
- Soil components: screened topsoil/loam, coco coir, peat (if used), compost.
- Aeration media: perlite, pumice.
- Retention/amendments: vermiculite, biochar, worm castings, hydrogel crystals (optional).
- Hand trowel, clear container for tests, scale.
Substrate and Additives — Practical mix recipes (by grow style)
- Indoor loam-based pot (best for flavor-forward phenos):
- 50% screened loam/peat-free topsoil
- 25% compost or worm castings
- 20% perlite
- 5% biochar
- Coco coir media (soilless, fast drain):
- 70% buffered coco coir
- 30% perlite or pumice
- 5–10% worm castings (top-dressed)
- Outdoor raised-bed loam (water-conserving):
- 40% native loam
- 30% compost
- 20% coconut fines or fine bark
- 10% vermiculite for retention
- Hydroponic inert wicking mix:
- 60% expanded clay (LECA) or rockwool cubes
- 40% coarse perlite for capillary action
Recommended water-retention amendments and exact ratios
- Vermiculite: 5–15% by volume — raises field capacity without sealing pores. Perlite/pumice: 15–40% by volume — improves aeration; higher % for heavier plants. Biochar: 2–8% by volume — increases cation exchange capacity (CEC) and holds nutrients.
5%** (weight) — for water-savings in arid climates; avoid for flood-prone systems. Worm castings: 5–10% (top-dress or mixed) — stable nutrient release and improved microbial life.
Simple field-capacity test (do this before final potting)
- Fill a representative pot with your substrate and weigh it dry (
W_dry).
- Slowly water until free drainage begins; allow 30 minutes for drainage, then weigh (
W_wet).
- Calculate field capacity water content:
FC% = (W_wet - W_dry) / W_dry 100.
- Compare to expected: loam mixes ~40–60% FC, coco mixes ~30–45% FC; adjust vermiculite/perlite as needed.
Warnings and troubleshooting
- Overcompaction: compacted mixes reduce macropores and cause oxygen deprivation—roots become waterlogged and susceptible to root rot. Loosen mix, add coarse perlite or pumice, and avoid tamping during filling. Heavy organic loads: too much fine compost increases water-holding but lowers aeration.
Reduce compost and add coarse aeration media. Salt buildup in coco: flush regularly and monitor EC; coco holds nutrients differently than soil.
Substrate mixes and amendments for water retention vs aeration tradeoffs
Table: Soil, Substrate and Mulching Strategies — Substrate/Mix, Water Retention, Aeration & more
| Substrate/Mix | Water Retention | Aeration | Best Use Case |
|---|---|---|---|
| Loam-based soil mix | Moderate–High (40–60% FC) | Moderate | Flavor-forward indoor/outdoor, resilient nutrient buffer |
| Coco coir + perlite (70/30) | Moderate (30–45% FC) | High | Soilless runs, fast growth, precise feeding |
| Peat-based mixes | High (45–65% FC) | Low–Moderate | Seedlings and moisture-critical climates (use with aeration) |
| Hydroponic inert media + wicking | Low–Moderate (controlled by wick) | High | Automated hydro systems, minimal substrate nutrients |
| Biochar amended mixes | Moderate (slightly increased retention) | Moderate–High | Long-term beds, improved nutrient retention and microbiome |
Understanding substrate tradeoffs and running a quick field-capacity test lets growers tune mixes to irrigation capacity and climate, preventing both drought stress and oxygen-starved roots. When substrate and mulch strategies match irrigation capability, plants use water more efficiently and grow with fewer root issues.
Key Takeaway: Adjust the size of the canopy and the layout of plants. This will help reduce water loss and improve how light spreads.
Landscape and Canopy Management for Reduced Water Use
Adjust the size of the canopy and the layout of plants. This will help reduce water loss and improve how light spreads. This ensures each bud site receives energy without wasting water from excessive leaves. Prune to lower the overall leaf area index (LAI) where shading creates high local humidity and evaporative demand.
Combine low-stress training and horizontal canopies to spread light, reduce vertical shading, and keep stomatal transpiration more uniform across the crop.
Thoughtful spacing patterns reduce pockets of stagnant air that force plants to transpire more to cool themselves, and monitoring plant responses lets teams dial practices back or intensify them as conditions change.
Pruning to control leaf area and water demand
Prune with purpose: remove older fan leaves that shade multiple colas and contribute little to photosynthesis.- Selective removal: target leaves that block light to top bud sites.
- Timing: prune during vegetative stretches and early flowering only; avoid heavy cuts during peak flower set.
- Expected outcome: lower LAI → reduced canopy transpiration and improved light penetration.
Training and shaping for uniform microclimates
- Implement
Low Stress Training (LST)early to spread branches horizontally and reduce vertical shading.
- Use
Screen of Green (SCROG)nets to create a single flat canopy that evens light and lowers per-plant water peaks.
- Apply gentle topping or fim cuts to redistribute growth but avoid excessive defoliation that forces regrowth and extra water use.
Example: flattening a four-plant bench into a SCROG canopy typically reduces peak transpiration events during midday by evening out leaf exposure.
Spacing patterns that reduce humidity pockets
- Staggered rows: create airflow channels to prevent localized high humidity and evaporation spikes.
- Bench vs. single-pot: benches with slight offsets allow consistent airflow; single-pot islands can trap moist air.
- Plant distance rule of thumb: start with enough horizontal spacing so mature canopy edges are 2–4 inches apart for small cultivars, 4–8 inches for larger sativas.
Monitoring and adjustment
- Use leaf-level checks: observe turgor, new growth rate, and stomatal closure signs.
- Measure microclimate: track canopy RH and leaf wetness rather than room-wide averages.
- Adjust incrementally: change one variable at a time—spacing, then pruning intensity, then irrigation volume.
Pruning/training methods and their effects on water demand and yield risk
Table: Landscape and Canopy Management for Reduced Water Use — Technique, Water Demand Impact, Labor Intensity & more
| Technique | Water Demand Impact | Labor Intensity | Yield Effect |
|---|---|---|---|
| Topping | Moderate increase short-term then neutral | Medium | Moderate yield increase (more colas) |
| Defoliation | Lowers leaf area → reduces demand if controlled | High | Variable; can increase bud quality but risk yield loss if overdone |
| Low Stress Training (LST) | Lowers peak transpiration by evening exposure | Low | Often increases uniform yield |
| Screen of Green (SCROG) | Reduces local humidity spikes, evens water use | High setup, low maintenance | High yield per m² with consistent quality |
| Selective pruning | Gradual reduction in overall water use | Low–Medium | Maintains yield while reducing waste |
Understanding these practical adjustments lets growers reduce water input without sacrificing canopy productivity; small, monitored changes produce durable efficiency gains. When teams apply spacing, pruning, and training together, irrigation techniques become more predictable and resource use drops while yields remain consistent.
Key Takeaway: Sensors and controllers become the nervous system for any modern grow: place sensors to represent real root-zone conditions, calibrate them against manual checks, set conservative automated actions, and use event logs plus analytics to iteratively…
Technology and Automation: Sensors, Controllers and Analytics
Sensors and controllers become the nervous system for any modern grow: place sensors to represent real root-zone conditions, calibrate them against manual checks, set conservative automated actions, and use event logs plus analytics to iteratively tighten schedules. Start by treating each irrigation zone as its own microclimate, instrumenting multiple depths and positions, then let controllers act within hard safety limits so automation increases efficiency without risking plants.
Install, Calibrate and Use Sensors and Controllers — Step-by-step
- Install sensors at representative root depth and multiple zones.
- Place one sensor per 1–4 plants in small beds or at 1–2m spacing in larger runs; for containers, position sensors at the active root zone (typically 1/3 down from surface).
- Calibrate sensors against manual soil moisture checks.
- Take spot-checks with a handheld moisture meter and gravimetric samples; adjust sensor offsets so capacitance readings match measured volumetric water content.
- Configure controllers with conservative auto-irrigation rules and safety limits.
- Set a maximum run-time per station, minimum soak intervals, and overlap prevention; use duration caps and a secondary humidity/EC interlock.
- Log events and enable analytics to schedules.
- Record every irrigation event, sensor reading, and actuator state; run weekly trend analyses to shift from calendar-based to demand-based irrigation.
Sensor strategy: Instrument multiple depths, stagger placement across high/low flow areas, and avoid direct emitter contact to prevent skewed readings.
Controller rules: Use hysteresis to avoid rapid cycling, cap duty cycles, and prefer time-of-day gating for nutrient-sensitive stages.
Analytics focus: Track cycle efficiency (water per g dry weight), detection of leaks via unexpected flow spikes, and correlative analysis between root-zone EC and plant stress.
> Industry analysis shows that switching to demand-based irrigation typically reduces water use while stabilizing substrate EC and root-zone oxygenation.
Definitions
Capacitance soil moisture: Sensor measuring dielectric constant to infer volumetric water content.
Tensiometer: Mechanical device measuring soil matric potential in kPa.
Inline flow meter: Device that measures water volume passing through irrigation lines.
Rain gauge: Instrument that measures precipitation accumulation.
EC/Salinity probe: Sensor measuring electrical conductivity in solution in mS/cm or ppm.
Common sensors (soil moisture, flow meter, rain gauge) for cost, accuracy and recommended use
Table: Technology and Automation: Sensors, Controllers and Analytics — Sensor Type, Typical Cost Range, Accuracy/Notes & more
| Sensor Type | Typical Cost Range | Accuracy/Notes | Best Placement |
|---|---|---|---|
| Capacitance soil moisture | $20–$100 | Fast response; needs calibration vs substrate type | Representative root zone (1/3 depth) |
| Tensiometer | $50–$200 | Direct soil water potential; best for stable substrates | Mid-root depth, sheltered from light |
| Inline flow meter | $80–$400 | ±1–3% depending on model; detects leaks | On main supply or branch lines |
| Rain gauge | $30–$150 | Simple cumulative measure; wind affects small events | Open area, level mounting |
| EC/Salinity probe | $50–$300 | Requires frequent calibration; measures mS/cm |
In reservoir, run-off or leachate lines |
Understanding these practices lets teams reduce waste, avoid common automation pitfalls, and tune irrigation to plant demand without handing full control over to unvalidated rules. When implemented carefully, automation preserves crop quality while delivering measurable water conservation and operational efficiency.
Key Takeaway: Start by checking the system for issues. Leaks, uneven emitters, clogged filters, poor aeration, and water-quality problems cause many production losses.
Troubleshooting Common Issues
Start by checking the system for issues. Leaks, uneven emitters, clogged filters, poor aeration, and water-quality problems cause many production losses. Triage quickly with simple checks and a repeatable test sequence so fixes are surgical rather than guesswork. Below are prerequisites, tools, step-by-step tests, and targeted fixes that save time and water while keeping plants healthy.
Prerequisites (what to have on hand)
- Spare emitters: Replace rather than chase intermittent failures. Pressure gauge and stopwatch: For emitter uniformity and flow tests. pH and EC meter: Calibrated
pHand conductivity readings are essential.
- Flush kit: Hose, fittings, and a flow-through valve for substrate flushing. * Air injectors or perlite: For quick aeration adjustments.
Tools and time estimates
- Emitter uniformity test: 30–45 minutes for a 50-runner zone. 2.
Leak detection sweep: 10–20 minutes per grow room. 3. Filter and flush routine: 15 minutes weekly for filters; 20–60 minutes per bed for substrate flushes.
Common problems and how to fix them
Leak detection and emitter uniformity
Run a zone at nominal pressure, then measure output per emitter with a stopwatch and small container. Industry-accepted variation is usually within ±10–15% of mean; larger spread indicates blockages, pressure loss, or mismatched fittings.- Quick fix: Replace visibly damaged emitters and tighten fittings.
- If variability persists: Check supply line pressure and install a pressure regulator or a baffled manifold to balance flow.
Flushing and filter maintenance
Filters clog progressively; pressure drop and erratic emitter flow are signals. Create a scheduled routine: backflush primary filters weekly and replace fine filters monthly under heavy particulate load.- Close downstream valves.
- Backflush at 2–3× normal flow rate for 2–3 minutes.
- Replace filter element if pressure differential remains elevated.
Substrate aeration when increasing water retention
When switching to a higher-retention substrate, add coarse amendments to maintain pore space.- Action: Mix 10–30% perlite or coarse coco between batches.
- If roots look waterlogged: Immediately reduce irrigation duration and increase drain intervals.
Water quality and regulatory compliance
Poor source water elevates EC and introduces contaminants. UseEC thresholds appropriate to cultivar and local rules; many operations maintain EC in runoff lower than feed by 10–20% to show compliance.
- Action: Install a simple cartridge or reverse-osmosis stage where municipal limits or crop sensitivity demand it.
- Recordkeeping: Log source tests and treatment steps to support regulatory audits.
Definitions
Leak detection: Systematic inspection and pressure-testing to find physical failures in piping or fittings.
Emitter uniformity: Measure of how consistently emitters deliver water across a zone.
Understanding these checks and following a disciplined testing cadence keeps irrigation precise, conserves water, and prevents crop losses—practical priorities for any commercial grower focused on efficiency and compliance.
Tips for Success (Pro Tips)
Look at water as something you can manage. Small changes in operations can lead to big savings. Using batch irrigation, strategic shading, staggered crop cycles, and A/B testing can lower water use while keeping yield and quality. These tactics fit both small-scale rooms and larger facilities when implemented with clear metrics and simple operational rules.
Practical pro tips and why they work
- Batch irrigation: Group plants by water needs and irrigate those groups together to reduce pump start/stop cycles and eliminate short, wasteful runs. Evaporative cooling and shade: Use evaporative cooling pads or shade cloth during peak heat to reduce canopy evapotranspiration (ET), lowering hourly water demand. Staggered crop cycles: Offset light schedules and transplant dates so multiple cohorts never peak simultaneously, smoothing daily and weekly water load.
, reduced run time, different emitter) and measure water use and plant response before scaling.
Step-by-step: implement batch irrigation in 7 days
- Day 1–2: Audit current irrigation runtime and map plant groups by stage and substrate.
- Day 3: Rezone plumbing so each irrigation zone aligns with a single water-need group.
- Day 4–5: Configure timers or controllers to run grouped cycles; set pump minimum run time to avoid short cycling.
- Day 6: Run a controlled cycle and record flow meters and substrate moisture.
- Day 7: Review results and adjust runtimes ±10% based on moisture targets.
Expected outcomes and time estimates
- Short term (1–2 weeks): According to recent research, a 10–25% reduction in pump cycles and visible reduced runoff can be achieved.
- Medium term (1–3 months): Research from effective water conservation strategies suggests 5–15% total water savings from optimized ET and smoothing demand.
- Long term (6–12 months): Operational savings combine with energy reductions and more predictable nutrient use.
Examples and tools
- Metering: Install inline flow meters per zone to capture baseline data; many commercial meters report to controllers.
- Control options: Use smart controllers that accept moisture sensor input or basic timers with adjustable intervals.
- Design practice: Pair shade cloth deployment with evaporative cooling schedules to avoid overcooling during lower humidity.
Troubleshooting common issues
- Overdrying after batching: shorten interval but increase run duration to improve wetting.
- Pump short-cycling persists: add minimum on-time or a buffer tank.
- A/B trial noise: ensure trials run at least one full growth stage to capture meaningful differences.
Running systematic tests and matching irrigation strategies to plant stage yields consistent water reductions while keeping crop health stable. Implement these tactics incrementally, measure rigorously, and operations will become both more water-wise and more predictable.
How to Monitor Your Success
Begin by creating a measurable baseline and commit to tracking the same metrics each month. That baseline allows you to measure improvements from changes in irrigation techniques, adjustments to substrates, or strain selection. Track water use against yield and set realistic reduction targets expressed as percentage improvements and L per g (liters per gram) so every change maps to a concrete efficiency outcome.
What to measure and why
- Monthly water use: Captures operational consumption and seasonal swings.
- Total yield: Harvested grams per month or per cycle to normalize water against output.
- L per g:
Total Water (L) ÷ Total Yield (g)gives a clear efficiency metric. - Per-plant metrics: Useful for mixed-density rooms or staggered cycles.
- Operational notes: Record changes (new emitter flow rates, schedule shifts, strain, VPD) for attribution.
Baseline period: Choose a steady 2–3 month window with representative environmental conditions. Targets: Set incremental targets — for example, a 10% reduction in L per g over six months is realistic without yield loss.
Step-by-step: set baselines and start tracking
- Calibrate water meters and validate harvest scales.
- Log water daily and aggregate monthly; record harvests against the same period.
- Calculate
L per gmonthly and plot a rolling 3-month average.
- Define action rules: if
L per gincreases >5% month-over-month, trigger irrigation audit.
- Review metrics monthly and adjust targets quarterly.
Example logging template
Template for logging monthly water use and crop yield to calculate liters per gram
Table: How to Monitor Your Success — Month, Total Water Used (L), Total Yield (g) & more
| Month | Total Water Used (L) | Total Yield (g) | L per g | Notes |
|---|---|---|---|---|
| January | 12,500 | 18,000 | 0.69 | Early veg heavy watering |
| February | 11,200 | 17,500 | 0.64 | Switched to drip emitters |
| March | 10,800 | 16,500 | 0.65 | New strain with denser buds |
| April | 9,900 | 15,800 | 0.63 | Adjusted feed schedule |
| May | 9,200 | 15,000 | 0.61 | Implemented reclaimed water blend |
L per g, indicating improved water efficiency after hardware and schedule changes. Tracking notes alongside metrics makes it possible to attribute gains to specific interventions and keeps targets realistic.
Practical checks and troubleshooting
- Calibration drift: Re-check meters quarterly to avoid false positives.
- Yield variance: Normalize for strain differences by tracking per-strain
L per g. - Seasonal bias: Use rolling averages to smooth environmental effects.
Understanding these monitoring practices enables teams to reduce water use without cutting yields, and gives clear evidence when investing in irrigation upgrades or switching genetics.
Conclusion
After applying the irrigation techniques and substrate strategies in this guide, most growers see immediate reductions in runoff and a steadier root-zone moisture during flowering. Practical changes like switching to deeper, less frequent watering, adding organic mulch, and using simple moisture sensors lead to measurable water savings and healthier canopies. Common questions such as how much to water during bloom or whether to add automation are resolved by observing soil tension and using controllers only when they replace guesswork; start by measuring, then automate selectively.
For clarity, keep these actions front of mind:
- Measure before changing: install a moisture sensor and record baseline use for one full cycle.
- Shift to pulse irrigation: shorter, more frequent runs that maintain active root zones.
- Layer mulch and adjust canopy: reduce evaporation and improve canopy light distribution.
Next steps: implement a single change this week (sensor, mulch, or adjusted run times), track water use and yield, then add another change in 2–3 weeks. For seed selections and varieties that pair well with water-efficient practices, explore resources like The Seed Connect’s cultivation pages at TheSeedConnect growing guides. These small, iterative moves deliver the twin wins growers want — better yields with less water and a more eco-friendly cannabis operation.