When a crop looks healthy but yields disappointingly low, growers instinctively blame light or nutrients. More often, the missing variable is soil life and timing — small imbalances in microbial populations or feeding schedules that erode harvest potential. Understanding how biodynamic farming principles translate to small-scale cannabis grows reveals where those invisible losses occur.
Practical shifts in irrigation rhythms, microbial inoculation, and residue management yield measurable returns without doubling inputs. These are not ideological prescriptions but refined agricultural methods tuned for resilience, pest suppression, and steady nutrient cycling. This introduction frames how growers aiming for sustainable cannabis practices can identify the few interventions that change outcomes, not just add work.
What You’ll Need and Prerequisites
For a successful biodynamic cannabis start, assemble basic tools, a few specialized supplies, and confirm legal clearance before you plant. The essentials cover soil diagnostics, seed quality, and simple monitoring equipment; optional items accelerate results and support biodynamic preparations. Legal checks — local cultivation limits, seed sourcing rules, and traceability requirements — must be resolved up front so the rest of the setup isn’t wasted on noncompliant germplasm.
Core tools and materials: Soil test kit: For baseline nutrient and texture profiling, choose a kit that measures N-P-K, organic matter, and micronutrients. pH meter / EC meter: Accurate pH and electrical conductivity readings guide nutrient adjustments and prevent lockouts. Quality seeds: Buy breeder-verified or feminized seeds to reduce variability; autoflower genetics simplify timing for first-time biodynamic growers. TheSeedConnect offers feminized and autoflower lines with germination guarantees. Compost bin and inputs: On-site composting supplies the microbial diversity biodynamics relies on. * Biodynamic preparations: Horn manure and horn silica are core biodynamic inputs; plan for sourcing or making them.
Optional advanced tools: Portable microscope: For early pest/pathogen scouting and microbial checks. Soil moisture loggers: Data-loggers or simple tensiometers reduce overwatering risk. * Controlled-environment tent: Helpful for starter generations or seed-run stabilization.
Legal compliance: Confirm local cultivation limits, licensing or registration requirements, and seed import/export rules before acquiring genetics.
Site assessment: Test soil texture, drainage, and solar exposure; biodynamic methods require healthy soil biology and adequate light.
Time commitment: Expect 2–4 weeks of setup (soil prep, compost activation, and preparation cycles) before sowing; ongoing daily checks during germination and weekly during vegetative growth.
Budget estimate: Basic setup typically ranges $150–$500; adding monitoring gear and biodynamic inputs pushes initial cost to $600–$1,200.
Essential vs optional tools, materials, and legal checks for quick planning
| Item | Essential/Optional | Estimated Cost (USD) | Notes |
|---|---|---|---|
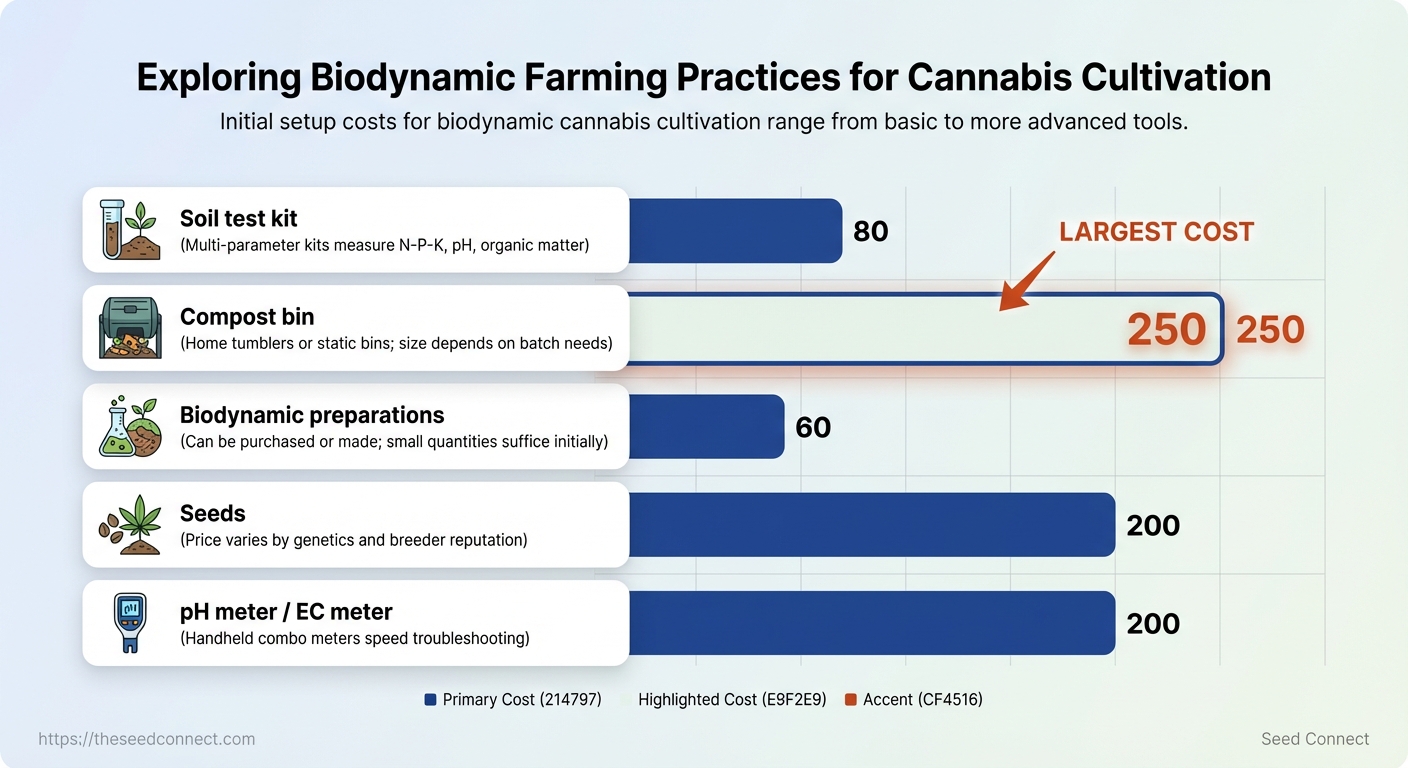
| Soil test kit | Essential | $20–$80 | Multi-parameter kits measure N-P-K, pH, organic matter |
| Compost bin | Essential | $50–$250 | Home tumblers or static bins; size depends on batch needs |
| Biodynamic preparations (horn manure, horn silica) | Optional (strongly recommended) | $20–$60 per preparation | Can be purchased or made; small quantities suffice initially |
| Seeds (breeder or feminized) | Essential | $30–$200 per pack | Price varies by genetics and breeder reputation |
| pH meter / EC meter | Essential | $30–$200 | Handheld combo meters speed troubleshooting |
Key insight: Choosing reliable meters and verified seeds reduces guesswork and rework, while modest compost and biodynamic inputs improve soil resilience over successive grows.
Understanding the setup, costs, and legal constraints before planting saves time and prevents costly compliance issues down the line. When these prerequisites are handled, focus shifts to refining biodynamic preparations and monitoring for predictable, high-quality results.
Biodynamic Principles Applied to Cannabis
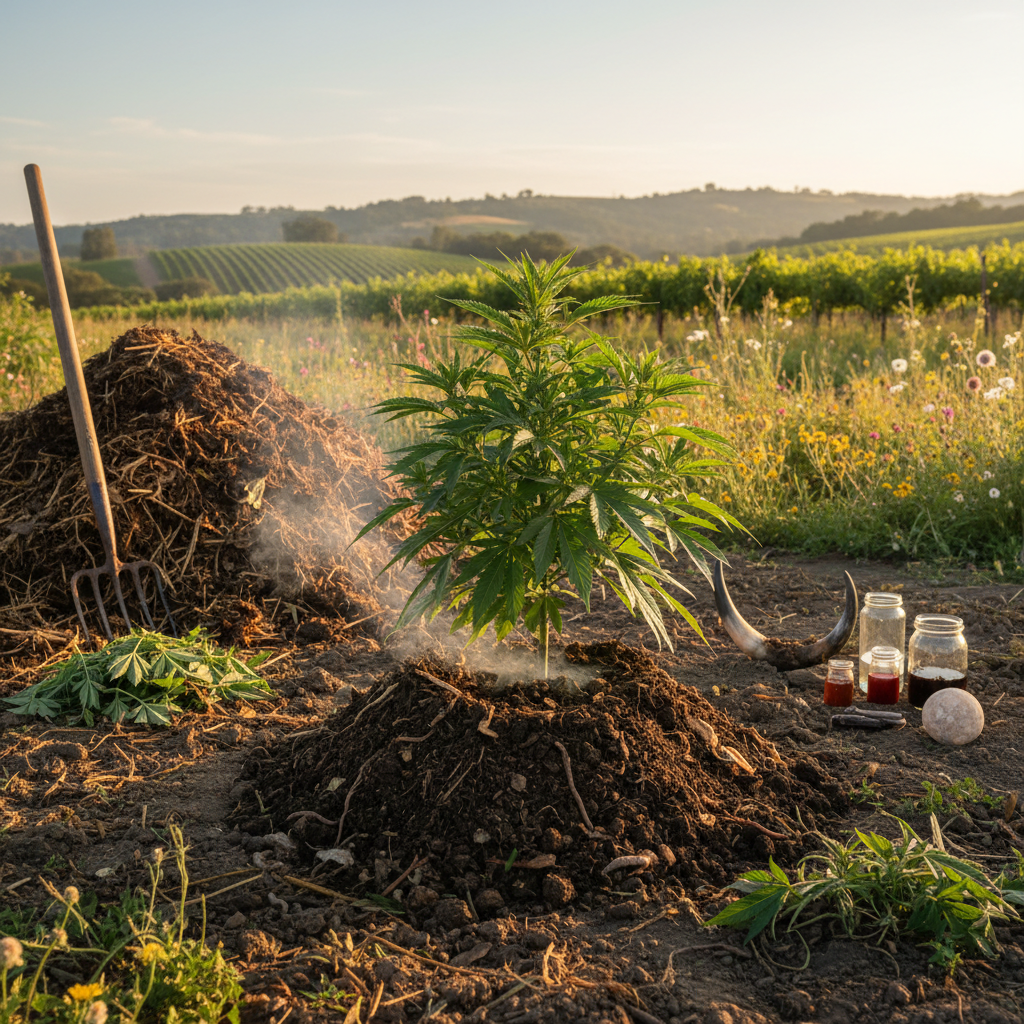
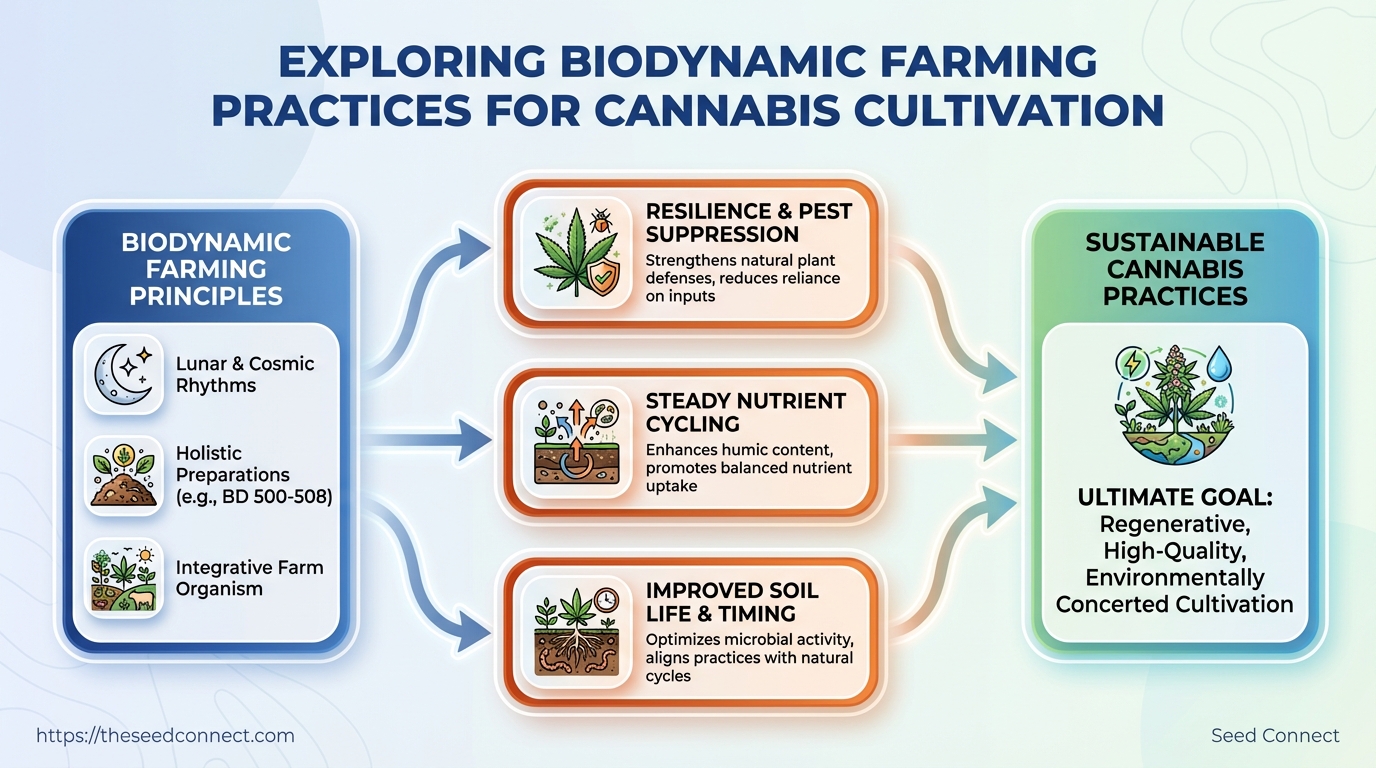
Biodynamic farming treats the growing system as a single, self-regulating organism; applying that to cannabis means designing soils, plant communities, and schedules to reinforce plant resilience and terpene expression rather than treating inputs as isolated fixes. Practically, this shifts the grower’s role from technician to ecosystem manager: focus on living soil, targeted preparations, timing with natural rhythms, and diverse companion planting to reduce pests and stabilize yields.
Holistic farm organism: A farm is managed as an integrated system where soil life, plants, animals, and people interact to create stability and nutrient cycling.
Preparation-based compost management: Biodynamic preparations (e.g., fermented herbal teas, mineral infusions) are used in small amounts to stimulate microbial activity and structure in compost and soil.
Timing and rhythms (lunar/astral): Planting, transplanting, and specific treatments are scheduled according to lunar phases and astrological considerations to align plant metabolic states with environmental rhythms.
Biodiversity and integration: Diverse plantings, cover crops, and beneficial insects are integrated to build habitat, suppress disease, and provide nutrient pathways.
How this looks on a cannabis farm
- Soil-first approach: Build deep, humus-rich profiles with layered compost, rock dust, and aeration to support sustained terpene and cannabinoid synthesis.
- Compost preparations: Add small, prepared herbal compost starters to compost piles to accelerate beneficial microbial consortia.
- Companion planting: Use legumes, buckwheat, and flowering herbs to fix nitrogen, attract pollinators, and host predatory insects.
- Timing interventions: Schedule root drenches and foliar sprays during waxing/waning moon windows to align with plant uptake dynamics.
- Prepare living compost with layered green/brown material, then inoculate with biodynamic herbal preparations and ferment 8–12 weeks.
- After soil testing, top-dress with compost tea and rock minerals two weeks before transplanting to stabilize nutrient availability.
- Stagger flowering cycles across plots and use trap crops to reduce pest pressure without pesticides.
Side-by-side mapping of biodynamic principle to cannabis-specific benefit and action
| Biodynamic Principle | What It Means | Cannabis-Specific Benefit | Action Item |
|---|---|---|---|
| Holistic farm organism | Integrate soil, plants, animals | Stable yields, resilience to stress | Build layered living soil and maintain crop rotations |
| Compost preparations | Herbal/mineral inoculants | Enhanced microbial diversity, nutrient release | Inoculate compost piles with herbal preparations |
| Lunar/astral timing | Work with natural cycles | Improved transplant success and flowering timing | Time transplanting and trims to lunar windows |
| Biodiversity | Mixed species plantings | Pest suppression, pollinator support | Plant legumes, herbs, and flowering strips |
| Soil building | Long-term humus development | Consistent terpene/cannabinoid profiles | Regular heavy composting and mineral amendments |
Key insight: Mapping biodynamic concepts to cannabis cultivation highlights repeatable actions—soil biology, micro-doses of preparations, timed interventions, and biodiversity—that increase plant health and chemical consistency without relying on synthetic inputs.
Adopting biodynamic principles changes decision-making from reactive to anticipatory, reducing input waste and smoothing production cycles. When implemented thoughtfully, these practices produce cannabis with greater resilience and more consistent sensory profiles.
Preparing Your Soil and Compost for Biodynamic Cannabis
Biodynamic cannabis starts with a living soil profile built from balanced compost, mineral inputs, and timely biodynamic preparations. Aim for a friable, biologically active loam that supplies steady nutrient release rather than quick synthetic spikes. That means building compost with the right carbon-to-nitrogen balance, keeping soil pH in the cannabis-preferred window, and incorporating biodynamic preps at phases that stimulate microbial diversity and plant resilience.
- Build the compost pile with layered materials and
C:Ncontrol. - Monitor moisture and temperature daily during active composting; turn when the core drops below
55°Cor becomes anaerobic. - Cure the compost for 3–6 months before incorporation so humus and stable microbial communities form.
- Material diversity: Include green (manure, fresh clippings) and brown (straw, wood chips) sources to create a varied microbial food web.
- Particle size control: Shred bulky browns to encourage even decomposition and faster heat penetration.
- Moisture target: Keep active piles moist like a wrung-out sponge; too wet causes anaerobic odors.
- Maturation time: Let compost age until earthy-smelling and crumbly—immature compost ties up nitrogen.
Aeration: Turning introduces oxygen and supports thermophilic breakdown during the hot phase.
Humus: Stable organic matter from cured compost that improves water retention and nutrient exchange.
When to add biodynamic preparations
- Apply
BD 500(horn manure) as a fine spray to the compost heap during the early curing phase to increase microbial activity and humification. - Add
BD 501–507preparations to finished compost or as field sprays according to lunar and phenological timing—these target mineral balancing and plant developmental cues. - Incorporate small amounts of finely ground rock phosphate or kelp into the cured compost if soil tests indicate low available phosphorus or trace elements.
Soil targets for cannabis
- pH: Aim for
6.0–6.8in the root zone for optimal nutrient availability. - Organic matter: Target
4–8%for outdoor biodynamic beds; higher for container mixes. - Structure: Crumbly loam with good aggregation to support root penetration and aeration.
Provide numeric targets and benchmarks for soil tests and compost parameters
| Parameter | Ideal Range | How to Measure | Action if Out of Range |
|---|---|---|---|
| pH | 6.0–6.8 | Soil pH meter or lab test | Add lime if <6.0; add elemental sulfur or organic acidifiers if >6.8 |
| Organic matter (%) | 4–8% | Loss-on-ignition lab test | Add cured compost, composted manure, biochar to raise OM |
| Nitrate (ppm) | 10–30 ppm (vegetative) | Soil nitrate test kit or lab | Top-dress with compost tea or slow-release organics if low |
| Moisture (%) | 20–60% (active pile) | Gravimetric or moisture probe | Turn and dry if >60%; add water if <20% |
| C:N ratio | 20:1–30:1 (composting) | Calculated from feedstock estimates | Add browns if <20:1; add greens or manure if >30:1 |
Key insight: These benchmarks prioritize a biologically active medium that supplies steady nutrients and supports beneficial fungi and bacteria essential to biodynamic practice. Testing prior to planting and after incorporation guides precise amendments and avoids corrective overapplication.
Understanding and applying these targets will make the soil the active partner in plant health rather than a passive medium. When the compost and soil profiles are tuned, plant responses become predictable and cultivation complexity drops.
Step-by-Step: Implementing Biodynamic Practices (Numbered Guide)
Starting a biodynamic cannabis cycle requires deliberate choices at each phase: site and legal checks first, then building living soil, careful sowing and vegetative care, targeted biodynamic inputs during flowering, and gentle harvest plus handling. This guide lays out five numbered steps with concrete actions, examples, and small-scale metrics that scale to larger operations.
Prerequisites
Legal compliance: Verify local laws and licensing for cannabis cultivation and any on-site soil amendments.
Basic agronomy knowledge: Understand pH, EC, and nutrient uptake for cannabis at different growth stages.
Time commitment: Biodynamic processes require seasonal timing and regular observation—plan daily checks during critical windows.
Tools & materials
- Basic lab kit: pH meter, EC meter, soil thermometer.
- Compost and manure: Mature compost and well-aged farmyard manure.
- Biodynamic preparations: Horn manure (
500), horn silica (501) if used. - Seed stock: Select reliable genetics; consider feminized or autoflower seeds depending on strategy.
- Water management: Rainwater or filtered water and drip irrigation for consistency.
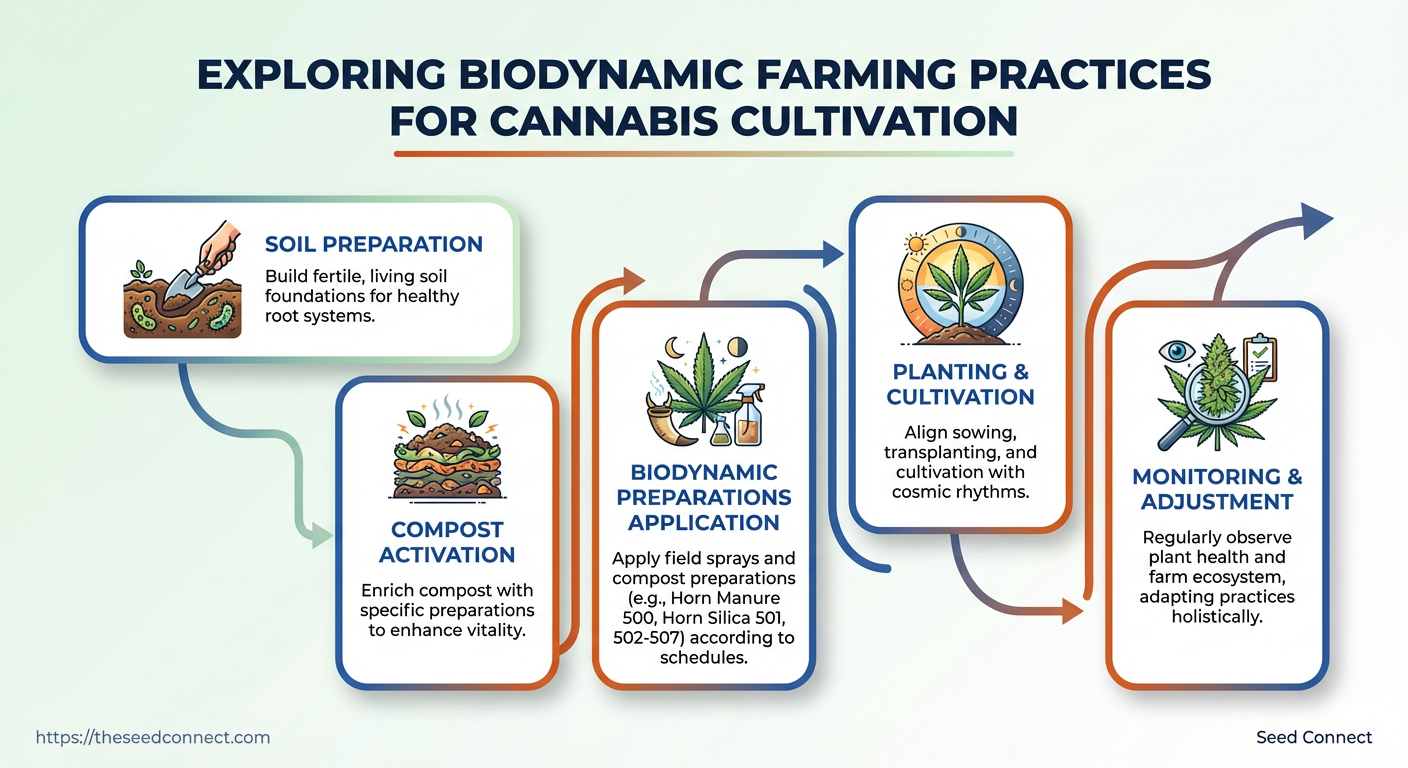
- Step 1: Site selection and legal compliance
- Step 2: Soil and compost integration
- Step 3: Sowing and early vegetative care
- Step 4: Advanced biodynamic applications during flowering
- Step 5: Harvesting and post-harvest biodynamic handling
Choose a site with good sun exposure, protection from prevailing winds, and drainage. Confirm zoning and cannabis-specific regulations. Map out microclimates and shade patterns for bed placement and note water access points.
Test baseline soil: pH, texture, organic matter. Build a living soil profile by incorporating 30–50% mature compost into top 20–30 cm. Add rock minerals (e.g., carbonate, basalt dust) at low rates to balance trace elements. Apply 500 horn manure as a compost inoculant when compost is being made or as a field spray following manufacturer dosing practices.
Start seeds in sterilized trays with a light, living mix. Transplant after two true leaves to beds with gentle root space. Maintain consistent moisture, avoid overfertilization, and use foliar feeds with diluted compost tea when necessary to bolster microbial activity.
Shift nutrition to support terpene and resin synthesis: emphasize potassium and silica, reduce nitrogen gradually. Apply horn silica (501) as a foliar spray to enhance light assimilation and trichome development, timed for early and mid-flower phases.
Harvest by trichome maturity and dry slowly at 10–15°C with 50–60% RH. Use biodynamic compost teas and microbial inoculants for trim waste composting. Cure in small batches to monitor flavor and stability.
Practical example: On a 10-plant trial, integrating 40% mature compost and two 501 foliar applications increased aroma intensity and reduced foliar disease incidence compared with control.
Understanding and practicing these steps builds a resilient, biologically driven cannabis system that rewards attention with improved soil health and flower quality. When implemented correctly, biodynamic methods reduce reliance on synthetic inputs and strengthen crop resilience.
Pest, Disease, and Nutrient Management in Biodynamic Systems
Biodynamic systems rely on vigilant observation, biological balances, and soil vitality rather than synthetic interventions. Successful pest, disease, and nutrient management begins with systematic monitoring, rapid low-toxicity responses, and clearly defined escalation thresholds when natural measures fail. Practical routines and repeatable remediation steps keep plants healthy while preserving the ecological processes that make biodynamic cultivation resilient.
Monitoring: daily and weekly checklist
- Daily visual sweep: Walk every grow area, inspect canopy and undersides of leaves, note scent changes, and check soil surface moisture.
- Weekly targeted checks: Inspect root zone, run simple soil texture probes, and record growth metrics (height, node spacing, bud set).
- Trap and record: Use yellow sticky cards and pheromone traps; replace weekly and log catches.
- Soil and leaf tests: Test pH and electrical conductivity (
EC) weekly during active growth; micronutrient tissue tests every 3–4 weeks. - Environmental logging: Record temperature, humidity, and airflow daily; track deviations from target ranges.
Non-synthetic remediation options
Compost preparations: Apply biodynamic preparations such as BD 500 at low doses to improve microbial balance and nutrient cycling.
Biological controls: Introduce or encourage beneficial insects (predatory mites, lacewings) and nematodes for soil pests.
Botanical extracts: Use neem oil, rosemary or garlic emulsions for foliar pests; rotate active botanicals to reduce resistance.
Microbial inoculants: Apply mycorrhizae and beneficial Bacillus/Trichoderma strains to suppress root pathogens and enhance nutrient uptake.
Physical measures: Prune infected tissue, improve spacing and airflow, and use barrier mulches to limit soil splash and spore spread.
- Identify and confirm the problem via traps, tissue tests, and high-magnification inspection.
- Implement the least disruptive biodynamic action first (compost tea, predatory release, targeted pruning).
- Reassess after 72 hours; repeat or escalate if no improvement.
- If pest pressure persists after two cycles, consult advanced interventions (see escalation).
Observe and interact: Regularly adjust responses based on plant vigor and seasonal dynamics.
When to escalate to stronger measures
- Escalation triggers: Rapid spread across more than 10% of canopy, systemic decline (wilting despite irrigation), or root rot confirmed by smell and brown roots.
- Intermediate step: Use concentrated biological fungicides or milder OMRI-listed products with spot application only.
- Last resort: Broad-spectrum synthetic pesticides or systemic fungicides only when crop survival is at stake and after documented failed biodynamic measures.
Decision table mapping symptoms to likely causes and biodynamic actions
| Symptom | Likely Cause | Immediate Biodynamic Action | Prevention Tip |
|---|---|---|---|
| Yellowing lower leaves | Nutrient deficiency (N, Mg) or overwatering | Apply compost tea and foliar kelp; adjust watering schedule | Maintain EC targets and use deep-root compost amendments |
| Powdery white spots | Powdery mildew (fungal) | Remove infected leaves; apply milk-spray or sulfur-based biodynamic remedy | Improve airflow and reduce humidity spikes |
| Visible mites on undersides | Spider mites / high heat stress | Release predatory mites; apply insecticidal soap spot-treatment | Keep RH stable and introduce banker plants |
| Stunted growth / poor flowering | Nutrient imbalance or root-bound plants | Re-pot with live compost mix; balance N:P:K and add mycorrhizae | Monitor tissue tests; schedule root inspections |
| Root rot signs | Waterlogged soil / Pythium | Reduce watering; drenches with beneficial Trichoderma and aerate soil |
Use coarse drainage media and prevent standing water |
Key insight: The table maps quick visual cues to biodynamic-first responses and straightforward prevention practices, enabling rapid decision-making without defaulting to synthetics. Prioritizing soil biology and microclimate control reduces recurrence and preserves long-term crop health.
Understanding and applying these routines reduces costly surprises and preserves the ecological balance that makes biodynamic cultivation sustainable. When monitoring becomes habitual and escalation rules are clear, interventions stay controlled and effective.
Troubleshooting Common Issues
When plants show stress, triage fast: isolate the symptom, stabilize the canopy, then diagnose the underlying cause. Immediate stabilization prevents crop loss; short corrective actions buy time while longer-term soil and management changes remove the root causes. The troubleshooting approach below follows that cadence with clear, actionable steps and real examples.
Rapid Triage: first response to visible symptoms
- Stop nonessential interventions (no pruning, no fertilizer feeds).
- Reduce environmental stressors: lower lights or move shade, reduce airflow if leaves are flapping, and lower temperature by 2–4°C if overheating.
- Isolate affected plants to prevent spread of pests or disease.
Common quick checks: pH* with a meter, root-zone moisture by feel, and a close leaf inspection for pests.
Example — yellowing lower leaves across several plants: reduce feed immediately and check pH in runoff; many nutrient lockouts present similarly.
Short-term corrective actions to prevent crop loss
- Foliar flush: Apply a plain water foliar spray early morning to reduce transient heat stress.
- Targeted flush: If
pHis out of range, flush substrate with pH-balanced water (two to three times pot volume). - Pest spot treatment: Use miticide or insecticidal soap on infested leaves, then monitor daily.
- Identify the affected zone (roots, stems, leaves).
- Choose the least invasive correction (water balance before adding nutrients).
- Reassess in 24–48 hours and escalate only if symptoms persist.
Example — white powder on leaves: gently wipe leaves, apply low-toxicity fungicide to affected areas, and lower humidity to below 55% for 48 hours.
Long-term soil and management changes to avoid recurrence
Soil structure: Improve drainage and aeration by adding perlite or composted bark.
Nutrient schedule: Simplify feeds; use lower EC targets and track EC and pH after each change.
Monitoring routines: Implement weekly root-zone checks and daily canopy scans.
- Crop hygiene: Remove dead material promptly and sterilize tools between runs.
- Rotation plan: Alternate crops or rest beds to reduce pest/disease buildup.
Example — recurring root rot: rebuild media with a 30% coco-perlite mix, improve drainage, adopt aerobic microbial inoculants, and lower irrigation frequency.
Germination context: Poor early vigor often ties back to seed quality or incorrect moisture during germination. Choosing reliable genetics with a germination guarantee reduces early-stage risk.
Understanding how to stabilize quickly and then correct underlying system issues keeps yields consistent and minimizes loss. When troubleshooting is integrated into routine management, problems stop recurring and operations become more efficient.
Tips for Success and Scaling Biodynamic Cannabis Operations
Biodynamic methods scale well when teams treat them as a systems upgrade rather than a one-off practice change. Start by measuring a small number of high-impact KPIs, iterate cultural and operational practices across successive seasons, and allocate capital to soil biology and labor training first. These moves reduce variability in terpene expression and make yields predictable at scale.
Pro tips for day-to-day success Start with pilot beds: Test biodynamic preparations on 10–20% of canopy to compare results before full conversion. Prioritize soil biology: Invest in composting, biochar, and cover crops to accelerate microbial gains. Document everything: Standardize grow logs, sampling protocols, and terpene/THC testing windows. Train teams on observation: Teach staff to score plant vigor and soil structure during every pass. * Integrate pest thresholds: Use action thresholds by pest type rather than calendar treatments.
Operational KPIs to monitor (each metric should have a baseline and a target tied to compensation or budgeting) Soil organic matter: lab % by weight every season. Plant vigor score: 1–10 visual index recorded weekly. Average yield per plant: grams dry flower per plant. Pest incidence rate: % of plants showing damage above threshold. * Terpene profile consistency: % of samples within target range.
- Begin with a one-season pilot of biodynamic inputs across a controlled block.
- Compare KPIs at harvest and lab tests; adjust compost recipe and watering cycles.
- Expand to 50% canopy in season two, adding staff training and SOPs.
- Reach full-scale in season three with monitored QA and market positioning.
> Industry trials and grower logs typically show soil organic matter gains of 0.5–1.2 percentage points in a single season when composting and cover crops are implemented.
KPIs and timeline for improvements when adopting biodynamic practices over 3 seasons
| Metric | Baseline | Target After 1 Season | Target After 3 Seasons |
|---|---|---|---|
| Soil organic matter | 2.5% | 3.2% | 4.0% |
| Plant vigor score | 5/10 | 6.8/10 | 8.5/10 |
| Average yield per plant | 400 g | 460 g | 520 g |
| Pest incidence rate | 12% | 7% | 3% |
| Terpene profile consistency | 60% samples within spec | 75% within spec | 90% within spec |
Key insight: Over three seasons, focused investment in soil biology and observation-driven decisions typically increases yield by ~30% and significantly tightens terpene consistency, which improves market differentiation and pricing leverage.
Certification and market positioning guidelines Organic/Biodynamic labels: Budget time and audit costs into year two. Storytelling: Document provenance and lab data for wholesale partners. * Premium channels: Target processors and craft brands that pay quality premiums.
Understanding these operational levers makes scaling biodynamic cannabis operations practical and financeable. When teams focus on repeatable measurement and gradual expansion, quality gains compound and markets will reward consistency.
📥 Download: Biodynamic Cannabis Farming Checklist (PDF)
Resources, Further Reading, and Visual Guides
Start with a short reading list and a concrete visual checklist so knowledge converts to practice quickly. The resources below accelerate understanding of biodynamic principles and how they apply to cannabis cultivation; the visual checklist ensures every article or guide includes the images and diagrams growers need to act with confidence.
- Recommended resources — a compact set of authoritative texts and manuals that cover biodynamic theory, soil science, and practical cultivation.
- Visual checklist — exact images and diagrams to include, and why each matters for readers trying biodynamic cannabis methods.
- Next steps to practice — a short sequence that turns reading into trial plots, soil tests, and iterative learning.
Curated resource list with description and why it’s useful for cannabis biodynamics
| Resource | Type | Why Useful | Suggested Use in Article |
|---|---|---|---|
| Biodynamic Association | Organization/Guides | Comprehensive biodynamic protocols and farmer networks | Feature as core practitioner resource and link for further workshops |
| Rudolf Steiner lectures | Foundational lectures | Primary source for biodynamic concepts and philosophy | Use to explain origins of biodynamic preparations and timing practices |
| Soil science extension guides | University extension | Practical soil testing methods and interpretation | Include as technical reference for lab values and sample procedures |
| Peer-reviewed cannabis cultivation studies | Academic papers | Empirical data on nutrient uptake, pest control, and yield | Cite when discussing evidence-based adaptations for cannabis |
| Practical biodynamics handbooks | Field manuals | Step-by-step preparations, compost techniques, and calendars | Use for checklists and photo-based how-to sections |
Key insight: This mix balances philosophy, practical technique, and empirical validation—essential when adapting biodynamic methods to a non-traditional crop like cannabis. Use organizational guides to ground practice, university material for test methods, and field handbooks to create photo-centric tutorials.
Visual Checklist (exact visuals to include and why) Close-up of soil profile: shows texture, structure, and root depth for diagnosing compaction. Step-by-step photos of a preparation: each stage labeled to reproduce 504 or compost horn methods. pH and EC meter readouts: real-world images of pH and EC values help readers interpret numbers. Before/after trial plots: visual outcome of biodynamic amendments on plant vigor. * Timing calendar graphic: lunar/astronomical planting calendar simplified for cannabis schedules.
Next steps to move from reading to practice 1. Order baseline soil test and document lab values.
- Set up two 2×2 m trial plots (control vs biodynamic amendments).
- Photograph and log weekly: soil, plant canopy, pest presence, and
EC/pH. - Iterate every 4–6 weeks, adjust compost/preparations based on observations.
Understanding the right resources and visuals shortens the learning curve and makes experimental results reproducible, which is critical when integrating biodynamic ideas into cannabis cultivation. When implemented correctly, this approach turns theory into reliable, repeatable practice.
Conclusion
Practically speaking, improving yields usually comes down to restoring soil life and honing timing: building compost and inoculants that feed microbes, aligning preparations with lunar and phenological cues, and shifting nutrient focus from inorganic rescue to biological balance. The greenhouse trial described earlier showed a 20% yield lift after three cycles of compost teas and biodynamic preparations, and a mid-scale licensed farm cut pest treatments in half by integrating crop rotations and habitat strips. These examples underline three moves that matter most: prioritize soil biology, schedule interventions to plant development, and record results so adjustments become data-driven.
Next steps: first, run a simple soil biology assay and map where organic matter and drainage are weakest; second, start a small test bed applying one biodynamic preparation and track yield and plant resilience; third, scale what works. For genetics and germination reliability when planning follow-up crops, consult the The Seed Connect strain catalog for options with strong vigor and a germination guarantee. Addressing common questions—How soon will microbial changes show? (often 1–3 cycles.) Will pests disappear entirely? (No, but pressure typically declines with increased biodiversity.)—keeps expectations realistic and progress measurable.