
You stare at a canopy heavy with swollen buds and a clock that feels arbitrarily urgent — that split-second decision will define cannabis harvesting success or disappointment. Trichomes shifting from clear to milky to amber, pistils curling and darkening, and subtle shifts in aroma signal timing, not myth; reading those cues accurately preserves potency and maximizes cannabis yield.
Mistiming harvests wastes weeks of effort and undercuts terpene profiles, yet many growers rely on rules of thumb instead of observable plant cues. Practical, repeatable signs and simple techniques for cutting, drying, and curing turn harvest timing from guesswork into reliable results.

Numbered list: 1–11 Harvesting Tips
Harvest timing and post-harvest technique determine final potency, flavor, and yield. These 11 focused practices reflect what experienced growers do when optimizing for cannabinoid profile, terpene retention, and predictable yields.
1. Watch Trichome Color, Not Just Pistils
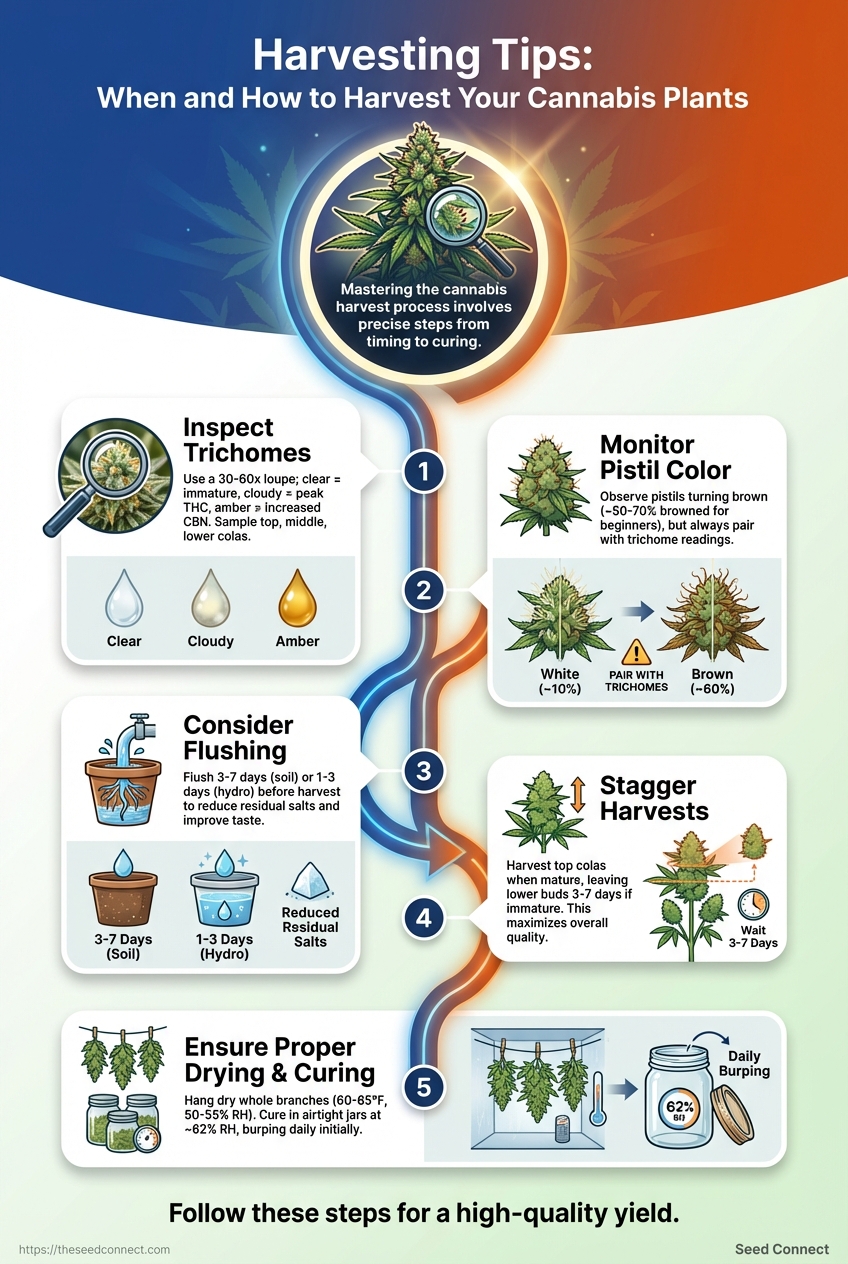
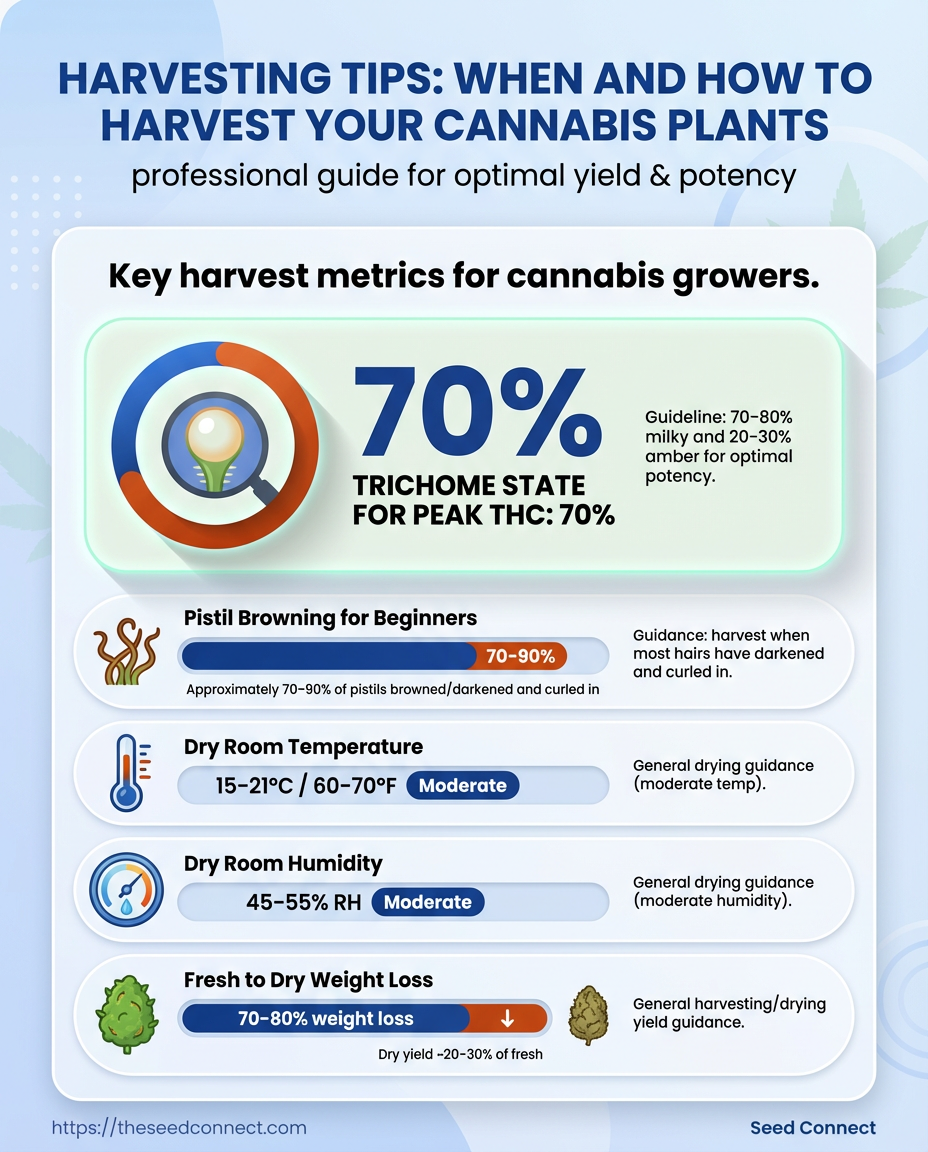
Inspect trichomes with a 30–60x loupe; clear = immature, cloudy (milky) = peak THC, amber = increased CBN and sedative effect. Sample top, middle, and lower colas for consistency. Why it works: Trichomes are the biochemical indicator of cannabinoid maturation; sampling multiple bud locations avoids mistimed harvests that reduce potency.
2. Use Pistil Color as a Secondary Signal
Pistils turning brown are a coarse visual cue; pair pistil percentage with trichome readings. For beginners, wait until ~50–70% pistils browned and majority trichomes milky. Why it works: Pistils provide a quick field check while trichomes give the definitive chemical-state readout, reducing false positives from late-maturing buds.
3. Time Your Flush Properly (When Relevant)
Flushing replaces nutrient-rich runoff with plain water to reduce residual salts. Soil: 3–7 days; hydro: 1–3 days shorter. Expect modest taste improvements, not dramatic THC gains. Why it works: Flushing reduces off-flavors from excess nutrients and prevents harsh smoke, while over-flushing can stress plants and slightly affect yield.
4. Harvest by Zone: Top Buds vs. Whole-Plant
Stagger harvests: pick top colas when trichomes peak, leave lower buds 3–7 days if still immature. Example schedule: tops at day 0, mid canopy day 3, lowers day 7. Why it works: Zonal harvesting maximizes overall quality and avoids harvesting immature buds that dilute batch consistency.
5. Use Clean Cutting Tools and Proper Technique
Sterilize blades with isopropyl alcohol, use sharp curved scissors for precision, cut at a 45° angle on stems. Handle buds gently to preserve trichomes. Why it works: Sharp, clean tools reduce tissue damage and contamination risk; angled cuts improve sap drainage and speed downstream drying.
6. Choose Drying Method: Hang Dry vs. Rack Dry
Hang dry whole branches for slower drying and better terpene retention; rack dry trimmed buds for faster throughput. Target drying room: 60–65°F, 50–55% RH. Why it works: Slower, controlled drying preserves terpenes and reduces chlorophyll harshness; rack drying is practical for high-volume operations.
7. Trim Before or After Drying? Pros and Cons
Wet trim: neater hang, faster dry, easier manicuring. Dry trim: improved trichome preservation and aesthetic bud shape. Craft growers often dry trim; commercial growers often wet trim. Why it works: Choice balances labor and quality—wet trim speeds workflow, dry trim can yield better-looking, terpene-rich buds.
8. Curing: Jars, Burping, and Long-Term Storage
Place dried buds into airtight glass jars at ~62% RH; burp daily first week, then weekly for month two. Store long-term in dark, 55–62°F conditions. Why it works: Controlled curing stabilizes terpene profiles and smoothness; burping prevents microbacterial growth while letting moisture equalize.
9. Avoid Mold: Detection and Immediate Actions
Separate suspicious buds, increase airflow, open jars to dry slightly, discard heavily infected material. Inspect for gray fuzzy growth (bud rot) vs crystalline trichomes. Why it works: Early detection and containment prevent spread; good airflow and correct moisture during drying/curing are the best preventive measures.
10. Monitor Weight and Moisture for Yield Accuracy
Expect 75–85% loss from fresh to dry (rough rule: fresh 1000 g → dry ~150–250 g depending on moisture targets). Weigh consistent sample branches to estimate batch yield. Why it works: Regular weight tracking informs realistic expectations and helps refine harvest timing and drying protocols for accurate forecasting.
11. Recordkeeping: Notes That Improve the Next Cycle
Log strain, harvest date, trichome state, fresh/dry weight, drying times, and curing observations. Example entry: “Strain X — 2025-08-12 — 70% milky trichomes top, final dry 180 g, burped 2×/day first week.” Why it works: Detailed logs reveal patterns across cycles so growers can fine-tune timing, flush length, and environmental settings for higher quality and yield.
Trichome states (clear/cloudy/amber) against expected THC/CBD potency, typical effects, and recommended action
| Trichome State | Cannabinoid Indicator | Typical Effect | Recommended Action |
|---|---|---|---|
| Clear | THC still synthesizing | Energetic but weaker | Wait; resample in 3–7 days |
| Cloudy (Milky) | Peak THC concentration | Potent, cerebral | Harvest for maximum THC |
| Amber | THC degrading to CBN | More relaxing, sedative | Harvest for indica-like effect |
Key insight: Trichome color maps directly to cannabinoid conversion; prioritize milky trichomes for potency and amber when a sedative outcome is desired.
Pistil percentage vs. trichome state to recommend harvest timing for different desired effects
| Pistil % Browned | Typical Trichome State | Recommended Effect (Energetic/Relaxing) | Harvest Recommendation |
|---|---|---|---|
| 25–40% | Many clear, some cloudy | Uplifting, mild | Continue monitoring, not yet ready |
| 50–70% | Majority cloudy, few amber | Balanced, energetic to relaxed | Good target for general use |
| 70–90% | Increasing amber | More relaxing, couch-lock | Harvest if sedative effect wanted |
Key insight: Pistil percentage is a coarse visual; combine with trichome loupe checks to align harvest with desired effects.
Flushing approaches (no flush, short flush, long flush) and expected outcomes for potency, taste, and risk
| Flush Strategy | Duration | Pros | Cons |
|---|---|---|---|
| No flush | 0 days | Max nutrient in tissue, minimal stress | Possible harsh taste, residual salts |
| Short flush | 3–7 days | Reduces residues, minimal stress | Small risk of nutrient depletion |
| Long flush | 10–14 days | Cleaner taste, better combustion | Possible stress, marginal yield impact |
Key insight: A short flush often balances taste improvement and plant health; duration depends on medium and nutrient program.
Single whole-plant harvest vs staged zonal harvest for yield, quality consistency, and labor
| Harvest Strategy | Effect on Yield | Effect on Consistency | Labor/Complexity |
|---|---|---|---|
| Whole-plant harvest | Simpler yield capture | Variable bud maturity | Low labor, simple |
| Staged harvest (top then lower) | Can slightly increase total usable quality | Higher consistency across jars | Moderate labor, scheduling needed |
| Selective bud harvesting | Max quality per jar | Very consistent | High labor, best for craft runs |
Key insight: Staged harvesting improves batch consistency and allows peak ripeness capture at the cost of workflow complexity.
Common cutting tools and practices for precision, trichome preservation, and ease-of-use
| Tool | Precision | Trichome Preservation | Ease of Cleaning |
|---|---|---|---|
| Pruning shears | High for stems | Good if sharp | Wipeable, robust |
| Scissors (curved) | High for buds | Excellent control | Easy to sterilize |
| Harvest saw | Low (bulk) | Risks trichome damage | Harder to clean |
| Gloves/handling tools | N/A | Protects buds from oils | Disposable or washable |
Key insight: Sharp, small tools and clean technique minimize trichome loss and contamination—invest in good scissors and sterilization habits.
Hang dry and rack dry methods for speed, trichome protection, mold risk, and suitability by grow size
| Drying Method | Speed | Trichome Protection | Mold Risk | Best For |
|---|---|---|---|---|
| Hang dry (whole branches) | Slower (7–14 days) | High | Lower with good airflow | Craft growers, small batches |
| Rack dry (trimmed buds) | Faster (4–10 days) | Moderate | Slightly higher if surface moisture high | Large operations, fast turnaround |
Key insight: Hang drying usually yields superior terpene retention but requires more space and time; racks work where throughput matters.
Side-by-side pros and cons of wet trimming vs dry trimming across quality and workflow metrics
| Trimming Method | Appearance | Curing Time | Terpene Retention | Labor Intensity |
|---|---|---|---|---|
| Wet trim | Neat, immediate | Faster drying, shorter cure | Slight terpene loss risk | Lower per-bud time |
| Dry trim | Fuller bud shape | Longer drying, longer cure | Better preservation | Higher per-bud time |
Key insight: Wet trim speeds processing; dry trim typically preserves terpene profiles and aesthetics for premium products.
Curing timelines and expected changes after 1 week, 2 weeks, 1 month for aroma, taste, and smoothness
| Curing Duration | Aroma/Terpene Development | Smoothness | Recommended Action |
|---|---|---|---|
| 1 week | Initial terpene settling | Slightly harsh | Continue burping, monitor humidity |
| 2 weeks | Noticeable aroma improvement | Smoother smoke | Reduce burping frequency |
| 1 month | Aromas deepen and balance | Much smoother | Move to monthly checks |
| 3 months | Peak stability for many strains | Optimized smoothness | Ideal long-term consumption window |
Key insight: Significant improvements occur within the first month; many cultivars continue to mature positively for up to three months.
Common post-harvest issues (mold, mildew, bud rot) with causes, detection signs, and mitigation actions
| Issue | Primary Cause | Detection Signs | Immediate Action |
|---|---|---|---|
| Bud rot (Botrytis) | High humidity, poor airflow | Gray/brown soft rot inside buds | Isolate, remove affected, increase airflow |
| Powdery mildew | Humid surfaces, spores | White powdery patches on leaves | Isolate, discard affected, sanitize |
| Mold in jars | Over-humidified jars | Musty/off smell, visible filaments | Open jars, dry buds, discard if widespread |
Key insight: Prevention via airflow and proper RH is easier than remediation; immediate isolation and disposal limit contagion.
Sample fresh weight to dry weight conversions across common scenarios to help growers set expectations
| Fresh Weight (g) | Expected Dry Weight (g) @15% | Expected Dry Weight (g) @20% | Notes |
|---|---|---|---|
| 1000 g | 150 g | 200 g | Common rough conversion range |
| 500 g | 75 g | 100 g | Normalize by consistent drying |
| 2000 g | 300 g | 400 g | Bulk operations scale similarly |
| 250 g | 37.5 g | 50 g | Small-batch example |
Key insight: Fresh-to-dry conversion typically yields 10–20% of fresh weight depending on target moisture; consistent sampling improves forecasts.
Template log fields for growers to capture key harvest metrics
| Field | Example Entry | Why it matters | Follow-up action |
|---|---|---|---|
| Strain | Blue Dream | Genetics affect timing | Note performance vs expectations |
| Harvest date | 2025-08-12 | Correlates with environmental data | Compare next cycle dates |
| Trichome state | 70% milky top | Confirms potency target | Adjust next harvest timing |
| Final dry weight | 180 g | Measures yield success | Adjust feeding/lighting next run |
| Curing notes | Burped 2×/day week1 | Tracks quality changes | Alter burping schedule if needed |
Key insight: A concise harvest log creates a feedback loop that tightens harvest timing and yield predictability across cycles.
Understanding and applying these practices narrows the gap between good and great harvests. Consistent inspection, careful handling, and disciplined recordkeeping make harvest timing and yield outcomes predictable and repeatable.
Comparison criteria and evaluation matrix
Evaluating harvesting techniques requires a consistent lens: how easy the method is to execute, the expected effect on potency and yield, what tools or skills are non-negotiable, and the operational risk each technique introduces. Use these criteria to prioritize changes that match your grow scale and risk tolerance.
Evaluation Criteria
Ease of use: Practical effort and learning curve for an average grower.
Potency impact: Likely effect on cannabinoids/terpenes — Low, Moderate, or High.
Yield impact: Expected change to total dried flower weight — Decrease, Neutral, or Increase.
Equipment or skill required: Specific tools, sensors, or advanced techniques required.
Risk profile: Probability of common failure modes (mold, degraded cannabinoids, harvest loss).
Common considerations when scoring: Timing precision demands (e.g., trichome-level decisions require magnification). Labor intensity (staged harvesting increases handling). Environmental control sensitivity (drying and curing need stable RH/temperature). Trade-offs between peak potency and maximum bulk yield.
Score each harvesting tip against standard criteria so readers can quickly identify best options for their situation
| Tip | Ease of Use | Potency Impact | Yield Impact | Equipment Needed |
|---|---|---|---|---|
| Trichome inspection | Moderate | High | Neutral | Loupe/microscope (30–60x), light |
| Pistil monitoring | Easy | Moderate | Neutral | Magnifying glass (optional) |
| Flushing | Easy | Moderate | Slight decrease | Clean water supply, runoff monitoring |
| Staged harvesting | Hard | High | Increase (targeted) | Labels, drying racks, scales |
| Drying method | Moderate | High (if controlled) | Neutral | Dehumidifier, fans, hygrometer |
| Curing | Moderate | High | Slight increase | Mason jars, Boveda/HR packs, hygrometers |
Key insight: Trichome inspection and curing consistently guard potency; staged harvesting can improve overall yield by prioritizing mature colas but demands more labor. Drying and curing are high-leverage steps — poorly controlled conditions cause the largest losses in both potency and weight.
Practical next steps: pick one higher-impact change (for most growers, improving drying/curing control) and one low-effort habit (routine trichome checks) to implement this cycle. These adjustments deliver measurable quality gains without massive capital outlay. Understanding and applying these criteria shortens the learning curve and improves harvest outcomes across seasons.
Comparison table: quick reference
Provide a single glance reference to choose which harvesting tip to apply based on timing and tools
| Tip # | One-line Action | Ideal Timing | Tools Needed | Primary Benefit |
|---|---|---|---|---|
| 1. Trichome inspection | Inspect trichome color and shape to decide harvest window | Final 7–14 days before planned cut | 60–100× jeweler’s loupe or digital microscope | Precise potency control; targets THC/CBD balance |
| 2. Pistil color | Monitor pistil darkening and receding for ripeness signal | Throughout last 2–3 weeks | Hand lens (10–30×) | Quick visual cue; good for large canopy checks |
| 3. Flushing | Stop nutrients and water with plain water flush to clear taste | 3–10 days pre-harvest depending on medium | pH-balanced water, runoff meter | Reduces residual salts; improves smoke quality |
| 4. Staged harvest | Harvest top buds first, later lower colas for uniform maturity | Over 2–7 days at peak ripeness | Sharp shears, harvest tags | Maximizes usable cannabinoid content across plant |
| 5. Cutting technique | Use clean, angled cuts to minimize tissue damage | During harvest | Sterilized trimming shears, sterilant | Faster healing for cut branches; reduces contamination risk |
| 6. Drying method | Hang-dry in dark, 45–55% RH and 60–70°F for 7–14 days | Immediately post-harvest | Dry room with hygrometer, fans | Preserves terpenes and prevents mold growth |
| 7. Trimming | Wet trim vs dry trim choice based on structure and speed | After cut (wet) or after drying (dry) | Trimming scissors, gloves, trays | Affects final appearance and curing speed |
| 8. Curing | Jar cure with burping to stabilize cannabinoids and terpenes | After drying, 2–12+ weeks | Mason jars, hygrometer packs | Improves flavor, smoothness, and long-term potency |
| 9. Mold prevention | Inspect, control humidity, and remove compromised buds | Throughout drying and curing | Hygrometer, dehumidifier, inspection light | Protects yield and product safety |
| 10. Weight monitoring | Weigh samples to track moisture loss for drying endpoints | Daily during drying | Precision scale | Objective drying endpoint; prevents over/under-drying |
| 11. Recordkeeping | Log dates, observations, and tools used for repeatability | At each harvest stage | Notebook or digital grow log | Builds a repeatable protocol to increase cannabis yield |
Key insight: This matrix places actionable steps next to precise timing and minimal toolsets so decisions happen quickly on harvest day. High-impact items—trichome inspection, staged harvest, and curing—directly move the dial on potency, yield, and final product quality. Smaller operational items like cutting technique and weight monitoring eliminate common losses and speed workflow.
Adopting a concise reference like this streamlines decisions and reduces costly guesswork during the busiest phase of a grow. Use it to standardize team practice and sharpen harvest results over successive cycles.
Honorable Mentions
These techniques are advanced or niche approaches that experienced growers experiment with to push quality or yield. Each has a clear use case, some caveats, and a place in an expert’s toolbox when standard methods are already dialed in.
1. Low-Stress Training (LST)
LST gently repositions branches to create an even canopy and expose more bud sites. Why it works: It improves light penetration and evens canopy development, often increasing cannabis yield without major plant stress.
2. Defoliation in Late Vegetative Stage
Selective leaf removal during late veg reduces shading and directs energy to developing nodes. Why it works: Removing large fan leaves opens inner nodes to light and air, which can improve bud set and reduce mold risk.
3. Manifold / Main-Lining
Main-lining creates a symmetric branching structure with evenly distributed sinks. Why it works: It establishes uniform colas and predictable growth patterns, simplifying canopy management for consistent harvest timing.
4. Dry Sifting Pre-Harvest (Kief Collection)
Mechanical kief collection from trimmings captures terpenes and trichomes for concentrates. Why it works: Recovering trichomes from waste material increases overall product value and reduces loss during trimming.
5. Controlled Drought Stress
Brief, controlled water reduction late in flowering can concentrate cannabinoids in some genotypes. Why it works: Mild stress can trigger secondary metabolite production, though responses are genotype-dependent and risky if overdone.
6. Light Spectrum Tuning
Adjusting red/blue ratios during flower can influence stretch and resin production. Why it works: Plants respond to spectrum shifts hormonally; targeted tuning refines internode length and can support resin development.
7. Foliar Amino Acid Sprays
Targeted amino acid sprays during early flower support metabolic processes under high demand. Why it works: Rapidly available nitrogen and precursors can help sustain bloom metabolism without altering substrate EC.
8. Phasic Flushing Protocols
Phased nutrient tapering with monitored EC/pH prepares plants for optimal curing and flavor. Why it works: Controlled tapering reduces nutrient lock-in and can improve smoke quality when done with precision.
Suitability notes: These are advanced techniques—appropriate when baseline practices (light, nutrients, environment) are already optimized. Caveat: Many are genotype-sensitive; pilot on a few plants before applying across a crop.
For many growers, combining one or two of these methods with rigorous harvest timing and post-harvest care yields the best returns. When applied thoughtfully, these techniques raise consistency and product quality without adding unnecessary complexity.
Resources & Recommended Tools
This selection focuses on the essentials for harvesting and monitoring that consistently improve yield and preserve cannabinoid and terpene quality. Each item lists the tool, what it does, what to look for when choosing one, and where growers typically source it.
1. Sharp Harvest Scissors
Purpose: Cleanly trim buds without tearing plant tissue. Selection tip: Look for stainless steel blades, comfortable ergonomic handles, and a fine tipping for sugar-leaf work. Where to source: Specialty grow shops, professional horticulture suppliers, and online retailers; consider buying a few sizes for different tasks. Why it works: A precise cut reduces bruising and microbial risk, which protects aroma and potency during cure.
2. Digital Hygrometer / Thermometer
Purpose: Real-time monitoring of relative humidity and temperature in drying and curing spaces. Selection tip: Choose units with ±1% RH accuracy and a data-logging option, or networked sensors for remote alerts. Where to source: Electronics retailers, horticulture stores, and smart-home suppliers. Why it works: Tight RH control prevents mold while preserving terpene profiles during drying.
3. Analytical Scale (0.01 g resolution)
Purpose: Accurate weighing for harvest batches, potency testing workflows, and inventory records. Selection tip: Use a calibrated scale with tare function and a capacity matched to expected batch sizes. Where to source: Lab supply vendors, kitchen-pro appliance stores, or horticulture suppliers. Why it works: Precise weights enable consistent dosing, inventory tracking, and yield calculations.
4. Drying Racks & Mesh Screens
Purpose: Maximize air circulation around hanging buds or trimmed material. Selection tip: Choose breathable, washable mesh with modular racks to scale by harvest size. Where to source: Grow-supply retailers and commercial drying-equipment vendors. Why it works: Even airflow reduces localized humidity pockets that harbor mold, improving overall quality.
5. Humidity-Controlled Cure Jars / Bins
Purpose: Long-term curing in a stable micro-environment to finish terpene and cannabinoid development. Selection tip: Select glass jars for small batches and food-grade, sealable bins with humidity packs for larger runs. Where to source: Packaging suppliers, specialty grow stores, and lab-equipment outlets. Why it works: Controlled cure smooths harsh chlorophyll notes and stabilizes potency over weeks.
6. Pocket Microscope / Jeweler’s Loupe
Purpose: Inspect trichome maturity for precise harvest timing and quality checks post-dry. Selection tip: Opt for 60–120x magnification with good optics and integrated lighting. Where to source: Photography shops, jeweler supply stores, and grow-supply retailers. Why it works: Visual trichome cues are one of the most reliable harvest-timing indicators.
7. pH and EC Meter
Purpose: Verify soil or hydroponic solution conditions through harvest for better post-harvest plant cleanup. Selection tip: Calibrate frequently and choose meters with replaceable electrodes and ppm/EC conversion. Where to source: Hydroponics suppliers, lab-equipment stores, and online marketplaces. Why it works: Maintaining optimal pH/EC up to harvest reduces nutrient lockup and unwanted residues.
8. Cold Storage / Freezer for Trim
Purpose: Preserve trichome-rich trim for rosin pressing or solvent extraction. Selection tip: Use chest freezers for stable temps; if storing biomass, employ vacuum-sealed packaging to limit freezer burn. Where to source: Appliance retailers and commercial cold-storage vendors. Why it works: Rapidly lowering temperature preserves volatile terpenes and makes rosin extraction cleaner and higher-yielding.
For seeds and genetics that influence harvest timing and yield potential, reputable suppliers with germination guarantees and expert support simplify planning and risk management—choose genetics that fit your harvest window and climate.
Understanding these tools and selection criteria reduces post-harvest losses and improves final product consistency, letting teams focus on refining technique rather than troubleshooting equipment failures.
FAQs about Harvest Timing and Yield
1. When is the best time to harvest?
Harvest when most trichomes are cloudy with a portion turning amber, and pistils have mostly curled in. Check multiple buds with a 30–60x loupe over several days to confirm progression. Why it works: Cloudy trichomes indicate peak cannabinoid development while amber signals cannabinoid conversion to CBN, letting growers target potency and effect.
2. How long does flowering usually take?
Photoperiod strains commonly finish in 8–12 weeks; autos typically finish in 8–10 weeks from seed. Track strain-specific timelines from breeder notes and adjust for phenotype variation. Why it works: Genetic expectations set planning windows; inspecting trichomes gives the final call rather than calendar days alone.
3. Will flushing increase yield or quality?
Flushing (switching to plain water) for 7–14 days before harvest can improve taste for some growers, but it doesn’t reliably increase weight. Flush only when nutrient buildup is evident or when flavor is a priority. Why it works: Flushing reduces residual fertilizer salts that can affect smoothness, though final weight depends more on late-stage water uptake and resin production.
4. How much yield should I expect?
Indoor yields vary widely: experienced growers often reach 0.5–1 g/W under good conditions; beginners should expect less. Outdoor harvests depend on climate, training, and plant size. Why it works: Yield scales with light, genetics, plant health, and training methods—control the controllables to improve returns.
5. Does harvest timing affect potency?
Yes. Harvest earlier (more cloudy trichomes) generally preserves higher THC; later harvests (more amber) shift toward sedative, degraded cannabinoids. Match timing to desired effects. Why it works: Cannabinoid biosynthesis and degradation continue late in flower, so timing directly changes biochemical profiles.
6. How do I avoid mold at harvest?
Lower humidity to 40–50% in the final two weeks, increase airflow, and harvest promptly in the morning when plants are driest. Remove large fan leaves to reduce moisture pockets. Why it works: Mold thrives in stagnant, humid microclimates; controlling moisture and airflow prevents colonization.
7. Should I dry whole plants or individual branches?
Both work. Whole-plant drying preserves terpene profiles and simplifies handling; branch drying allows quicker, more uniform drying for dense plants. Why it works: Choice depends on space, airflow, and drying time control—select the method that keeps stems bending, not snapping, during drying.
8. How do genetics influence yield vs. harvest time?
Genetics set maximum potential for bud size, cannabinoid profile, and flowering length. Choose strains whose flowering window fits your schedule and climate. Why it works: Aligning genetics with grow conditions reduces surprises and improves predictable outcomes.
Understanding these points helps plan harvests that match desired potency, flavor, and yield while reducing post-harvest risk. When harvest timing aligns with clear observations—trichomes, pistils, and plant condition—results become far more predictable.
📥 Download: Cannabis Harvesting Checklist (PDF)
Actionable Checklist Before You Harvest
Preparing the last 48 hours before harvest determines final potency, aroma and how clean the trim will be. This checklist focuses on immediate inspection, drying and curing prep, safety, and documentation so harvest day runs smoothly and losses are minimized.
1. Inspect trichome maturity
Check trichomes with a jeweler’s loupe or microscope at least every 12 hours during the last two days. Why it works: Trichome color (clear → cloudy → amber) is the most reliable indicator of cannabinoid maturity and helps time harvest to the desired effect profile.
2. Final pest and mold sweep
Do a quick scan for webs, mites, powdery mildew, or bud rot; remove any affected branches immediately. Why it works: Removing compromised material prevents contamination during drying and protects overall yield.
3. Flush strategy decision
If you use flushing, complete it at least 24–48 hours before harvest; otherwise maintain normal feed to avoid shock. Why it works: Controlled flushing minimizes residual nutrients and improves flavor during curing.
4. Prepare drying space
Set up a dark, cool room with 40–60% relative humidity and 60–70°F (15–21°C); hang racks or lines and label zones. Why it works: Stable temperature and RH prevent mold and ensure even drying, which preserves terpenes and potency.
5. Assemble trimming and storage supplies
Lay out sharp scissors, gloves, sanitized trays, breathable drying racks, clean jars, and humidity packs. Why it works: Having tools at hand reduces handling time and contamination risk, improving trim quality and shelf life.
6. Establish handling and safety protocols
Designate one clean area for trimming, enforce glove and mask use, and plan waste disposal for green matter. Why it works: Consistent sanitation prevents microbial transfer and keeps processed product compliant with quality expectations.
7. Set documentation and batch labeling
Create harvest logs with strain name, harvest time, wet weight, and grow notes; label jars with batch IDs. Why it works: Accurate records protect traceability and help refine timing and techniques for future runs.
8. Calibrate scales and environmental monitors
Verify scale accuracy and check hygrometers/thermometers; place backups where possible. Why it works: Precise measurements prevent record errors and ensure drying conditions match targets.
9. Plan curing schedule and QC checkpoints
Reserve curing jars, set target RH (58–62%), and schedule quality checks at day 7, 14, and 30. Why it works: Planned QC prevents surprises and ensures the final product meets aroma, moisture, and potency expectations.
Understanding these steps reduces last-minute errors and preserves the work invested throughout the grow. When followed consistently, this 48-hour routine improves yield quality and simplifies post-harvest workflows.
Conclusion
You’ve seen how small choices — from trichome inspection to staggered cutting and immediate dry-room conditions — reshape final quality and cannabis yield. Practical patterns recur: growers who inspect trichomes under magnification, stagger harvests by strain, and flush thoughtfully regularly report cleaner smoke and steadier potency; indoor short-flower indica runs often finish faster and benefit most from staggered canopy cuts, while late-season outdoor sativas demand weather-aware timing to protect yield. The comparison matrix and checklist make those decisions repeatable rather than guesswork.
Next steps: inspect a representative bud daily, plan two staggered harvest days for mixed canopies, and log results to refine timing. For genetics, germination support, or seed-to-harvest troubleshooting, the SeedConnect growing resources (SeedConnect growing guides) streamline implementation. Apply these steps this cycle, track changes, and the pattern shows measurable improvements in both potency and overall harvest weight.