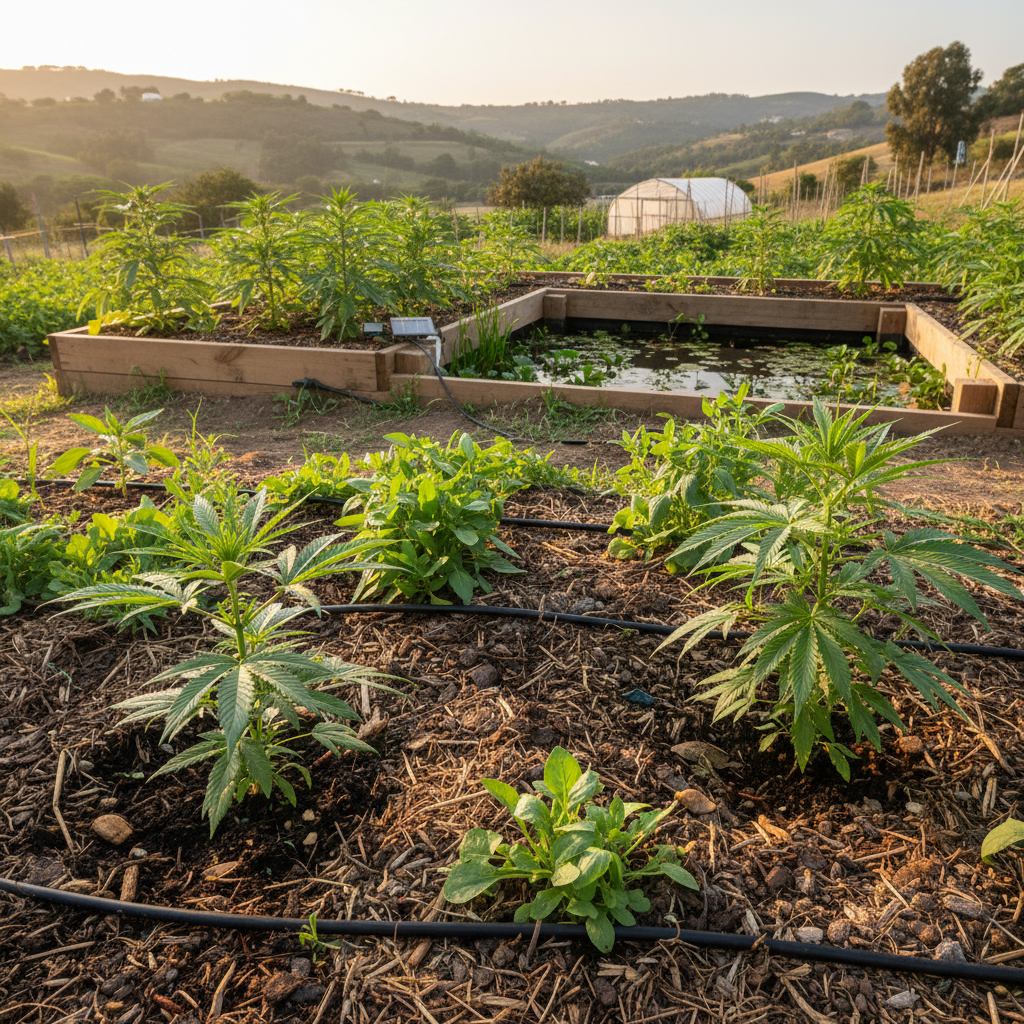
Clay tracks in the grow bed tell the same story as browned leaf tips: soil design, not genetics, often dictates harvest size. Growers trying to fold regenerative practices into cannabis cultivation stumble where permaculture principles meet legal and space constraints, producing good intentions but patchy results.
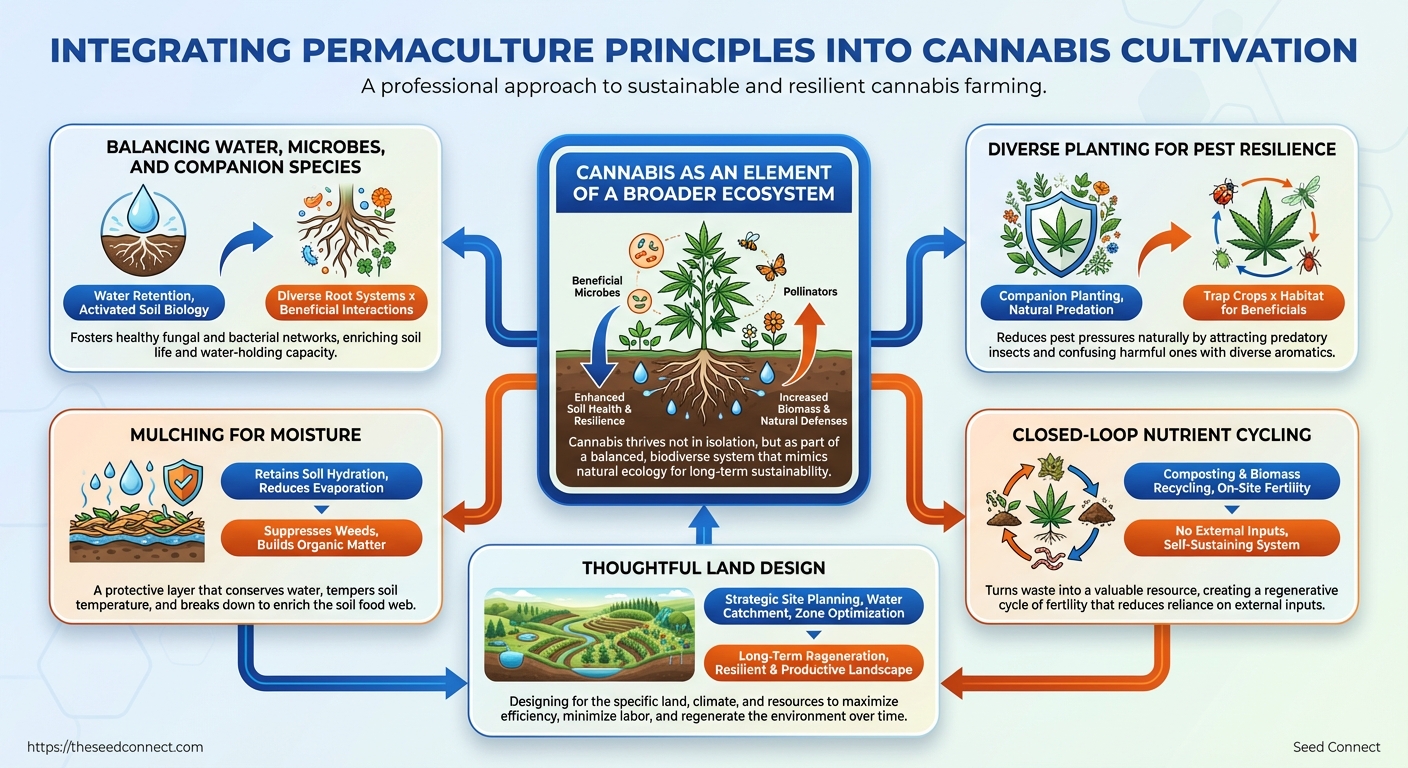
Successful projects treat cannabis as an element of a broader ecosystem, not a stand-alone crop, balancing water, microbes, and companion species. Applying sustainable agriculture tactics—mulching for moisture, diverse planting for pest resilience, and closed-loop nutrient cycling—reduces inputs while stabilizing yields.
This piece focuses on practical moves for on-the-ground improvement, from contouring beds to selecting low-disturbance soil amendments, all rooted in thoughtful land design. Expect concise, field-tested options that translate directly to small plots, urban lots, and rural parcels without jargon or unrealistic resource demands.
Table of Contents
- Permaculture Principles Applied to Cannabis
- Site Assessment and Design (Zone and Sector Planning)
- Soil Building and Nutrient Cycling
- Water Management and Micro-Irrigation
- Step-by-Step Implementation Guide (Numbered Steps)
- Integrated Pest Management & Biodiversity
- Maintenance, Harvesting, and System Evolution
- Troubleshooting Common Issues
Permaculture Principles Applied to Cannabis
Permaculture adapts ecological design principles to create resilient, low-input systems; applying those ideas to cannabis production reduces inputs, stabilizes yields, and improves plant health over time. Start by thinking in terms of systems — soil biology, water flow, plant communities and edge effects — then translate each permaculture principle into cannabis-specific practices that fit your scale, climate and legal framework. Prerequisites
- Site knowledge: record microclimates, sun hours, prevailing winds, water sources (1–2 site visits).
- Soil baseline: test pH, organic matter, and texture (
pH 6.0–7.0target for most varieties). - Legal compliance: confirm local regulations and secure appropriate permits.
Tools & materials
- Soil testing kit: handheld pH and NPK tests.
- Compost system: tumblers or static bins.
- Mulching materials: straw, wood chips, or living cover seed mixes.
Principles, definitions, and cannabis-specific applications Observe and interact: Spend time watching site patterns before intervening.
- Plant clones or seedlings in trial beds for one season to map microclimates.
- Use portable shade cloths to test sun exposure impacts on trichome density.
- Track pest hotspots weekly to focus controls.
Expected benefit: spot treatments and layout choices cut pest pressure and energy costs. Catch and store energy: Capture water, biomass, and solar gain for later use.
- Install swales or berms to slow runoff and recharge soil moisture.
- Build compost tea systems to convert biomass into available nutrients.
- Use thermal mass (water barrels) to moderate greenhouse temperatures overnight.
Expected benefit: reduced irrigation frequency and steadier nutrient availability. Obtain a yield: Design every element to produce something of value.
- Interplant nitrogen fixers (clover) at canopy edge to support root zones.
- Maintain a perennial herb strip for companion pest management.
- Harvest and compost every plant residue to close nutrient loops.
Expected benefit: higher usable biomass and lower purchased fertilizer needs. Produce no waste: Turn residues into resources.
- Set up vermicompost for leaf and trim waste.
- Convert pruning into mulch or biochar feedstock.
- Recycle irrigation runoff into settling tanks for reuse.
Expected benefit: lower disposal costs and improved soil structure. Use and value diversity: Reduce failure risk through genetic and species variety.
- Rotate strains with different flowering times to spread harvest labor.
- Mix pest-resistant genetics alongside high-yield varieties.
- Plant flowering strips to attract beneficial insects year-round.
Expected benefit: stabilized yields and fewer catastrophic pest outbreaks. Practical next steps: run a small permaculture trial bed this season, track inputs and yields, and scale practices that demonstrably reduce inputs while improving crop health. This approach shifts management toward long-term resilience rather than constant troubleshooting.
Site Assessment and Design (Zone and Sector Planning)
Start by treating the site like a living map: walk it daily for a week, note repeating patterns of sun, wind, water flow and human movement, then translate those observations into a zone-based layout that places cannabis where care, security and microclimate needs align. Zone-and-sector planning reduces daily friction, focuses resources, and protects plants from predictable stressors. Prerequisites
- Site notebook and camera: record observations, photos and timestamps.
- Tools: compass or smartphone compass app, light meter or
sun calcapp, flagging tape, measuring tape. - Time: minimum 1 week of observation; 2–4 weeks gives stronger microclimate data.
Definitions used in layout planning Zone 0: Immediate home/interior where daily attention occurs. Zone 1: Area nearest the home (daily visits); high-intensity cultivation. Zone 2: Short walk from home; frequent but not daily care. Zone 3: Low-maintenance production; occasional visits. Zone 4/5: Semi-wild to wild; minimal intervention, habitat or forage areas. Step-by-step site assessment and zone layout
- Walk the property at different times of day (sunrise, midday, sunset) and log sun hours and shade changes.
- Perform a baseline soil test (10–20 minutes sampling; results in 1–2 weeks).
Practical examples and considerations
- Example micro-siting: A south-facing slope 20–30 meters from the house with morning sun and afternoon shade is ideal for photoperiod varieties needing steady light and moderate heat.
- Security: Position plants within visual range of living areas and behind natural screens; small hedges or trellises serve as barriers without creating dense concealment.
- Water logistics: Situate beds near existing water sources to reduce hose length and labor.
Permaculture zones and recommended cannabis activities per zone
Zone | Typical Distance from Home | Recommended Cannabis Activities | Maintenance Frequency |
|---|---|---|---|
Zone 0 | Inside or attached to home | Seed starting, cloning, mother plant maintenance | Daily |
Zone 1 | 0–10 m | Vegging plants, small-scale photoperiod grows, secure autoflowers | Daily–every other day |
Zone 2 | 10–50 m | Main outdoor flowering beds, larger autoflower plots | 2–3 times/week |
Zone 3 | 50–200 m | Low-input field genetics, bulk feed crops | Weekly–monthly |
Zone 4/5 | >200 m | Seed production, conservation plots, wild genetics | Occasional |
Key insight: Positioning cannabis within zones 1–2 streamlines labor and security while allowing zones 3–5 to perform supporting ecosystem functions like pollinator habitat and nutrient cycling. Expected outcomes and troubleshooting
- Outcome: Easier daily management, reduced plant stress from microclimate extremes, and clearer security planning.
- Troubleshooting: If a chosen micro-site shows unexpected frost, extend observations through a colder period and consider windbreaks or slight grade changes.
Including quality seed choices that match microclimates — for example selecting robust autoflower genetics for marginal zone-2 plots — speeds success and reduces replacement costs. Understanding these spatial principles helps teams move faster without sacrificing plant health or operational security.
Permaculture Zones & Sectors – Permaculture Design Principles
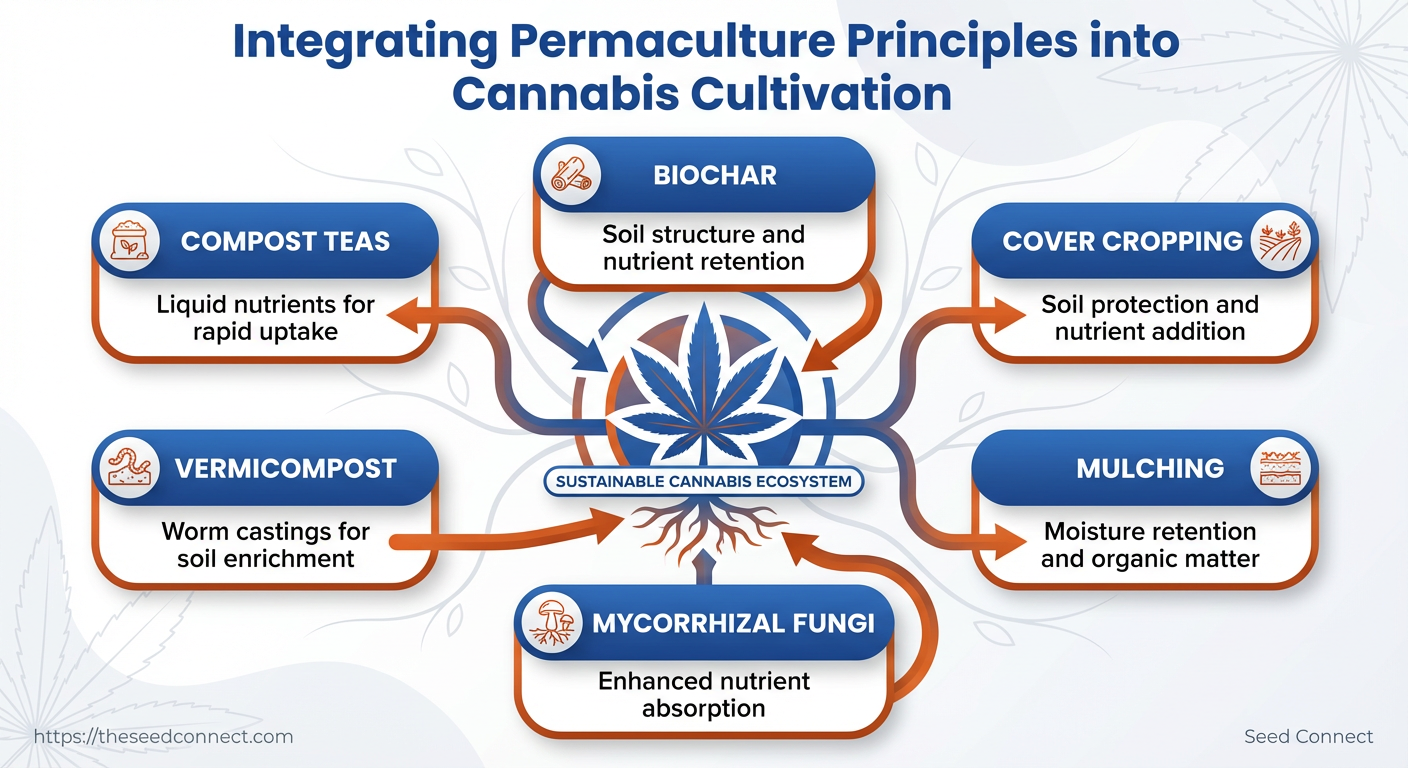
Soil Building and Nutrient Cycling
Soil is the production system for cannabis; building living, resilient soil reduces reliance on synthetic fertilizers and stabilizes yield and terpene quality. Start by diagnosing the existing medium, then sequence biological amendments, compost products, and cover crops so nutrient availability matches the plant’s growth stages rather than forcing plants to chase ephemeral feeds.
- Soil test: A quantitative analysis of
pH, nutrients, and organic matter used to guide amendments. - Hot compost: Fast decomposition method that sanitizes and stabilizes nutrients.
- Cold compost: Slow decomposition that builds humus and microbial diversity.
Practical signals of success include darker, friable soil, more earthworm activity, and steadier EC readings across the season. Incorporating these steps creates a self-reinforcing nutrient cycle that lowers input needs while improving plant health and consistency.
Water Management and Micro-Irrigation
Efficient water management starts with a clear map of how water moves across the site and a micro‑irrigation system sized to deliver the right volume where plants need it. Start by capturing and directing water, then tailor emitter flow to pot or bed volume, and combine surface strategies—mulches and living groundcovers—to cut evaporation and improve soil moisture retention.
- Map water flow and install catchment
- Walk the site after a rain and mark flow paths, low points, and runoff outlets.
- Identify roof and hard‑surface catchment areas; size storage tanks by multiplying roof area (m²) × average rainfall depth (mm) × 0.9 for collection efficiency.
- Install gutters and first‑flush diverters to protect tanks; route overflow to infiltration swales or storage basins.
- Select and size drip emitters
- Match emitter flow to container or bed volume: for small pots use
2-4 L/hremitters; for medium pots4-8 L/hr; for large pots or raised beds8-16 L/hror use multiple emitters per plant. - Use pressure‑compensating emitters on long lateral runs to maintain uniformity.
- For evenly packed beds, install 15–30 cm emitter spacing; for individual plants, position two emitters equidistant around the root ball.
- Install mains, manifolds and control systems
- Place a filter and a pressure regulator on the mainline upstream of manifolds.
- Use a solenoid valve and a programmable controller for timed cycles; pair with a soil moisture sensor for on‑demand irrigation.
- Design manifold zones by water requirement, not by arbitrary area—group similar pot sizes and plant stages together.
Combine surface strategies to reduce evapotranspiration
- Mulch: Apply 5–10 cm of organic mulch to reduce surface evaporation and moderate soil temperature.
- Living groundcovers: Establish low‑growing covers (e.g., clover, native grasses) between beds to shade soil and interrupt wind.
- Windbreaks: Use temporary shade cloth or hedgerows to cut transpiration during hot periods.
Practical examples and troubleshooting
- Example: A 200‑m² canopy with 600 mm annual rainfall can yield roughly 108,000 L/year of harvestable rainwater after losses—enough to offset summer mains irrigation with proper storage and scheduling.
- Clogging: Backflush or clean filters monthly; install 120‑mesh filters for well water and 200‑mesh for surface water.
- Uneven wetting: Check for pressure drop; add pressure compensating emitters or reduce lateral length.
Understanding these design and installation steps shortens setup time and reduces water waste while protecting plant health. When systems are balanced—capture, delivery and surface management—operations become more resilient and predictable.
Step-by-Step Implementation Guide (Numbered Steps)
This sequence turns permaculture principles into a practical cannabis grow plan on a small plot. Start by designing for water capture, soil life, and perennial-supporting plantings; then proceed step-by-step from site prep to multi-year maintenance. Each numbered step lists what to bring, estimated difficulty, time required, and measurable success criteria so teams can track progress objectively.
Preparations and materials
- Essential tools: spade, broadfork, soil thermometer, moisture meter, wheelbarrow, watering can, hand pruners
- Soil inputs: compost, well-aged manure, cover crop seed mix, rock dust, biochar (optional)
- Plants and seedstock: diverse companion plants and cannabis seeds (consider certified feminized or autoflower genetics for predictability)
- Protective items: deer netting, row cover, pH test kit, small greenhouse tunnel (optional)
- Site assessment and design — Materials: topographic sketch, compass, soil probe; difficulty_level: easy; time_estimate:
2–4 hours; measurable_success_criteria: soil profile recorded, slope and sun map completed, one water-capture swale location sited. - Begin weekly walkthroughs during vegetative stages and twice-weekly during flowering.
Warnings: avoid working wet soil (compaction risk), and manage staking to prevent root disturbance. Use certified seed sources for predictable germination and genetics when establishing long-term guilds. Understanding these steps helps teams move from theory to a resilient, low-input cannabis system that improves with time. When implemented with careful monitoring, permaculture-based grows reduce external inputs while building productive soil.
Integrated Pest Management & Biodiversity
Start with habitat and diversity to make pest outbreaks the exception, not the rule. Design choices—crop layout, companion planting, and habitat features—change pest dynamics more reliably than reactive sprays. This section gives a concrete scouting protocol, clear action thresholds, companion-plant pairings, and simple habitat-build steps to lower pest pressure in permaculture cannabis systems and other sustainable agriculture contexts. Scouting & Action-Threshold Plan
- Aphids: treat when average >20 aphids/plant or any colony causing >10% defoliation.
- Spider mites: treat at first detected egg clusters or >3 motile mites per leaf under 60x magnification.
- Whiteflies: treat when sticky trap count exceeds 10/week per trap or >5 nymphs/leaf on new growth.
- Fungal disease: treat at any sign of active sporulation or >5% canopy showing lesions.
Companion Plants Proven for Cannabis Systems
- Marigold (Tagetes): repels nematodes and attracts parasitoids.
- Nasturtium: traps aphids and protects nearby plants.
- Borage: attracts bees and predatory insects; improves soil structure.
- Yarrow: concentrates beneficial predator populations.
- Lavender: deters moths and reduces pest landings.
Habitat-Build Actions (easy installs)
- Plant perennial insectary strips at field edges with yarrow, fennel, and buckwheat.
- Early season: site prep and baseline measurement
- Mid-season: active maintenance and targeted interventions
- Pre-harvest: timing and gentle handling
- Harvest day: organized, low-impact processing
- Post-harvest: soil-first handling and restorative steps
- Check environmental baselines: confirm temperature, humidity, and light schedule; adjust HVAC or move plants to stable conditions.
Genetics and cultural choices Resistant genetics: Favor varieties with thicker cuticles and robust terpene profiles to reduce herbivore preference—selecting seeds with these traits cuts pressure before it starts. Cultural sanitation: Remove heavily infested material off-site and avoid overhead irrigation that prolongs leaf wetness. Monitoring, companion planting, and simple habitat features let ecological processes do the heavy lifting. Applied consistently, these steps turn pest prevention into a predictable part of sustainable land design and permaculture cannabis management.

Maintenance, Harvesting, and System Evolution
Start the season with a clear maintenance calendar and end it with harvest handling that actively improves soil and system resilience. A disciplined seasonal workflow reduces pest pressure, conserves nutrients, and sets the design up for measurable evolution: plant, observe, measure, adapt. Below are the prerequisites, tools, and a tightly sequenced seasonal plan that treats harvest as the beginning of next season’s fertility rather than the end. Prerequisites and tools
- Soil test kit: Basic N-P-K and pH testing capable of
pH 6.0–6.8readings. - Basic workshop kit: Pruners, burlap sacks, tarps, compost thermometer.
- Recording system: Notebook or digital log for yield, pest observations, and amendments.
- Cover-crop seed mix: Fast-establishing legumes and grasses suited to local climate.
Seasonal maintenance and harvest workflow (step-by-step)
Test soil, map microclimates, and record last season’s problems. Plant early cover crops in any fallow beds. Expected outcome: clearer nutrient baseline and reduced erosion.
Schedule weekly inspections for pests, foliar issues, and irrigation uniformity. Apply foliar feeds only when deficiencies are documented. Expected outcome: fewer foliar nutrient corrections at harvest.
Flush with clean water as needed, stop high-N inputs two weeks before harvest, and plan harvest windows around lower humidity days. Expected outcome: cleaner harvest with minimized mold risk.
Triage plants on-site: separate clean biomass from diseased material. Handle root balls gently if saving for replant or soil transfer. Expected outcome: material sorted for highest post-harvest utility.
Chop healthy stalks into the bed as coarse mulch or route them to high-C compost. Bury diseased material deeply or remove for off-site disposal. Seed cover crops within 7–14 days. Expected outcome: retained organic matter and rapid microbial recovery. How harvest handling benefits future soil health
- Reduced tillage: preserves structure and mycorrhizal networks.
- On-site biomass retention: returns carbon and micronutrients.
- Rapid cover-cropping: prevents nutrient leaching and suppresses weeds.
Iterative design: measure, observe, adapt
- Measure: record yield/kg, pest incidents/plot, and
pHshifts monthly. - Observe: photograph representative plants and note microclimate changes.
- Adapt: change cover-crop mixes, adjust irrigation zones, or alter nutrient timing based on incoming data.
Common troubleshooting
- Late-season mold — increase air movement and harvest sooner.
- Slow compost heating — reduce bulky wet material and add dry carbon-rich stalks.
Understanding seasonal maintenance as a single continuous cycle—from site prep through harvest and immediate soil restoration—keeps systems productive and improves outcomes every year. When teams adopt this approach, decisions are driven by data and the land itself, so each iteration becomes more resilient and efficient.
📥 Download: Permaculture Principles Integration Checklist for Cannabis Cultivation (PDF)
Troubleshooting Common Issues
Most problems in small-scale cannabis grows are solvable with quick diagnostics and corrective action; act fast, record changes, and prevent recurrence using sustainable practices. The common failure modes are nutrient imbalance, water stress, pests and mold, poor germination, and environmental swings — each has a short checklist to confirm the cause and a stepwise fix that can be completed within an hour or over several days depending on severity. Common problems, quick diagnostics, and fixes
- Yellowing leaves (lower first): Usually nitrogen deficiency or overwatering — check leaf pattern and soil moisture.
- Leaf curl or burn at tips: Often nutrient salt buildup or high EC; inspect runoff EC and leaf margins.
- Slow or failed germination: Wrong temperature, soaking time, or seed viability — test seeds and adjust conditions.
- Pests (spider mites, aphids): Look for stippling, webbing, or sticky residue; inspect underside of leaves.
- Powdery mildew or bud rot: High humidity and poor airflow; examine canopy density and RH readings.
Step-by-step fixes (fastest to implement)
Permaculture-based prevention
- Design for resilience: diversify companion plantings and layered canopy to attract beneficial insects and reduce monoculture pests.
* Soil health focus: build living soil with compost, mycorrhizae, and slow-release amendments rather than relying solely on salts.
- Water cycling: employ swales, mulch, and drip systems to stabilize moisture and reduce stress.
Definitions EC (electrical conductivity): Measure of dissolved salts in runoff, used to assess nutrient concentration. Mycorrhizae: Symbiotic fungi that extend root nutrient uptake and improve drought resistance. Legal and safety reminders are crucial: follow local regulations for cultivation and use only labeled, approved products for pest control. For germination issues, consult supplier guarantees — many reputable seed providers, including TheSeedConnect, offer germination support and replacement policies. Understanding these troubleshooting steps reduces downtime and protects yields while supporting sustainable, permaculture-informed growing practices.
Conclusion
The practical thread running through this piece is simple: thoughtful land design and soil-first decisions change harvests more reliably than chasing genetics. By applying permaculture cannabis thinking—mapping zones and sectors, building living soils, and matching micro‑irrigation to plant demand—growers convert reactive maintenance into predictable yields. Remember the site-assessment example where shifting beds to a lower-slope zone cut runoff and halved supplemental irrigation, or the compost-tea trial that restored microbial activity and stopped nutrient burn: those are repeatable wins when design precedes implementation. Prioritize soil-building, water-matching, and biodiversity as the first investments; they pay compound dividends each season.
Next steps are concrete and achievable. First, perform a quick zone and sector sketch of your site this weekend. Then run a simple soil test and start a small compost pile. Finally, trial micro‑irrigation on one bed before scaling. Expect visible improvements in 1–2 seasons, faster for moisture control and slower for full soil ecology shifts. Questions about seed selection, germination guarantees, or matching cultivars to a regenerative plan can be resolved with focused resources — see the Seed Selection & Germination Guide at TheSeedConnect for practical options. Treat design as the crop’s foundation, and the harvest will follow.