A packet of seeds tucked into a drawer that once sprouted vigorous seedlings now yields patchy germination and limp sprouts. Many growers recognize that slow decline—seeds that look fine but lose vigor—and wonder what went wrong with their cannabis seed storage.
Small mistakes matter: a few degrees of temperature change, a single humid season, or long exposure to light can shave years off viability and ruin plans for specific phenotypes. Simple adjustments preserve genetics, germination rates, and the traits growers care about when preserving seed quality.
This guide breaks down the practical, low-effort steps that keep seeds viable whether they sit for months or years. Expect clear, usable seed storage tips rooted in what experienced cultivators actually do, so the next time a packet is opened the sprouts match the expectation.
Understanding Cannabis Seeds and Why Storage Matters
Seeds are alive and time is their enemy: they carry just enough energy and moisture to kick-start a plant, and every hour in poor conditions chips away at that reserve. Proper storage keeps the seed’s metabolism nearly paused, preserving embryos and nutrient stores until planting. Cool, dark, dry, and stable conditions slow chemical reactions and prevent the biological processes that reduce germination rates.
Seeds age because of basic chemistry and biology. Small amounts of residual moisture allow enzymes to run slowly, breaking down fats and proteins that seedlings need. Temperature swings speed up those reactions and can cause microfractures in the seed coat. Light and oxygen drive oxidative damage. Put simply: reduce moisture, lower temperature, block light, and limit oxygen exposure, and seeds stay viable far longer.
Seed viability: Ability of a seed to germinate and produce a healthy seedling. Dormancy: A physiological state that prevents germination until conditions are right; distinct from loss of viability.
What to watch for and why it matters: Moisture control: Even a few percent of extra moisture greatly increases biochemical activity; use desiccants and airtight containers. Temperature stability: Fluctuations cause repeated expansion/contraction and accelerate aging; aim for a steady, cool environment. Light and oxygen exposure: Light can trigger photoreceptors and oxygen fuels oxidation; opaque, sealed storage reduces damage. Physical damage: Cracked seed coats let moisture and microbes in; handle seeds gently. * Pests & mold: High humidity invites fungal growth and insects that consume seeds.
- Store seeds in an airtight container.
- Add a desiccant packet to keep
relative humiditylow. - Keep containers in a consistently cool, dark spot (refrigeration or dedicated seed vault if available).
How Cannabis Seeds Age: Biology in Plain Terms
Metabolism never fully stops in a viable seed. Low moisture and low temperature reduce enzymatic activity and slow lipid peroxidation. Over months and years, oxidative damage to membranes and DNA accumulates, and energy reserves are consumed. Proper storage simply reduces the rate of those processes.
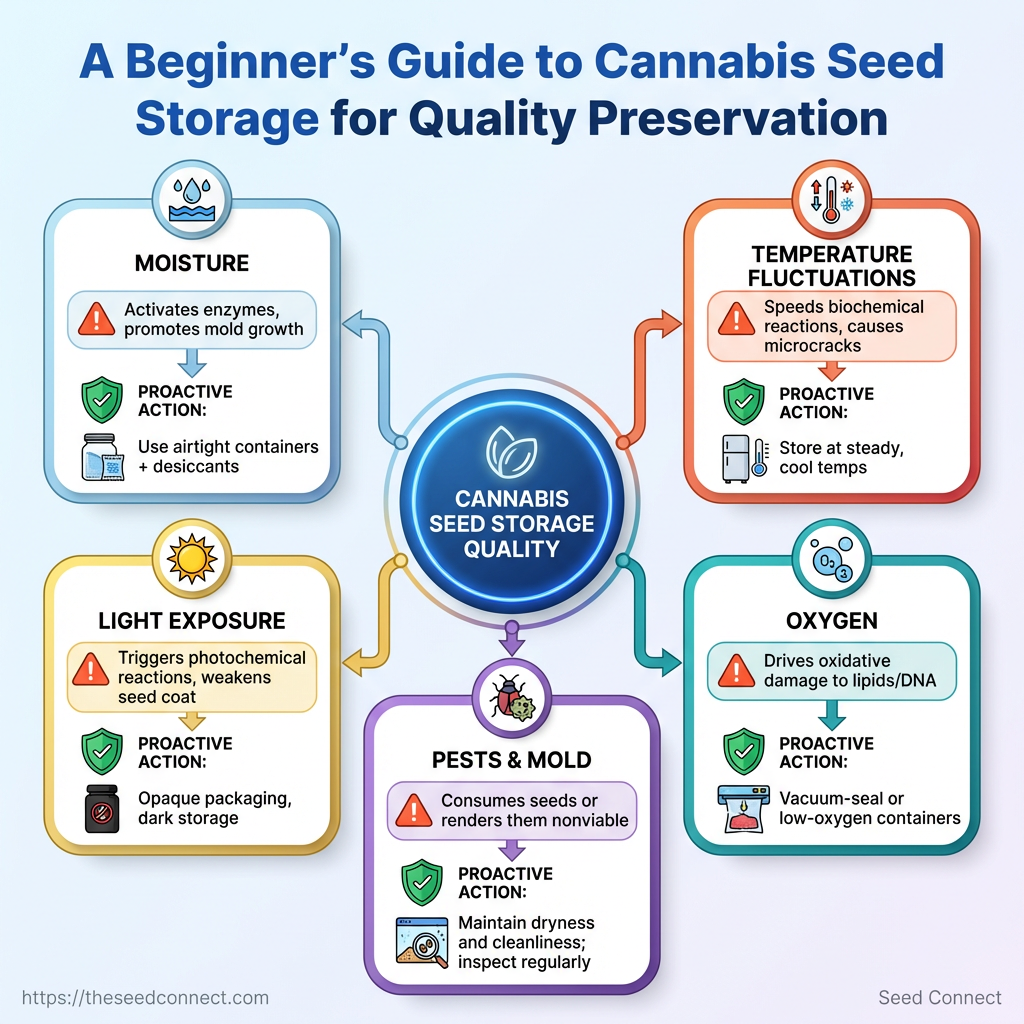
Common Causes of Seed Quality Loss
How each degradation factor affects seeds and the most effective preventative measures
| Degradation Factor | How it Damages Seeds | Likelihood (Low/Med/High) | Best Preventative Action |
|---|---|---|---|
| Moisture | Activates enzymes, promotes mold growth | High | Use airtight containers + desiccants |
| Temperature Fluctuations | Speeds biochemical reactions, causes microcracks | High | Store at steady, cool temps (refrigerator) |
| Light Exposure | Triggers photochemical reactions, weakens seed coat | Med | Opaque packaging, dark storage |
| Oxygen | Drives oxidative damage to lipids/DNA | Med | Vacuum-seal or low-oxygen containers |
| Pests & Mold | Consumes seeds or renders them nonviable | Low/Med | Maintain dryness and cleanliness; inspect regularly |
Key insight: Moisture and temperature are the biggest, most controllable risks; addressing them gives the biggest boost to long-term germination rates.
For practical purchases, consider investing in quality storage containers and desiccants, and explore reputable sources when buying initial stocks—cannabis seeds for sale offers a germination guarantee that pairs well with good storage. Keeping seeds well-stored is a small step that directly increases the odds of strong, uniform crops later on.
What You’ll Need: Tools, Materials, and Conditions
Preserving seed viability starts with a handful of reliable items and a steady, cool, dry environment. Get the basics right and seeds will survive months — even years — without losing germination potential. Below are the must-haves, sensible upgrades, and a realistic view of time and difficulty so scaling this process stays practical.
Understanding seed condition: Know whether seeds are fresh, dried, or already refrigerated. Legal reminder: Check local laws before buying, storing, or transferring seeds. Clean workspace: A dust-free, low-humidity bench prevents contamination.
Tools & materials
- Basic kit: glass jars, silica gel packets, permanent marker, airtight lids.
- Climate control: a small dedicated freezer or a fridge that reliably holds
~4°C. - Packaging: vacuum-seal bags or foil mylar pouches for longer storage.
- Monitoring: a small hygrometer (0–100% RH) and thermometer for checks.
- Seeds: source high-quality genetics like cannabis seeds for sale when relevant.
Optional upgrades
- Vacuum sealer: reduces oxygen exposure for bulk batches.
- Desiccant canisters: reusable, higher capacity than silica packets.
- Label printer: durable labels for seed ID, date, germination batch.
Quick comparison of common storage materials and their pros/cons
| Item | Purpose | Pros | Cons |
|---|---|---|---|
| Glass jar (mason) | Short- to mid-term airtight storage | Non-reactive, reusable, visible contents | Breakable, needs desiccant |
| Vacuum-sealed bag | Remove air for longer storage | Reduces oxidation, compact | Requires sealer; not moisture-proof alone |
| Foil mylar pouch | Low-permeability packaging | Light and moisture barrier, cheap | Requires heat sealer; punctures possible |
| Small freezer (dedicated) | Long-term low-temp storage | Stable low temp, minimal aging | Cost, space, risk of freeze-thaw |
| Silica gel packets | Humidity control inside container | Affordable, simple to use | Needs recharging or replacement |
Key insight: choose a primary barrier (jar, vacuum, mylar) plus desiccant and temperature control; the combination determines how long seeds stay viable.
Time estimates and difficulty
- Initial setup: 20–60 minutes for small batches; 1–3 hours for a larger bank.
- Ongoing checks: visually inspect and spot-check hygrometer weekly for the first month, then monthly.
- Difficulty level: Easy for 1–50 seeds; moderate when managing hundreds and multiple strains.
Scaling advice: split seeds into smaller, clearly labeled containers to reduce repeated exposure, and automate humidity monitoring if you manage many strains. A little organization up front saves time and preserves germination rates later.
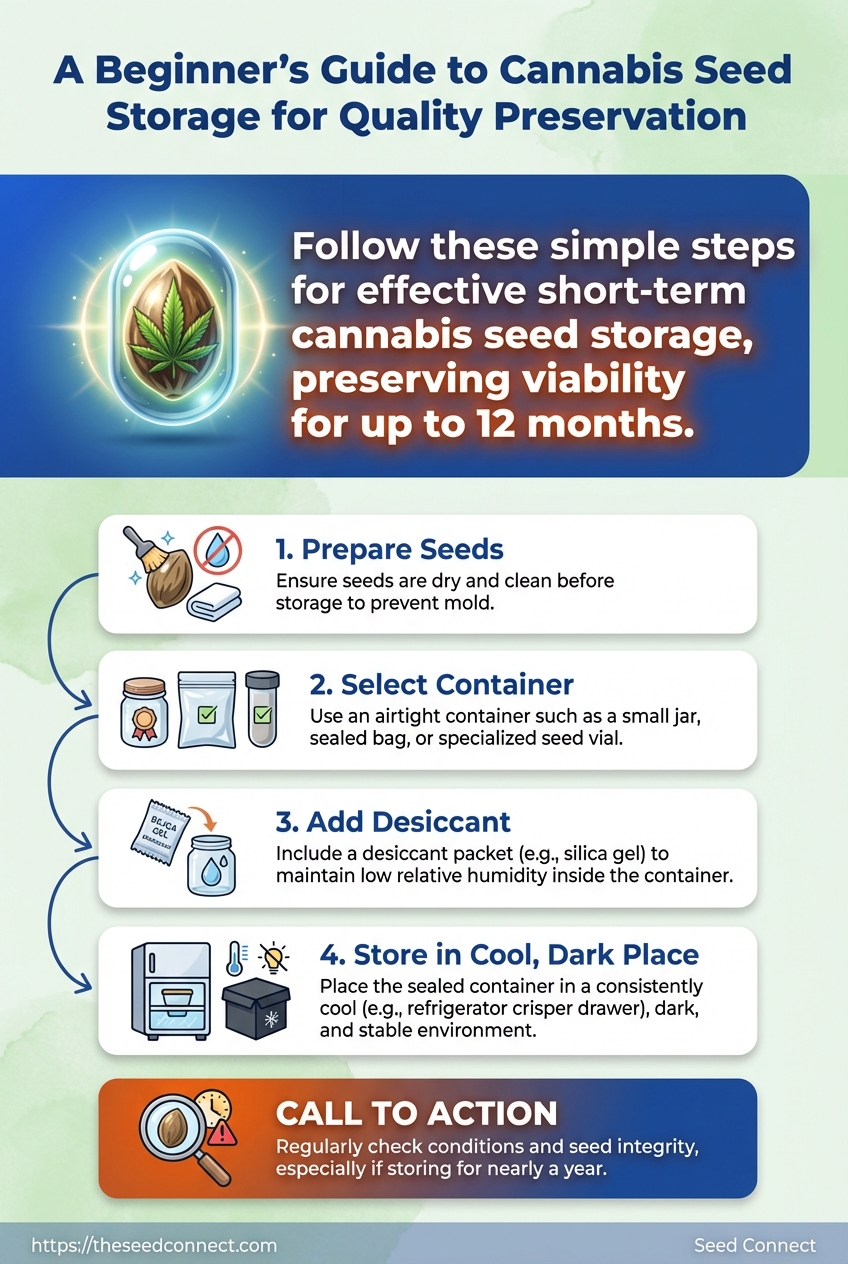
Step-by-Step: Short-Term Storage (Up to 12 Months)
Short-term storage focuses on keeping viability high without the complexity of deep refrigeration. Store seeds in cool, dark, dry, and stable conditions; that preserves germination rates for most strains up to a year. The following steps assume seeds are mature, clean, and handled minimally to avoid oils and moisture transfer from fingers.
Seed maturity: Use only fully developed seeds with hard shells and mature coloring.
Clean handling: Hands, tweezers, and surfaces must be dry and free of oils.
Tools & materials
- Containers: Small, airtight, opaque jars or vacuum-seal bags.
- Desiccant packets: Food-safe silica gel or molecular sieve packs.
- Humidity indicator cards: To confirm internal humidity stays near
30-40%. - Labels and permanent marker: Date and strain info.
- Inspect seeds and remove damaged ones before storage.
- Ensure seeds are at safe moisture levels; use humidity indicator cards.
- Package seeds in airtight, opaque containers with desiccant.
- Label containers clearly with strain, date, and expected discard date.
- Store containers in a cool, stable environment.
- Check humidity and condition every 2–3 months.
Examine each seed under good light. Discard or use immediately any seeds that are soft, cracked, moldy, or discolored; those reduce overall batch viability and can introduce moisture risk.
Aim for storage humidity near 30-40%. Place a humidity card in the container to verify conditions. If indicators show higher humidity, dry seeds gently for 24–48 hours in a cool, well-ventilated area on clean paper before re-packing.
Place seeds in small paper envelopes (to avoid direct contact with desiccant), then into an airtight opaque container. Add a desiccant packet but avoid direct contact with seeds. Opaque containers prevent light-triggered metabolic activity.
Write strain name, purchase/harvest date, and a “use by” date 12 months out. Good labels save guesswork and reduce unnecessary handling.
Choose a place that stays between 5–15°C (41–59°F) if possible—avoid garages or attics where temperatures fluctuate. Keep containers away from heat sources and direct sunlight.
Open containers briefly to inspect physical condition and humidity cards. Replace desiccant if saturated and reseal promptly.
Following these steps keeps seeds viable and reduces handling stress. Treat storage as a gentle, low-intervention process: less movement and consistent conditions protect germination potential. If sourcing replacement genetics, consider ordering cannabis seeds for sale from reputable suppliers that back quality with a germination guarantee.
Step-by-Step: Long-Term Preservation (1 Year+)
Storing seeds for a year or more shifts priorities: remove oxygen and moisture, keep temperature stable, and track inventory so nothing slips past checks. Follow a sequential approach that controls those three variables—vacuum or airtight packaging with desiccants, cold storage (refrigerator or freezer) when practical, and a simple inventory + inspection routine to catch problems early.
Prerequisites
Dry seeds: Seeds must be fully cured and dry before storage; moisture above 8–10% dramatically shortens viability.
Clean packaging: Use food-grade or seed-safe materials to avoid off-gassing or contamination.
Stable environment: Choose a place with minimal temperature swings and low humidity.
Tools & materials
- Vacuum sealer — seals out oxygen and compresses packaging.
- Desiccant packets — food-safe silica gel, one per small pouch.
- Opaque, airtight containers — mason jars or mylar bags work well.
- Freezer or dedicated refrigerator — if using cold storage, avoid frequent door openings.
- Labeling supplies — waterproof labels and a log sheet or digital inventory.
Numbered Steps for Long-Term Storage
- Ensure seeds are dry and at room humidity below
30%before packaging. - Place seeds into small, sealed inner pouches with a single silica gel packet; smaller batches reduce repeated exposure.
- Vacuum-seal the pouches or transfer them into airtight jars; remove as much air as possible to reduce oxidation.
- Store sealed packets inside an opaque, insulated container to buffer short temperature changes.
- Label each package with strain, date, and batch number; record the same info in an external inventory (spreadsheet or logbook).
- For refrigeration, place packages in the fridge at
0–4°C; avoid the freezer compartment door where temperature swings are greatest. - For freezing, move vacuum-sealed packets into a frost-free freezer at
-18°C; allow sealed packs to reach freezer temperature before long-term placement to reduce condensation risk. - To retrieve frozen seeds, thaw packages slowly in their sealed state inside the refrigerator for 24–48 hours before opening; open only after fully acclimated to avoid moisture shock.
- Perform a physical check every 6–12 months: inspect seals, desiccant condition (color-change types), and inventory integrity; replace desiccants or re-seal if needed.
- If storing beyond 5–10 years, consult cryostorage services (liquid nitrogen) and move only verified, valuable genetics.
Freezing gives major longevity gains but requires disciplined thawing and stable power. Vacuum sealing plus desiccant is the most accessible long-term improvement for home growers. Keep records so poor batches can be identified and culled before they affect breeding or planting plans.
Long-term storage options (room temperature, refrigerator, freezer, cryostorage) by expected viable years, cost, accessibility, and handling complexity
| Storage Option | Expected Viability (years) | Cost | Pros | Cons |
|---|---|---|---|---|
| Cool Dark Cupboard (~10°C) | 1–5 | Low | Low cost, easy access | Shorter viability, humidity risk |
| Refrigerator (0–4°C) | 2–10 | Low–Medium | Extends life, widely available | Moderate complexity, needs stable temp |
| Freezer (-18°C) | 10–20 | Medium | Much longer viability, low metabolic activity | Requires careful thawing, power risk |
| Cryostorage (liquid nitrogen) | Decades (20+) | High | Longest-term preservation, proven for germplasm | Expensive, specialized handling |
Key insight: Refrigeration and freezing progressively increase viable years but add handling complexity and cost; vacuum sealing with desiccants is a high-impact, low-cost step for any option.
Warnings and tips are woven into the steps—avoid opening cold packs too soon, replace color-indicating desiccants when spent, and never store seeds in the fridge door. For anyone buying seed stock to preserve, consider purchasing quality-guaranteed genetics; for example, cannabis seeds for sale with germination guarantees simplify the risk side of long-term collections.
Careful packaging, low moisture, stable cold, and consistent inventory checks make year-plus storage practical and reliable; treat preservation like asset management, and losses become avoidable rather than inevitable.
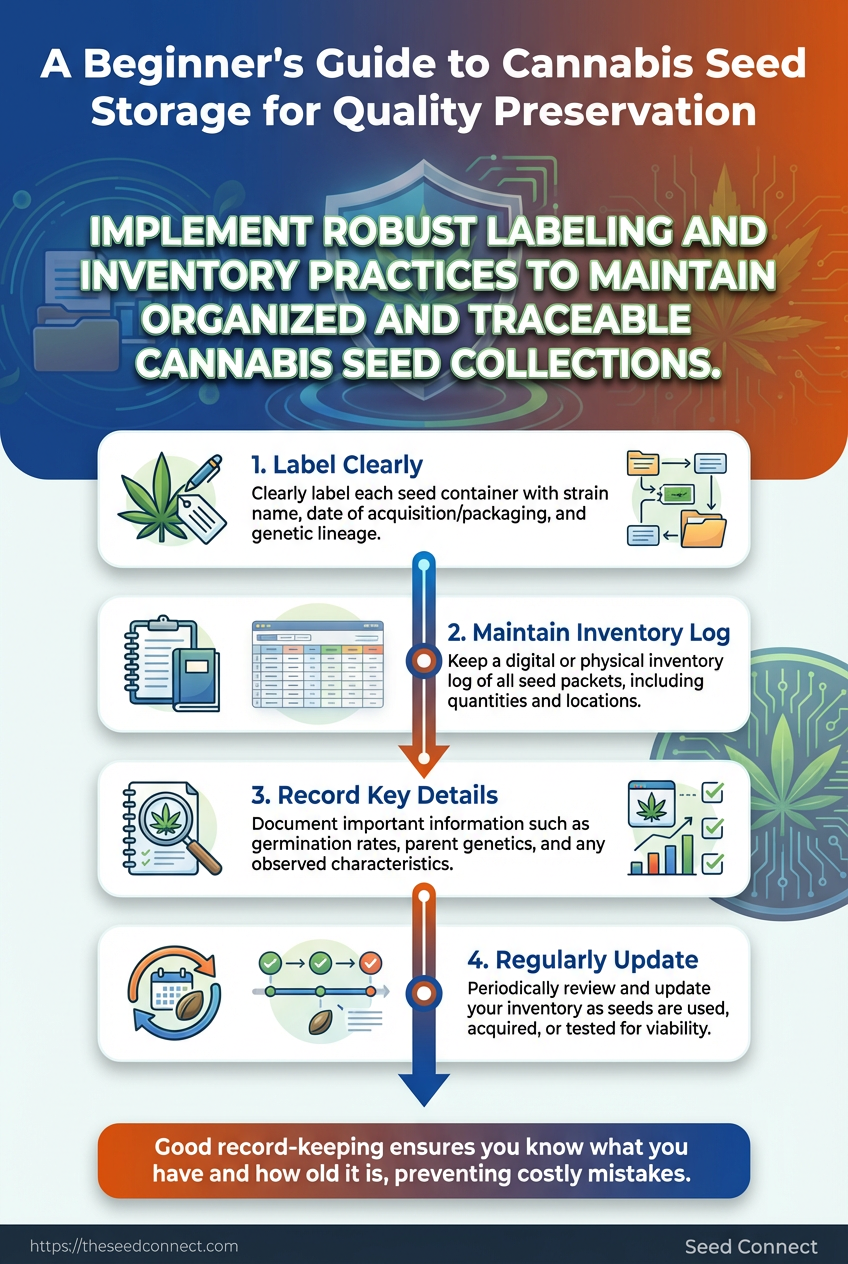
Best Practices for Labeling, Inventory, and Record-Keeping
Standardized, consistent records stop small mistakes from snowballing into big losses. Use a compact inventory template, dual-label every seed pack, and log germination test results so storage and handling choices improve over time. These practices save time at planting, make compliance simpler, and protect genetic integrity across seasons.
Start with a reliable template and enforce a simple labeling workflow.
Inventory Template essentials
Provide a compact inventory template for seed batches with recommended fields
| Field Name | Why It Matters | Example Entry |
|---|---|---|
| Strain Name | Identifies genetics quickly for phenotype expectations | Northern Lights |
| Breeder/Source | Tracks origin and warranty or germination guarantee | SeedBank Co. |
| Lot or Batch # | Links physical pack to production data and test results | NB-2024-045 |
| Date Stored | Allows age-based decisions and first-in/first-out rotation | 2024-01-10 |
| Storage Location | Exact container and environment for retrieval and audits | Freezer A / Drawer 2 |
Key insight: This template keeps entries scannable and actionable — strain + lot + location resolve the most common operational questions, and the date field lets germination data drive future storage choices.
Labeling workflow (step-by-step)
- Create a unique
Inventory IDfor each purchase or internal seed run. - Print an outside label with Strain Name, Inventory ID, and Date Stored and attach to the package exterior.
- Place an internal label inside the package with Strain Name, Batch #, Germination Rate (if known), and Storage Conditions.
- Scan or manually enter all fields into your inventory system immediately after labeling.
- Run a small germination test (10–20 seeds), record the % that sprout, and add that result to the seed batch record.
Practical details that matter
- Dual labeling prevents data loss if the outer label is damaged.
- Standard fields reduce ambiguity between team members and across seasons.
- Germination records guide whether to move older batches to priority planting or to discard.
- Digital backups (photo of label + inventory entry) protect against physical damage.
Inventory ID: Short alphanumeric code linking the physical pack to digital records.
Germination Rate: Percentage of seeds that successfully sprout in a controlled test.
Following this process keeps seed storage efficient and decisions evidence-based; over a few seasons the data will clearly show which storage methods actually preserve viability and which seed lines need special handling. For sourcing or replacement, consider cannabis seeds for sale as a straightforward supplier option.
Testing and Preparing Seeds for Germination After Storage
Stored seeds need a gentle, evidence-based wake-up plan. Start by testing a small sample to estimate batch viability, then bring the remainder back to room conditions slowly to avoid condensation or shock. That approach preserves what’s left of stored vigor and stops fledgling roots from drowning or rotting during the first 48–72 hours.
Clean workspace: A disinfected tray and tweezers to avoid introducing pathogens.
Temperature control: A stable cool area (around 18–22°C) for acclimation.
Simple germination setup: Paper towels, distilled water, a covered container, and labels.
Viability testing (quick sample estimate)
- Take a representative sample of 10–20 seeds from the batch.
- Place seeds between two damp paper towels, put them inside a covered container, and keep at
20–22°C. - Check daily for radicle emergence for up to 10 days.
- Record germination count and calculate percent viability.
If the sample returns less than 50% germination, consider discarding or using the seeds for experimentation and breeding rather than full-scale grows. For commercial or high-investment runs, a sub-50% batch generally isn’t worth the time and resources.
Thaw and acclimation protocols (avoid condensation and thermal shock)
- Slow warming: Move seeds from cold storage to an intermediate chilled environment (e.g., from
-20°Cto4°C) for 24 hours before room temperature. - Dry-to-damp transition: Keep seeds dry until they reach room temperature to prevent immediate condensation on cool seed coats.
- Minimal handling: Open containers only after temperatures stabilize to avoid moisture spikes.
Common mistake: rapid transfer from freezer to warm, humid rooms—this causes surface condensation that can trigger mold or premature imbibition damage. If condensation appears, air-dry seeds briefly in a clean, cool spot before initiating germination.
Preparing the full batch after testing
- Acclimate remaining seeds slowly as described above.
- Use the germination method that matched the sample (paper towel, direct soil, or starter plugs).
- Keep records: seed lot, storage duration, sample viability, and germination method.
Following a measured testing and thaw protocol preserves stored seed quality and prevents avoidable losses. Treating a few seeds as a diagnostic will save time and resources when scaling up to a full germination run—especially when working with valuable cannabis seeds for sale.
Troubleshooting Common Seed Storage Issues
Seeds kept too long or under the wrong conditions often show predictable failures — poor germination, mold, or unexpected viability loss. Start by diagnosing the symptom, isolate affected batches, and follow a stepwise recovery plan. The sooner action is taken, the better the chance of salvaging seeds.
Diagnosing the problem and initial checks
- Smell and appearance: A musty odor or white fuzz usually means mold. Dark, shriveled seeds indicate desiccation damage.
- Moisture test: Remove one seed into a dry paper towel for 24 hours; tacky or damp surfaces hint that the desiccant failed.
- Germination test: Place 10 seeds on a damp paper towel in a warm spot and check germination over 7–10 days to quantify viability.
When desiccant fails or becomes saturated
- Remove seeds from the compromised container immediately.
- Place seeds on a dry paper towel in a well-ventilated area for 12–24 hours to let surface moisture evaporate.
- Transfer seeds to fresh, airtight containers with new desiccant packs rated for small seeds (silica gel or molecular sieves).
- Move containers to a stable, cool location — ideally
4°Cfor long-term storage or15°C–18°Cfor medium-term.
If mold was present, treat steps 1–3 and then run a germination test. Discard any seeds that remain soft, collapsed, or emit strong odors after drying.
Salvaging or isolating contaminated batches
- Isolate immediately: Store suspect seeds in a separate, clearly labeled container to avoid cross-contamination.
- Sanitize storage: Wipe shelves and containers with 70% isopropyl alcohol and let dry before reuse.
- Partial salvage: If only part of a batch shows mold, test the remainder — many unaffected seeds will still germinate.
When to re-test and when to discard
- Re-test: Run a 10-seed germination check after recovery steps; more than 70% success suggests the batch is usable.
- Discard: If germination falls below ~30% or seeds are physically degraded (soft, leaky, discolored), retire the batch to avoid wasted effort later.
Practical note: if sourcing replacements, consider cannabis seeds for sale with germination guarantees. Troubleshooting quickly and isolating problems protects the rest of the collection and saves time when planning the next grow.
📥 Download: Cannabis Seed Storage Checklist (PDF)
Tips for Success and Pro Tips from Experienced Growers
Start by treating seed stewardship like a small-scale lab: controlled environment, repeatable checks, and clear records. Experienced growers avoid surprises by splitting risk, testing regularly, and buying seeds whose origin they can trace. These practices preserve germination rates and make problems visible early — when fixes are cheap and fast.
Practical best practices
- Split storage: Store the same batch across two separate locations to avoid a single-point failure.
- Cold, dry environment: Keep seeds near
4–8°Cand relative humidity around20–30%for long-term storage. - Use airtight containers: Vacuum-sealed or desiccant-lined jars reduce moisture swings.
- Clear labeling: Include strain, lot number, purchase date, and expected viability check date.
- Rotate batches: Use a first-in/first-out rotation for operational batches to avoid long-forgotten stock.
- Document provenance: Keep receipts and supplier details so quality issues can be traced.
Viability: The percentage of seeds expected to germinate under optimal conditions.
Provenance: A documented chain showing where seeds came from, who produced them, and any lab testing or genetics notes.
Small routine germination test (do this monthly for long-term stock)
- Take 5–10 seeds from a storage container.
- Place seeds on a moist paper towel inside a sealed zip bag and keep at
20–25°C. - Check after 48 and 96 hours; record how many have sprouted.
- Log results with date, sample ID, and storage location.
- If germination drops below your acceptable threshold (often 80%), isolate that lot and change handling.
What growers do with these results: if a lot trends down, move remaining seeds to a colder, drier storage, and notify the supplier if provenance is clear. Prefer reputable sources and keep buying records; when provenance is documented, claims about non-viable seeds are far easier to resolve. For sourcing, consider established sellers — for example, cannabis seeds for sale with a germination guarantee.
A few subtle pro tips: store seeds with silica packs sized for the jar, avoid frequent temperature cycles, and keep seeds in the dark. Small investments in testing and split storage pay off by preventing whole-batch loss and preserving genetics for future grows.
Conclusion
Keep it simple: cool, dark, dry conditions plus consistent labeling and a routine check will preserve viability far longer than tossing seeds in a drawer and hoping for the best. Throughout the article, practical steps—clean containers, tight seals, temperature control, and periodic viability tests—were shown to prevent the slow decline that turns promising packets into patchy germination. Experienced growers quoted here moved from room-temperature jars to vacuum-sealed containers in a refrigerator and reported noticeably improved sprout rates after a year, while others found desiccant packs plus opaque storage best for short-term keeps. If you’re wondering whether to refrigerate, freeze, or just improve humidity control, start with humidity below 8–10% and a steady, cool environment; those adjustments handle most problems without exotic equipment.
If the goal is preserving seed quality and getting reliable germination when you’re ready to grow, label everything, control moisture, and test a small sample before committing to a full batch. To streamline sourcing seeds that are already handled with germination care, consider this curated selection: Browse high-quality cannabis seeds with germination guarantee. That’s a practical next step after implementing these seed storage tips—inspect varieties, pick ones suited to your plans, and keep the storage routine consistent so future grows start strong.