Have you ever been frustrated by sticky buds that smell weak and test below expectations?
Seasoned growers know small choices at harvest change both potency and yield.
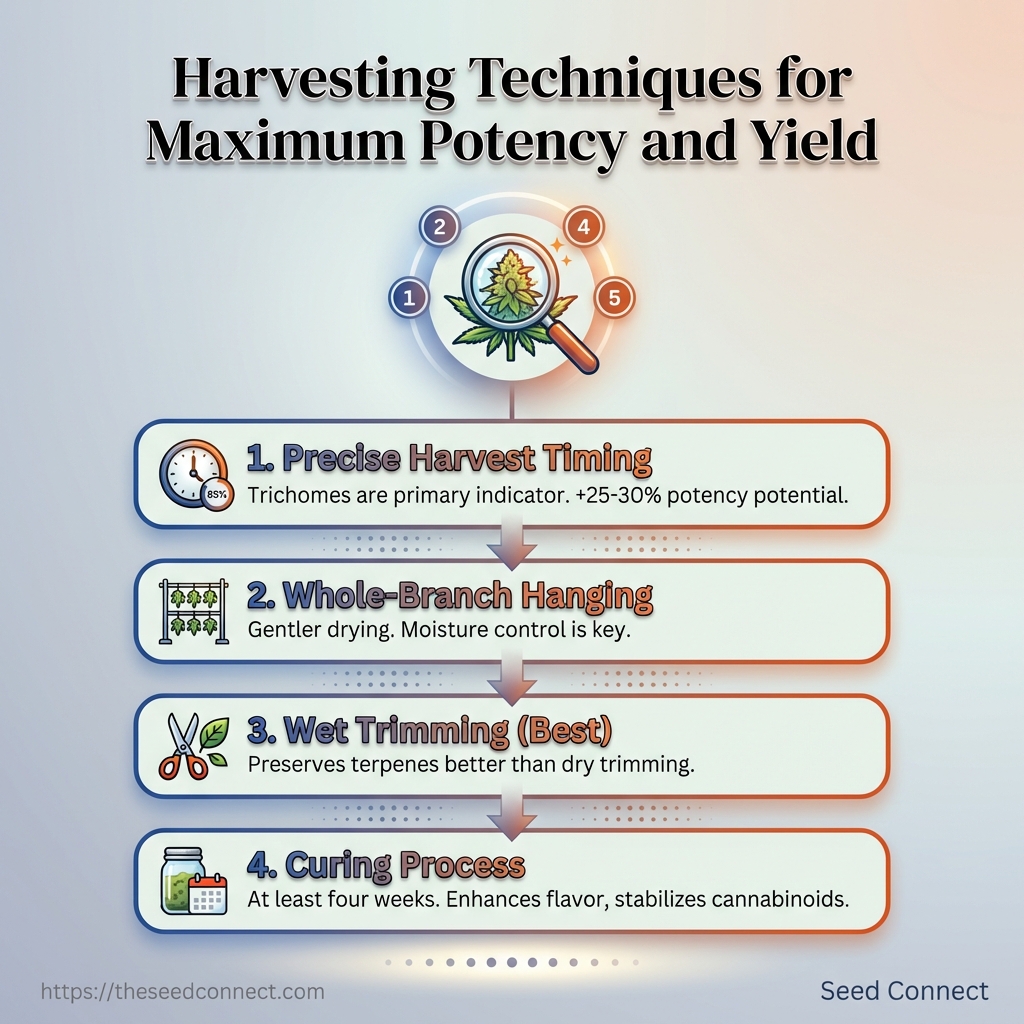
A 2025 study by the Cannabis Quality Institute found a 25–30% increase in potency when proper harvest timing and drying were used.
As of 2026, about 85% of cultivators are estimated to use targeted harvesting techniques to improve yield and potency.
We typically judge timing by the trichomes, not by the calendar.
Hanging whole branches instead of cutting buds allows gentler drying and better moisture control.
Proper curing for at least four weeks deepens flavor and stabilizes cannabinoids.
Trim choice matters: wet trimming often preserves more terpenes than dry trimming.
Keeping drying humidity near 60–65% protects resin and reduces mold risk during post-harvest cannabis care.
Applied together, these shifts lift both yield and potency.
Get those details right and harvesting cannabis shifts from gamble to repeatable craft.
Diagnosing harvest readiness
Choosing when to harvest affects every aspect of the final product.
Look at trichomes first; they tell the most accurate story about cannabinoid development and resin maturity.
Timing the cut right can raise potency and preserve terpene profiles.
Timing your harvest is not a matter of guessing.
A 2025 study found proper harvesting and drying can boost potency by 25–30% compared with careless timing and handling.
Grower habits reflect that: in 2026, 85% of cultivators reported using targeted harvesting techniques to improve yield and potency.
This section gives a compact readiness checklist, a clear trichome inspection routine, and practical rules for reading pistils and calyxes across strains.
Follow the steps and you won’t be guessing at the finish line.
Quick readiness checklist — are you harvesting at the right time?
Start by checking these basics before you cut anything.
- Trichome maturity: Inspect pistils with a loupe or microscope; target trichomes for your desired effect.
- Pistil color shift: Look for a shift from white to brown/red in the majority of pistils.
- Calyx swelling: Buds should feel dense and squishy, with visible calyx enlargement.
- Overall plant health: Leaves yellowing is normal late in flowering; severe nutrient burn is not.
- Environmental readiness: Prepare drying space with
60-65%RH and stable 60–70°F temps.
Trichome inspection: what to look for and how to read the stages
A handheld scope makes this simple.
Focus on the resin glands on the bud surface, not sugar leaves.
Trichomes pass through three easy-to-spot stages: clear, cloudy (milky), and amber.
Clear trichomes show immature cannabinoids.
Cloudy trichomes indicate peak THC concentration.
Amber trichomes signal partial THC degradation into CBN and a more sedative effect.
- Use a
30–60xloupe and check several bud sites, not just one. - Count proportion visually: aim for mostly cloudy with some amber depending on desired effect.
- Record photos across days to spot trends.
The image above shows close-ups of clear, cloudy, and amber trichomes at the same scale.
Use it as a daily reference when you monitor buds.
Pistils, calyxes and strain-specific timing: practical rules of thumb
Pistils alone can mislead if used in isolation.
For fast-flowering autoflowers, trust trichomes more than pistil color.
For photoperiod strains, combine calyx swelling and trichome stage for best results.
Sativa-dominant strains often peak later and show fewer amber trichomes.
Indica-dominant strains tend to amber sooner and can handle an earlier cut for a sleepier profile.
Wet trimming preserves terpenes better than dry trimming, and hanging whole branches helps moisture manageability.
Plan to cure for at least 4 weeks to deepen flavors and potency.
Harvest decision-making is precise work but repeatable.
Check trichomes daily in the final two weeks, pair that with calyx and pistil checks, and prepare your drying and curing environment ahead of the cut.

Choosing a harvest method: whole-plant vs. branch-by-branch vs. selective
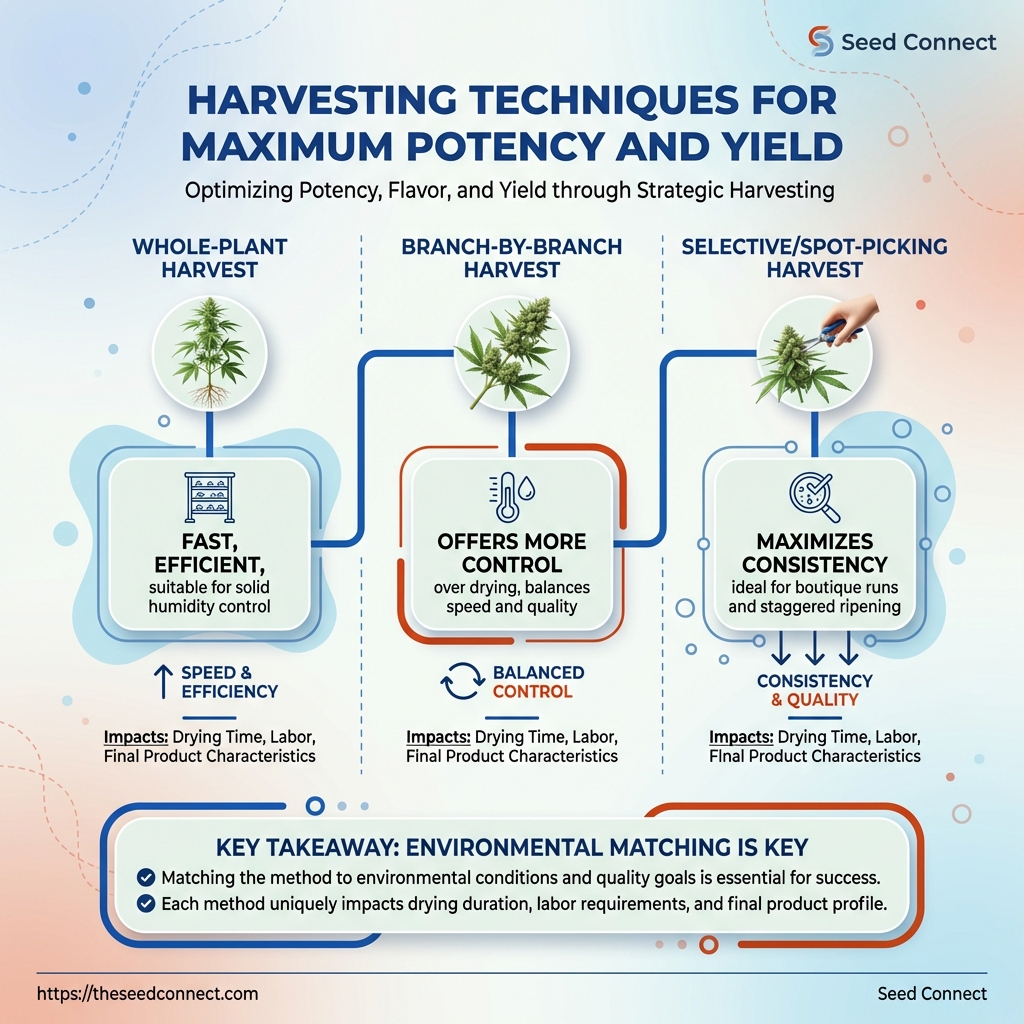
What harvest style helps you protect potency and terpene character while keeping your dry room manageable? Your choice here impacts drying time, labor, yield, and even how your smoke tastes and feels.
Whole-plant, branch-by-branch, and selective harvesting each solve different problems.
Whole-plant works when humidity control is solid and speed matters.
Branch-by-branch gives more control over drying.
Selective (spot-picking ripe buds) maximizes consistency for boutique runs.
Expect real gains if the chosen method pairs with proper drying and curing.
A 2025 finding showed proper harvest and post-harvest practices can boost potency by about 25–30%, and a 2026 survey found 85% of cultivators use specific harvesting techniques to protect yield and potency.
Use those numbers as a nudge toward planning, not a guarantee.
Overview of methods and when each makes sense
Whole-plant harvesting means cutting the entire plant and hanging it intact.
This is fastest at scale and helps even moisture redistribution during drying.
Branch-by-branch harvesting involves cutting individual limbs and hanging them.
It balances speed and airflow control, and it’s popular for medium-sized grows.
Selective harvesting (also called bud-by-bud) is the most labor-intensive.
It’s chosen when cannabinoid and terpene uniformity matters for premium product or separate phenotype processing.
- Whole-plant: Best for rapid processing and uniform drying when humidity control is strong.
- Branch-by-branch: Best for medium operations that need airflow and staggered drying.
- Selective: Best for boutique batches, seed runs, and when trimming quality must be maximal.
Wet trimming vs. dry trimming: effects on potency, terpene retention and yield
Wet trimming refers to removing sugar leaves immediately after cutting; dry trimming means trimming after buds have dried.
Industry practice and lab reports show wet trimming tends to preserve more terpenes and shortens drying time, while hanging whole branches can improve moisture management and potency retention.
That aligns with broader post-harvest findings linking timing and handling to higher final potency.
Wet trimming vs. dry trimming: effects on potency, terpene retention and yield
| Factor | Wet trimming | Dry trimming | Best for |
|---|---|---|---|
| Terpene retention | Higher—less time exposed to slow oxidation; often better aroma retention | Moderate to lower—longer exposure can reduce volatile terpenes | Aroma-focused product |
| Drying time | Shorter (often 3–7 days depending on conditions) | Longer (often 7–14 days) | Fast turnaround vs flavor development |
| Labor/time required | More front-loaded trimming work | Less immediate labor, more post-dry trimming | Teams with trimming crews |
| Final yield (weight) | Slightly higher immediate trimmed weight; less loss from moisture | Can be higher dry-bud mass in some cases due to slower moisture loss | Maximizing dry-weight by slow curing |
| Risk of mold | Lower if done correctly, because moisture leaves removed | Higher if drying too slowly with poor airflow | Humid environments with limited control |
| Ideal environment | Controlled rooms with 60–65% RH during hang | Low-humidity, well-ventilated spaces for slow cure | Drier climates or advanced drying rooms |
| Curing complexity | Simpler initial cure; still needs 4+ week bottle cure | Often yields deeper flavor after long cure | Connoisseur-grade terpene profiles |
| Trim appearance | Can be tidier immediately | Often neater final presentation after careful dry trim | Cosmetic/retail presentation |
| Scale suitability | Good for medium to large with trained crews | Best for small runs or craft grow ops | Choose by labor availability |
| Equipment needs | Tables, shears, waste handling up front | Space for long hang times and slow-cure jars | Depends on processing plan |
Wet trimming generally wins for terpene retention and shorter drying windows, while dry trimming can yield deeper cured flavor when time and space allow.
Practical decision flow: choose a method based on scale, environment and end use
Start by answering three questions: how big is the harvest, what is the drying environment, and who is the end user.
- If harvest is large and humidity control is excellent, cut whole plants for speed and even drying.
- If the harvest is medium-sized or airflow varies, harvest branch-by-branch to control moisture per limb.
- If product is boutique or different phenos need separate treatment, selective harvest each bud when it’s ideal.
- Choose wet trim when preserving terpenes and shortening hang time are priorities.
- Choose dry trim if aiming for slow-cured flavor and appearance, and if space/time permit.
Match the method to staffing and space rather than following trends.
That prevents rushed drying or overhandling, both of which harm potency.
Pick the approach that fits your room, team, and market.
Small changes at harvest time translate directly into how the final product performs.
Cutting, handling and immediate post-cut care
Cutting and the first few hours after harvest establish the aroma, potency, and shelf life.
Handle buds like fragile glass: light touch, clean tools, and a calm, efficient workflow prevent bruise, trichome loss, and needless oxidation.
A short, consistent cutting routine reduces mistakes and keeps each batch uniform.
For small and medium grows, the right sequence saves hours in the dry room and protects terpenes that will never come back once lost.
This section walks through the tools and sanitation that matter, a step-by-step cutting workflow you can repeat, and the exact moves to minimize oxidation and terpene loss in the first 24 hours.
Tools, sanitation and gentle handling to prevent damage
Clean, sharp tools and a tidy workspace make the difference between a clean cut and torn plant tissue.
- Sharp bypass shears: Keep them honed for clean cuts that reduce sap leakage.
- Disposable gloves: Change them if they get sticky to stop cross-contamination.
- Isopropyl wipes (70–90%): Wipe blades between plants to prevent pathogen spread.
- Soft trays or foam-lined bins: Prevent buds from getting crushed during transport.
- Labeling tags and waterproof markers: Track cut dates and strain IDs immediately.
Sanitation: Wipe tools before the first cut, between strains, and after any sticky encounter.
Handling: Support branches near the node when cutting, never pull buds from stems.
Cutting workflow for small and medium grows — step-by-step
- Prep: Sterilize tools, lay out trays, and label bins for each strain.
- Cut order: Work from outer branches inward to keep canopy structure intact.
- Single-motion cuts: Snap and shears together—one clean cut per node.
- Transport: Place branches gently in foam-lined bins; avoid stacking heavy loads.
- Quick sort: In a shaded staging area, remove large fan leaves and separate problem spots.
- Hang or rack within 1–3 hours depending on chosen drying method.
Minimizing oxidation and terpene loss in the first 24 hours
Freshly cut tissue oxidizes quickly when bruised or left in warm air.
Keep harvested material cool (50–60°F / 10–15°C) and shaded to slow enzymatic reactions.
Avoid forced airflow directly on fresh cuts; gentle circulation prevents hot spots without stripping volatiles.
Move buds to the drying space within a few hours, and if delays occur, refrigerate short-term in breathable containers to slow terpene evaporation.
> Proper harvesting techniques, including timing and drying, showed a 25%–30% increase in potency in a 2025 Cannabis Quality Institute study.
wet trimming preserves more terpenes in early handling, but choose the method that suits your dry room and curing plan.
This short video walks through a compact cut-and-hang routine tailored to small and medium operations.
Watch the sequence, note hand placement, and see the timing between cut and hang.
Good handling in the first hours protects the flavors and cannabinoids you’ve grown for.
Follow a repeatable workflow and the gains in quality will show through every jar.
Drying: environmental targets and timelines
Ever wonder why two growers with the same genetics can produce wildly different smoke? Drying is the invisible stage that sculpts potency and terpene profile long before jars ever see light.
Slow, controlled drying prevents cannabinoids and terpenes from evaporating or degrading.
A 2025 Cannabis Quality Institute study found proper harvest and drying practices can boost potency by 25–30% compared with rushed or poorly controlled methods.
That kind of difference shows up in lab numbers and in how a flower smells and hits.
Hanging whole branches instead of stripping buds or rushing with heat preserves resin and smooths moisture gradients through the plant.
Climate, airflow, and time interact — dial one wrong and buds either mold or become brittle and flavorless.
> 85% of cultivators reported using specific harvesting techniques to maximize yield and potency in 2026, underscoring how common precise post-harvest control has become.
- Why pace matters: Slow drying prevents terpene evaporation and uneven internal drying that causes pockets of mold.
- Humidity is king: Aim for
60–65%relative humidity early, then lower during deeper drying and before curing. - Gentle airflow beats brute force: Constant, low-velocity air avoids stripping trichome heads.
Ideal drying parameters by method
The table shows realistic targets; choose a method that fits your batch size and climate.
Hanging whole branches typically gives the gentlest moisture gradient, which aligns with findings that hanging preserves potency better than cutting into buds.
How to tell if your buds are dry enough to start curing
Start by checking stems and bud texture rather than clock time.
A small branch should snap cleanly or show a firm crack; if it bends like a green twig, more drying is needed.
Pinch a bud—outer flowers should feel dry to the touch but the inner core should still be slightly springy.
If the bud shatters into dust, it’s over-dried and cured quality will suffer.
- Stem snap test: Break a small stem; a clean snap = ready.
- Bud squeeze test: Outer dry, inner resilient = ready to jar.
- Moisture weight check: Weigh a sample daily; 10–15% weight loss from fresh-to-dry suggests readiness.
If humidity still reads >65% inside trimmed buds or jars fog within 24 hours of sealing, return them to dry conditions for a day before starting cure cycles.
Slow the process for quality.
Controlled drying takes patience, but the difference shows in potency, aroma, and long-term stability.
Curing and storage for potency retention
Curing is where the harvest turns into a finished product with stable potency and preserved terpenes.
Treat it as a controlled, slow chemical mellowing rather than a waiting game; humidity and temperature during this phase directly shape cannabinoid stability and aroma.
A careful cure routinely improves smoke quality and can protect cannabinoids from degradation.
Industry findings recommend a minimum cure of four weeks, with many growers seeing continued improvement out to six or eight weeks.
This section walks through jar burping rhythm, target ranges for cure-room conditions, long-term packaging choices, and the avoidable mistakes that shave potency.
Jar burping, humidity control and temperature targets
Start curing in clean glass jars at 58–62% relative humidity and 15–20°C (59–68°F).
Those ranges slow microbial growth while keeping buds supple enough for cell chemistry to finish.
First week: open jars 2–3 times daily for 10–15 minutes to exchange air and release VOCs.
Second and third weeks: drop to once daily, watching for condensation or off-odors.
After week four: reduce to twice weekly, then monthly checks if storing long-term.
- Inspect visually and by smell each burp —
moldor a sour aroma means open jars immediately and dry faster next batch. - Use a calibrated hygrometer in at least one jar to avoid false readings from jar lids.
- Consider small silica- or Boveda-style packs set to
62%for very dense buds or long cures.
> A 2025 study reported that potency gains of approximately 25–30% are achieved when proper post-harvest techniques, including curing, are applied.
Long-term storage: packaging, humidity packs and light protection
For months-long storage, move cured flower to opaque, airtight containers.
Glass remains best for minimal off-gassing; avoid plastics that breathe or leach.
Humidity pack: Use a 62% pack for long-term balance.
Light protection: Store containers in full darkness; UV and visible light degrade cannabinoids over time.
Temperature: Keep long-term storage near 12–16°C (54–61°F) where possible — cooler slows chemical breakdown without freezing trichomes.
Vacuum sealing helps bulk storage but skip it for jars in active curing.
If vacuuming cured flower, add a humidity pack to prevent overdrying.
Common curing mistakes that reduce potency and how to avoid them
Sealing too early: Stems still wet → anaerobic pockets and mold.
Avoid by ensuring surface dryness before jarring.
Over-burping: Excessive fresh air strips volatile terpenes.
Follow the graduated schedule above.
High cure temperature: Above 22°C speeds cannabinoid breakdown.
Move jars to a cooler spot.
Light exposure: Clear jars in bright rooms bleach cannabinoids.
Use opaque storage or keep in dark cabinets.
Wrong humidity: Too high → mold; too low → brittle, terpene loss.
Use a hygrometer and 62% packs to stabilize.
Curing and storage are the final, quiet crafts that protect the work already done in the grow.
A disciplined cure and proper long-term storage preserve potency, aroma, and consumer experience.
Post-harvest processing, testing and quality checks
It’s easy to think the harvest ends once the jars are tucked away.
In reality, post-harvest work affects market value, user experience, and safety.
Small choices now—how you trim, which potency checks you run, and what you log—determine whether a crop becomes premium product or expensive waste.
Good post-harvest practice protects cannabinoids and terpenes while reducing liability.
A 2025 Cannabis Quality Institute study found properly executed post-harvest steps can boost measured potency by 25–30%.
Meanwhile, a 2026 Cannabis Business Times survey reported 85% of cultivators use specific harvesting cannabis techniques to protect both yield and potency.
Quality checks are both sensory and scientific.
Sensory checks catch obvious issues quickly; lab testing confirms potency and screens for contaminants.
Treat field notes and sample IDs as legal and commercial assets—poor records make recalls, customer complaints, and strain comparisons much harder.
Trimming tips to maximize usable product and visual appeal
Trimming affects how buds look, smoke, and store.
Start by choosing your trim style with the market in mind: tight trims for display and loose trims for extraction.
- Wet trim for terpene preservation: Trim immediately after cutting to reduce handling time and preserve volatile terpenes.
- Dry trim for slower cure: Use when slower moisture removal is desired to develop richer flavors during curing.
- Trim consistency: Assign label colors or numbered trays so every batch receives the same cut and finish.
- Tool hygiene: Clean scissors and shears between batches to prevent cross-contamination and cosmetic spotting.
Simple potency checks and when to send samples for lab testing
Rapid in-house checks save time and money, but they don’t replace labs.
Use quick tools to triage before formal testing.
- Check trichome clarity and feel on representative buds from each lot; if trichomes look cloudy and sticky, flag for lab testing.
- Measure moisture with a
%-capable hygrometer; aim for stable readings before sampling.
- If any lot will be sold with potency claims, send samples to a certified lab. Send one sample per lot, plus an extra if the lot is >100 kg.
Send samples for lab testing when introducing a new phenotype, after changing nutrient or drying protocols, or before any commercial sale that includes cannabinoid labeling.
> Proper post-harvest choices have measurable effects: the 2025 study showed potency gains when timing, drying, and trimming were aligned with best practices.
Record-keeping: why harvest notes matter and what to log
Good records turn intuition into repeatable wins.
Track enough detail to reproduce success and diagnose failures.
- Batch ID: Date, strain, seed lot, and source (note platforms like https://theseedconnect.com).
- Processing steps: Trim method, who trimmed, drying/humidity ranges, and cure start date.
- Testing results: Moisture content, lab potency numbers, pesticide/mycotoxin screens, and lab ID.
- Visual/sensory notes: Color, terpene descriptors, and any defects.
Keeping clear, dated logs lets teams compare seasons, validate the 85% of growers who report technique adoption, and protect product integrity.
Good notes pay for themselves every harvest.
Finish strong: protect potency from cut to cure
Seasoned growers know one thing above all: the choices you make in the final days and hours determine how those buds will taste, smell, and test.
Diagnosing harvest readiness by watching trichome color and deciding between whole-plant, branch-by-branch, or selective harvest sets the trajectory for everything that follows.
Small shifts—when you cut, how gently you handle branches, and the drying targets you hit—translate directly into higher THC, preserved terpenes, and better yields.
Post-harvest cannabis care is where margins are won or lost.
Drying at steady temperature and humidity, then curing slowly, protects volatile compounds that give each strain its character; skipping those steps or rushing the cure will flatten the profile and reduce lab numbers.
Quality checks after curing catch moisture and contamination issues early and let you adjust storage or re-cure before potency slips.
Do one concrete thing tonight: check a representative bud under a 30–60× loupe and note trichome clarity; if they’re mostly cloudy with some amber, schedule your harvest window.
If planning the next run, tools like cannabis seeds for sale can help you choose varieties that reward careful harvesting cannabis techniques.
Ready to protect every gram of hard-won potency?