Half your crop’s fate is decided before a seed even sees soil. When packets arrive with mixed ages, shaky storage histories, or unclear origins, the practical question becomes whether those seeds will sprout at all — and that’s where germination rates matter more than strain hype or cannabinoid profiles. Understanding how many seeds reliably pop, and why some fail, saves time, money, and a lot of guesswork during a grow cycle.
Most growers learn the hard way that cannabis seed germination is less mystique and more predictable biology: moisture, temperature, and seed health set the odds. Knowing how to interpret a germination percentage and how seed viability declines over time turns purchasing decisions from hope into risk management. This isn’t just about numbers on a label; it’s about planning how many seeds to start, when to expect replacements, and how to avoid the scramble of last-minute backups.
What Is Seed Germination Rate?
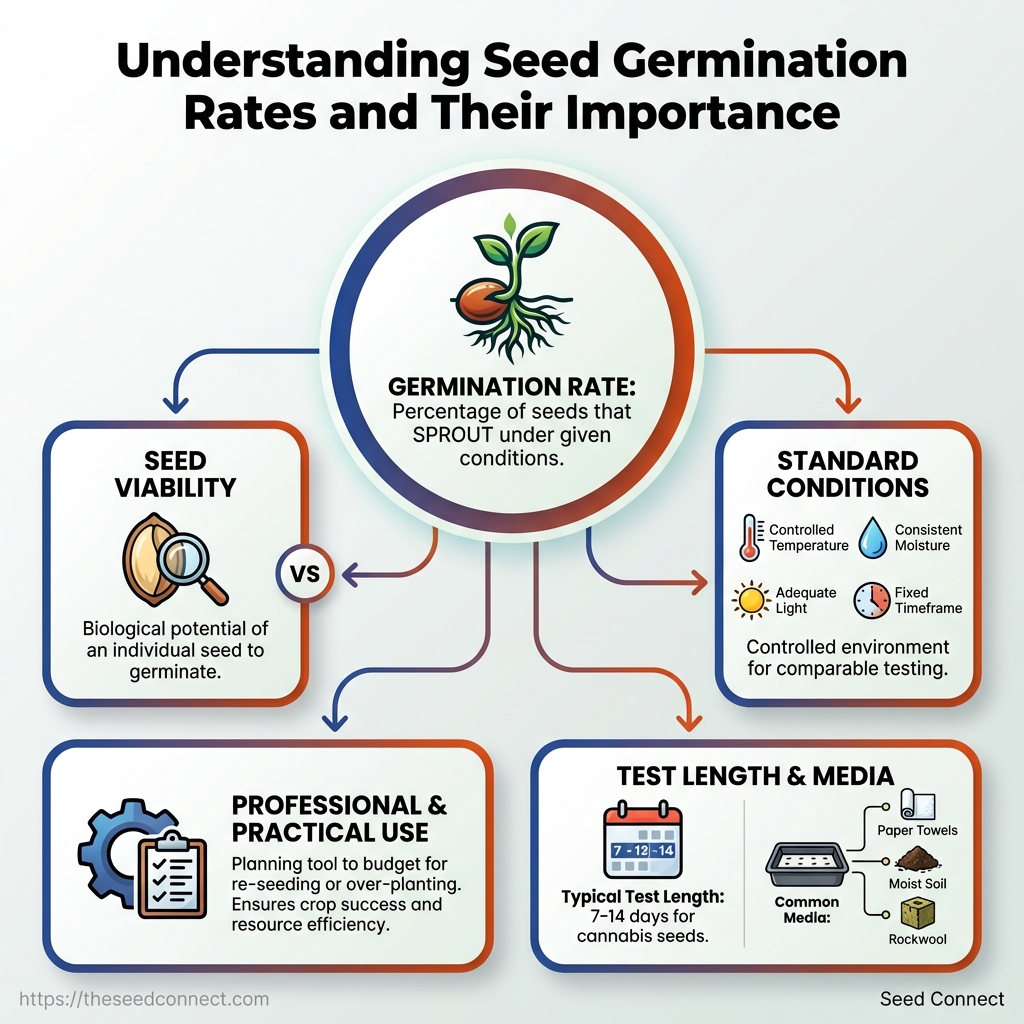
Germination rate measures the percentage of seeds that successfully sprout under a given set of conditions. For growers, it’s the simplest way to understand how many seeds in a packet are likely to become healthy seedlings — and therefore how many seeds to plant, how much space and time to plan for, and whether a seed lot is worth the investment.
Germination rate: The percentage of seeds that produce a visible radicle or true leaf within a defined testing period under standard conditions.
Seed viability: The biological potential of an individual seed to germinate; viability can remain even if a seed doesn’t germinate immediately.
Standard conditions: The controlled set of temperature, moisture, light (if required), and time used when testing germination so results are comparable.
How professionals use the metric
Experienced growers treat germination rate as a planning tool, not an absolute guarantee. Commercial seed producers routinely perform germination tests on representative samples to report something like “80% germination” — that means roughly 8 out of 10 seeds sprouted in their test conditions. Reporting often includes qualifiers about temperature, medium, and the number of days used for the test.
- Typical test length: Many cannabis seed tests run 7–14 days.
- Common media: Paper towels, moist soil, or rockwool.
- Why it matters: Predicts how many plants reach the seedling stage and helps budget for re-seeding or over-planting.
Quick guide: how to report germination results
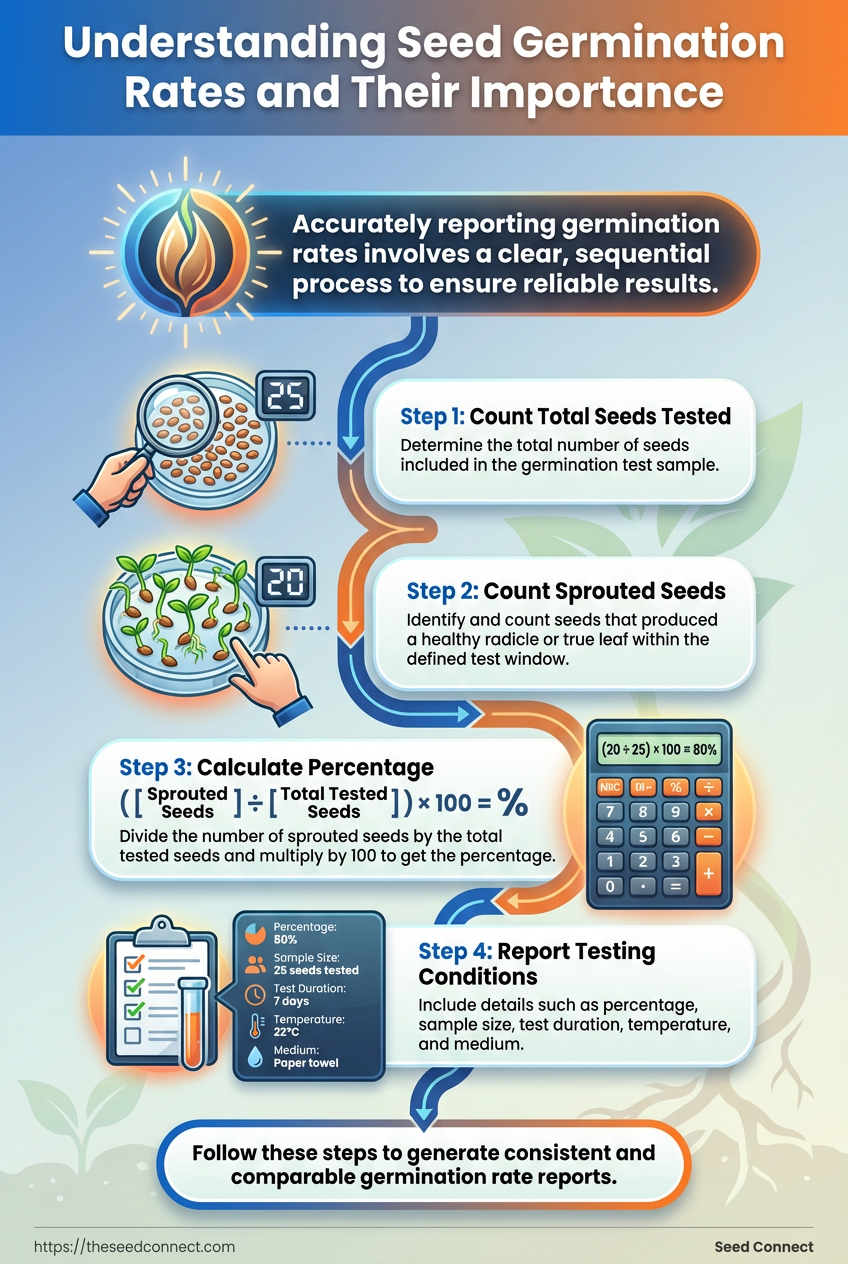
- Count the total seeds tested.
- Count seeds that produced a healthy radicle or true leaf within the test window.
- Calculate percentage: divide sprouted seeds by total tested and multiply by 100.
- Report testing conditions and sample size, for example:
80% (25 seeds tested, 7 days, 22°C, paper towel).
Germination rate and seed viability aren’t identical but work together: high viability with poor storage or bad technique can still yield low germination. For cannabis growers, choosing high-quality genetics and following proven germination methods reduces surprises; for example, reputable sources of cannabis seeds for sale often provide germination guarantees or guidance. Knowing the rate ahead of time keeps crop planning realistic and reduces wasted time and space.
How Does Seed Germination Work? The Mechanism Explained
Germination is the seed switching from dormancy to active growth — a controlled awakening where stored energy and environmental cues combine to produce a seedling. For cannabis, that process follows predictable stages and hinges on two variables growers can control: temperature and moisture. Seed age and storage history also play an outsized role; older or poorly stored seeds behave differently than fresh, well-kept ones.
- Dormancy
- Imbibition
- Activation & Enzyme Mobilization
- Radicle Emergence
- Establishment
Seeds are metabolically quiet and protected by a seed coat. Dormancy keeps embryonic tissue safe until conditions look favorable.
The seed soaks up water and swells. This rehydrates enzymes and triggers metabolic pathways that were paused during dormancy.
Stored carbohydrates and lipids are broken down by enzymes into usable sugars and energy for the embryo. Mitochondrial activity and respiration ramp up.
The first visible sign: the radicle (primary root) breaks the seed coat and grows downward. That anchors the seedling and begins water/nutrient uptake.
Cotyledons or first true leaves open, photosynthesis begins, and the seedling becomes autonomous from seed reserves.
What to monitor closely
- Moisture: Keep substrate consistently damp but not waterlogged; fluctuations stress the embryo.
- Temperature: Aim for a stable range around
20–25°Cfor most cannabis strains; too cool slows germination, too warm can reduce viability. - Depth & medium: Shallow planting and a light, airy medium let the radicle find oxygen and moisture.
- Seed quality: Fresh seeds with a glossy, undamaged coat germinate faster than shriveled or cracked ones.
- Handling: Rough handling, excessive light exposure before emergence, or prolonged storage at room temperature can cut germination rates.
Practical example: a packet stored in a cool, dry place (airtight, <12% humidity) will commonly outperform an identical packet left in a warm garage. If starting small batches, test germination on a few seeds first to estimate your germination rates.
For anyone sourcing genetics, starting with high-quality, properly stored cannabis seeds for sale shortens the path to reliable germination. Understanding these stages makes troubleshooting simple: if the radicle never appears, check moisture and seed viability; if seedlings collapse, reassess medium aeration and watering.
Knowing the mechanism lets you anticipate problems and adjust the three most important levers — moisture, temperature, and seed condition — to get more consistent starts.
How Germination Rates Are Measured and Reported
Germination rate is simply the percentage of seeds that produce a normal seedling under a defined set of conditions. Practically, that means running a repeatable test, counting how many seeds sprout within the test window, and reporting the result as a percent. For anyone managing inventory or choosing genetics, the difference between a reported 85% and a lab-verified 95% can change ordering and buffer decisions.
Practical differences between home and lab approaches
- Home tests are fast, cheap, and good for a sanity check.
- Lab protocols aim for reproducibility and traceability, using controlled temperature, sterile media, and defined scoring rules.
Tools & materials common to both Paper towels or filter paper — moisture-holding medium Sterile petri dishes or zip bags — containment and humidity control Thermometer — track incubation temperature Marker & data sheet — record counts and dates
4-step paper towel test anyone can run at home
- Place a folded paper towel on a tray and moisten it evenly with clean water.
- Arrange 20 seeds spaced apart on the towel and fold the towel over them.
- Put the towel in a sealable plastic bag or container, label it, and keep it at a stable warm spot (about
20–25°C). - Check daily, keep the towel moist, and record the day each seed shows a root or visible radicle.
How to calculate percentage and a simple confidence check
Step: Count sprouted seeds after the test window (commonly 7–14 days). Formula: Germination % = (number of normal seedlings / total seeds tested) × 100
Example: testing 20 seeds, 17 sprouted → 17/20 × 100 = 85%.
A quick confidence sense: with 20 seeds, each seed represents 5 percentage points, so small sample noise is expected. Doubling to 40 seeds halves that granularity and gives a more stable percentage.
Practical testing distinctions to watch for
Scoring rules: Lab tests score only normal seedlings; malformed sprouts are usually counted as failures. Environment control: Labs hold constant temperature, light, and use sterile surfaces to reduce fungal loss. * Error sources: Home tests suffer from uneven moisture, temperature swings, and small sample sizes. Labs mitigate these with replicates and statistical protocols.
Home vs. lab germination test methods across accuracy, time, cost, skill level, and typical error sources
| Method | Accuracy | Time to result | Cost & materials | Skill level required |
|---|---|---|---|---|
| Paper towel (home) | Moderate (±10–15%) | 7–14 days | Low: paper towel, water, bag | Low |
| Paper towel (controlled incubation) | Good (±5–8%) | 7–14 days | Moderate: incubator, trays, towels | Medium |
| Petri dish (lab) | High (±3–5%) | 5–10 days | Petri dishes, sterile media, laminar flow | High |
| Tetrazolium staining (viability) | High for viability (not germination) | 1–3 days | Tetrazolium, lab chemicals, heating block | High |
| X-ray or professional imaging | Very high (viability & internal defects) | Same-day to 3 days | Specialized equipment, operator | Very high |
Key insight: Labs deliver reproducible, traceable germination figures while home tests are excellent for quick checks; choose the method that matches your decision stakes.
For purchasing decisions, consider running a home test on a small sample and trusting lab-style results or vendor guarantees for larger orders—many reputable suppliers back their cannabis seeds for sale with germination guarantees. Running a simple paper-towel test first saves time and money when scaling up.
Why Germination Rates Matter for Cultivators
High germination rates change the math of a grow before a single seed breaks its shell. A reliable germination percentage lets a cultivator plan exactly how many seeds to order and start, convert costs into predictable per-plant figures, and reduce the operational risk that comes from gaps in bench space or limited flowering slots. For tight grows — small tents, limited lights, or fixed canopy space — that predictability is often the difference between a profitable run and one that wastes time, money, and labor.
germination rate: The percentage of seeds that successfully sprout under standard starting conditions.
Planification and space management matter more than most growers realize. Accurate seeds-to-start planning: Knowing 90% vs 50% germination changes how many seeds are started and how many clonal or veg spaces are needed. Lower cost per successful plant: Higher germination reduces wasted seed purchases and the per-plant cost of inputs like trays, soil, and labor. * Reduced schedule risk: Fewer re-seeds mean fewer staggered harvests and less disruption to nutrient and pest management schedules.
Concrete examples help. A small medical grower who needs exactly five mature plants but orders assuming 50% germination must start twice as many seeds and allocate extra veg space. Conversely, a cultivator relying on 90% viability can minimize veg time and reduce transplant shock by keeping the run compact.
Operational impacts break down like this: 1. Order sizing
- Decide target mature plants.
- Divide by expected germination (use a conservative figure if uncertain).
- Round up to ensure buffer for non-viable seed or early losses.
- Cost accounting
- Calculate seed cost per successful plant by dividing seed pack cost by expected successful plants.
- Add predictable labor/medium costs per started seed to compare scenarios.
- Risk management
- Use higher-viability genetics or guaranteed seeds to reduce re-seeding needs.
- Build a contingency plan for poor germination (reserve a few seed slots or keep a backup pack).
Seeds-to-start required to reliably reach target plant counts at different germination rates
| Target mature plants | At 50% germination | At 75% germination | At 90% germination |
|---|---|---|---|
| 5 plants | 10 | 7 | 6 |
| 10 plants | 20 | 14 | 12 |
| 20 plants | 40 | 27 | 23 |
| 50 plants | 100 | 67 | 56 |
| 100 plants | 200 | 134 | 112 |
Key insight: Moving from 50% to 90% germination roughly halves the number of seeds needed and slashes the hidden costs of extra veg space, trays, and labor. For growers with limited footprint, investing in higher-viability seeds or packages with a germination guarantee often pays for itself through reduced overhead.
For cultivators who want consistent outcomes, choosing genetics and suppliers with proven viability is a practical lever. Consider sourcing cannabis seeds for sale that offer germination guarantees to make budgeting and scheduling more reliable.
Reliable germination turns uncertainty into predictable inputs — and predictable inputs make runs profitable and repeatable.
How to Improve Germination Rates: Best Practices
Start by choosing fresh, well-stored seeds and a simple, sterile workflow — most germination failures are avoidable with good stock and clean technique. Work deliberately: set your environment to the right temperature and humidity, handle seeds with sanitized tools, and watch for early warning signs so you can intervene before problems spread.
Practical steps: from purchase to seedling
- Buy reliable genetics and check freshness.
- Store seeds correctly until use: cool, dark, low-humidity conditions.
- Prepare a sterile germination area and gather tools: tweezers,
pH-balanced water, paper towels, trays, and a clear lid for humidity. - Follow a short soak, then move to your chosen germination medium (paper towel, starter plugs, or direct soil).
- Maintain target conditions and monitor daily until radicle and hypocotyl emerge.
Specific, actionable settings and timings
- Temperature: Maintain
20–25°C(68–77°F) for highest metabolic activity. - Humidity: Keep near-saturated microclimate in the immediate seed zone; overall environment can be 60–70% RH.
- Soak time: Use
12–24 hoursin distilled or filtered water for fresh seeds; extend to36–48 hoursonly for older, dry seeds and discard if no change. - Light: Seeds don’t need light to germinate; provide indirect light only after true leaves appear.
- Sterile tools: Wipe tweezers and trays with isopropyl alcohol between batches; avoid bare-handed handling.
Troubleshooting common issues and when to discard
- No radicle after 7–10 days: Try a gentle pressure test; if the seed is soft or smells off, discard.
- Mold on paper towel or plug: Remove affected seeds immediately; increase airflow and reduce soak duration.
- Weak or malformed seedlings: Often caused by
excessive soakorincorrect temps— salvage only if taproot and cotyledons look healthy. - Split but no root: If a seedcoat cracks and nothing emerges after 72 hours, chances drop — discard and try another.
Vendor choice and storage are the largest controllable factors for success, so prioritize reputable sources and proper seed care. For ready access to reliably stored genetics, consider checking cannabis seeds for sale when sourcing material. Small changes in handling and environment will pay dividends in germination rates and stronger first-stage seedlings.
Common Misconceptions About Germination Rates
Germination rate numbers on paper often tell a different story in the tray. Many growers assume a percentage is a fixed, universal truth, but germination depends on seed quality, storage history, and how the test is run. Misunderstanding those variables leads to wasted time and surprise results in the grow tent.
Myths and realities
* Myth: A labeled germination rate is absolute. Reality: Reported rates usually come from ideal lab conditions. Real-world factors—temperature swings, humidity, and how old seeds are—can push that number up or down.
* Myth: Older seeds are useless. Reality: Age reduces viability gradually, not instantly. Properly stored seeds (cool, dry, dark) can stay viable for years. A small decline in rate is common, but total failure is rare if handled well.
* Myth: The float test proves viability. Reality: Floating seeds can still germinate and sinking seeds can fail. The float test is unreliable because buoyancy reflects seed density and surface residues, not embryo health.
* Myth: Autoflowers germinate worse than photoperiods. Reality: Genetics and seed production practices determine viability, not the flowering mechanism. Well-produced autoflower seeds often match or exceed photoperiod germination rates.
How to test assumptions quickly at home
- Place seeds between moist paper towels on a plate.
- Cover and keep in a warm spot (around
21–25°C). - Check daily for radicle emergence; record how many sprout within 7–10 days.
This simple trial gives a practical, on-bench germination rate that reflects your environment. If rates are low, repeat with seeds from a different batch or supplier to isolate variables.
When a myth still holds
- Exceptional poor storage: If seeds were frozen then thawed repeatedly, viability can collapse.
- Poor genetic stock: Some poorly bred lots will consistently underperform regardless of storage.
- Contamination: Mold or pesticide residues can prevent germination even in otherwise healthy-looking seeds.
Choosing reputable genetics reduces guesswork. For dependable options and a germination guarantee, consider sourcing from trusted suppliers like cannabis seeds for sale. Testing a small sample before committing a whole batch saves time and aligns expectations; do that, and surprises become rare.
Real-World Examples and Case Studies
Growers who track germination carefully get practical leverage: small changes to storage, pre-soak, or medium can move germination rates from mediocre to excellent. Below are compact, actionable case studies showing measured germination results, the corrective actions taken, and the lessons that can be applied to your own planning.
Case studies and practical scenarios
Case 1 — Small indoor grow (photoperiod strains) A hobbyist measured a 62% germination rate after a winter storage period. The corrective action was simple: move seeds to a stable, insulated container with a desiccant and bring them to room temperature for 48 hours before using a 24-hour cold-stratified pre-soak. Germination rose to ~90% on the next batch. Lesson: Proper temperature stabilization and a short pre-soak can recover viability lost through cold fluctuations.
Case 2 — Commercial nursery (large seed lots) A producer found 78% germination from a new supplier. They implemented a float test for 30 minutes to identify likely non-viables, then used a moist paper towel method with dark warmth (22–25°C). Germination improved to 94% for the remaining lot. Lesson: Quick viability screening plus consistent moisture and gentle warmth drastically improves usable rates.
Case 3 — Outdoor seasonal planting (autoflowers) Outdoor growers reported patchy emergence after planting directly in cold spring soils. Corrective action: start seeds indoors in small Jiffy pellets for 10–14 days, then transplant after hardening off. Predictable germination and uniform stands followed. Lesson: For cooler climates, controlled indoor starts reduce field losses and simplify planning.
Case 4 — High-THC breeder (rare genetics) Low-count, high-value seeds showed inconsistent germination. The breeder used sterile media, 1:10 hydrogen peroxide surface soak for 30 seconds, and a humidity dome with daily misting. Germination stabilized around 88% while preserving genetic integrity. Lesson: For precious seeds, sterile technique and careful humidity control protect both germination and genetic quality.
Practical checklist (quick)
- Record baseline: Track germination percentages per batch.
- Stabilize storage: Use airtight containers and desiccant.
- Screen quickly: Float or visual checks before expensive setups.
- Control environment:
22–25°C, steady moisture, gentle airflow.
For reliable sourcing and replacement options when rates are low, consider exploring
📥 Download: Seed Germination Checklist (PDF)
Tools, Resources, and Additional Testing Options
Reliable tools make the difference between hitting consistent germination rates and chasing random results. For routine runs, a handful of inexpensive, well-chosen items will stabilize moisture and temperature. For seed lots being sold, bred, or bred for genetics verification, professional testing and lab services become worth the cost. Below are practical recommendations, when to use them, and budget-friendly alternatives.
When professional testing makes sense Breeder validation: confirm viability and true-to-type genetics before large-scale distribution. Large commercial batches: small percentage failures scale into real losses. * Regulatory or quality claims: independent lab results support labeling and buyer confidence.
Practical, actionable tool recommendations: Digital hygrometer/thermometer: monitor microclimate; aim for stable 70–78°F and 70–80% RH during germination. Heat mat + thermostat: use when ambient temps are below optimal; thermostats prevent overheating. Germination tray with dome: inexpensive, retains humidity for consistent results. pH meter: useful when using nutrient solutions or tap water; target pH 5.8–6.2 for seedlings. Moisture meter: prevents overwatering; look for shallow probes for seed trays. Sterile tweezers & gloves: reduce contamination risk during handling and transplant. Seed soaking/scarification kit: for older or very hard seeds; includes mesh, mild peroxide, and timers. Professional seed testing lab: performs viability, purity, and pathogen tests for commercial assurance.
Recommended tools by purpose, cost band, and when to use (hobbyist vs. commercial)
| Tool | Primary purpose | Cost band | When to use |
|---|---|---|---|
| Digital thermometer/hygrometer | Monitor temp & RH | Low ($15–$60) | Hobbyist & commercial daily monitoring |
| Heat mat + thermostat | Keeps substrate warm | Low–Medium ($25–$120) | Use in cool rooms or to speed germination |
| Germination tray with dome | Humidity control & organization | Low ($10–$40) | Hobbyists, clonals, seed-starting benches |
| pH meter | Measure water/solution acidity | Medium ($30–$150) | When using nutrients or questionable tap water |
| Moisture meter (shallow probe) | Prevent over/under-watering | Low–Medium ($20–$80) | Small grows and propagation benches |
| Sterile tweezers & gloves | Reduce contamination | Low ($5–$30) | Always during handling and transplanting |
| Seed soaking/scarification kit | Improve uptake for old/hard seeds | Low ($10–$50) | When germination rates dip for older seed lots |
| Professional seed testing lab | Viability, purity, pathogens | High ($100+) | Commercial lots, breeder validation, regulatory needs |
Key insight: a small investment in monitoring (thermometer/hygrometer + heat mat/thermostat) yields outsized improvements in germination rates and repeatability. Labs add cost but are justified when risk, scale, or regulatory claims demand independent verification. For sourcing seeds, consider cannabis seeds for sale when comparing genetics and germination guarantees.
Consistent germination comes down to controlling a few variables—temperature, moisture, and cleanliness—and choosing the right mix of tools for your scale and goals. If consistency and scale matter, prioritize accurate monitoring and consider lab verification for any seed lots you sell or distribute.
Conclusion
Half the harvest really is decided before planting: understanding cannabis seed germination, measuring germination rates correctly, and maintaining seed viability are the small, practical moves that prevent big headaches later. Remember the grower case studies that switched to cold, dark storage and a simple pre-soak routine — they saw steadier, more predictable starts; another example showed lab testing clarified whether older seed lots were worth planting. If you’re asking whether older seeds can still sprout or how to check viability at home, try a small paper-towel germination test and a quick viability float test to get confident, low-cost answers.
For the next steps, test a representative sample from each batch, standardize storage (cool, dry, dark), and track germination rates over time so problems surface early. To streamline sourcing and avoid guesswork, consider reliable seed suppliers that back their stock with guarantees — one convenient option is Shop quality cannabis seeds with a germination guarantee. That page can serve as a practical starting point for browsing genetics with documented viability while you apply the testing and storage practices covered above.